
Abstract
Central venous cannulation is a frequent need for urgent or scheduled hemodialysis. Many studies confirmed the pivotal role of ultrasound in this procedure. Vascular access guidelines strongly recommend ultrasound guidance. Its usefulness has been demonstrated not only in reducing complications of venipuncture but more recently for the evaluation of central venous catheter (CVC) placement and real-time check for possible complications. The use of ultrasound requires a precise technique for the correct handling of the probe and the needle movement. Different approaches as the out-of-plane, in-plane, and oblique methods are available, enabling the most appropriate for the individual case. Although the learning curve for CVC ultrasound placement is usually fast, formal training and certification for beginners are strongly recommended.
Introduction
Ultrasonography began to play a role in central venous catheterization in 1978 when venous Doppler examination was used for the first time to locate the internal jugular vein (IJV) and to mark the skin above the venipuncture site. 1 This technique was then refined and applied to central venous infraclavicular access, 2 but the first use of ultrasonography in real-time dates back to 1986 when internal jugular vein cannulation in longitudinal scanning was successfully carried out. 3 However, despite the innovative and useful features of this new technological resource, the standard technique for central vessel cannulation continued to be mostly based on anatomical landmarks until the end of the 1990s. 4 The first meta-analysis on ultrasonographic assistance for the placement of central venous catheters (CVCs)was published in 1996. 5 In 2001, the Agency for Healthcare Research and Quality Evidence Report, with the support of robust scientific evidence, recommended ultrasound (US) placement of CVCs as one of the 11 practices to be adopted by clinicians. 6 Since then, a broad series of reports have confirmed the appropriateness of this clinical practice and the association with a significant reduction in the number of complications as compared to the “blind” method.
The most critical review to address this issue was by Rabindranath et al. 7 in the Cochrane Library in 2011, which analyzed seven studies, including 767 patients and 830 CVC placements. The results confirmed the reduction in the number of attempts by venipuncture, failures, and main complications (arterial puncture, hematoma, hemothorax, or pneumothorax) related to the procedure. To date, most guidelines recommend the insertion of CVCs under ultrasound guidance.8–11
Ultrasound use for CVC positioning
The main reason for utilizing real-time US guidance in CVC insertion as vascular access for hemodialysis (HD) is the absolute need to fulfill some essential prerequisites before venipuncture (see below point 3 of the algorithm).
Additional primary aspects are related to the possibility to follow the advancement of the needle towards the target vessel and to confirm the location of the needle and then the guidewire in the lumen before proceeding with CVC insertion.
An accurate pre-scan is critical to confirm the feasibility of the vascular access plan and to identify the needle entry site. A standardized approach to neck vessels has been proposed (RaCeVa, Rapid Central Vein Assessment), and involves seven quick steps in sequence, 12 emphasizing the full benefits of US when pairing pre-procedure assessments with echo-guided venipuncture. 13
The site of catheter placement in HD is influenced by multiple factors such as the expected duration of use (acute or chronic), the patient’s condition, the clinical urgency, and previous history and future perspectives of vascular access. The jugular and femoral veins represent the most often sites used in HD, especially the former for long-term indications. However, many studies have shown considerable anatomical variability between the internal jugular vein and the carotid artery. In particular, the vein is in a lateral or anterolateral position in about 84%–92% of cases, it is less frequently anterior (14%–18%), and rarely medial (1%), and it overlaps the artery in up to 75% of its section,14–16 regardless of head rotation. 17 In femoral access, 8% of patients show an overlap of more than 25% of the two vessels, with some degree of overlap in 65% of patients.18,19
The first step in the pre-procedural evaluation is to identify the target vessel and the adjacent artery, which differ in their ultra-sonographic shape, compressibility, and pulsatility. The patency of the vein can be verified by applying gentle pressure on the overlying skin with the transducer, 20 and echo color doppler confirmation may be helpful in cases where there is doubt about compressibility. If any degree of resistance is observed without clear signs of thrombosis, the pulsed wave may confirm the suspicion of a deeper central vein obstruction. Dynamic response to the Valsalva maneuver and the presence of a collapsing vein as an indirect state of volume depletion should also be established. A small vein diameter could be associated with a higher risk of reduced blood flow and thrombosis, especially with the large catheters needed for hemodialysis treatment. However, the issue of the catheter/vein ratio is complex in dialysis patients, where large variations could be observed in a fluid overload status versus a hypovolemic post-dialysis status. Thus, the impact of catheter—vein ratio as a risk factor for central vein thrombosis through vein stasis remains undetermined.
Materials and equipment
The key tool is the ultrasound machine. Currently, advanced equipment that can be adapted to different situations is available. Increasingly affordable hi-tech devices are equipped with practical wireless probes that are easy to use even in unfavorable workspaces.
The technology that should be adopted is the bi-dimensional ultrasound, since color-doppler may be useful in the pre-evaluation phase but not for carrying out the puncture itself as needle visibility in the vessel is reduced. The transducer consists of a high-resolution linear probe with a frequency range of 7–18–20 MHz. Ideally, the surface of the probe should suffice to display the vessel in the short or long axis and with little clutter on the skin.
Other key elements include preventive measures against infections using an aseptic technique with sterile gel and a probe cover (the use of an inner surface adhesive material ensures tight adherence to the probe without the need for gel inside). Sterile saline solution or chlorhexidine 2% are acceptable alternatives.
The procedure should be performed by an operator who must identify the best ergonomic position as related to the site and side of insertion where the screen of the US monitor should be in front of the operator as this facilitates hands-eye coordination. In IJV cannulation, the operator is positioned superior to the patient’s head (Figure 1) and faces caudally, while in the femoral approach the operator is positioned distally and faces cephalad, avoiding any rotations of the head or trunk. The probe should be oriented appropriately so that the structures beneath the left portion of the transducer appear on the left side of the screen. The US machine should include the possibility to record and save the images.
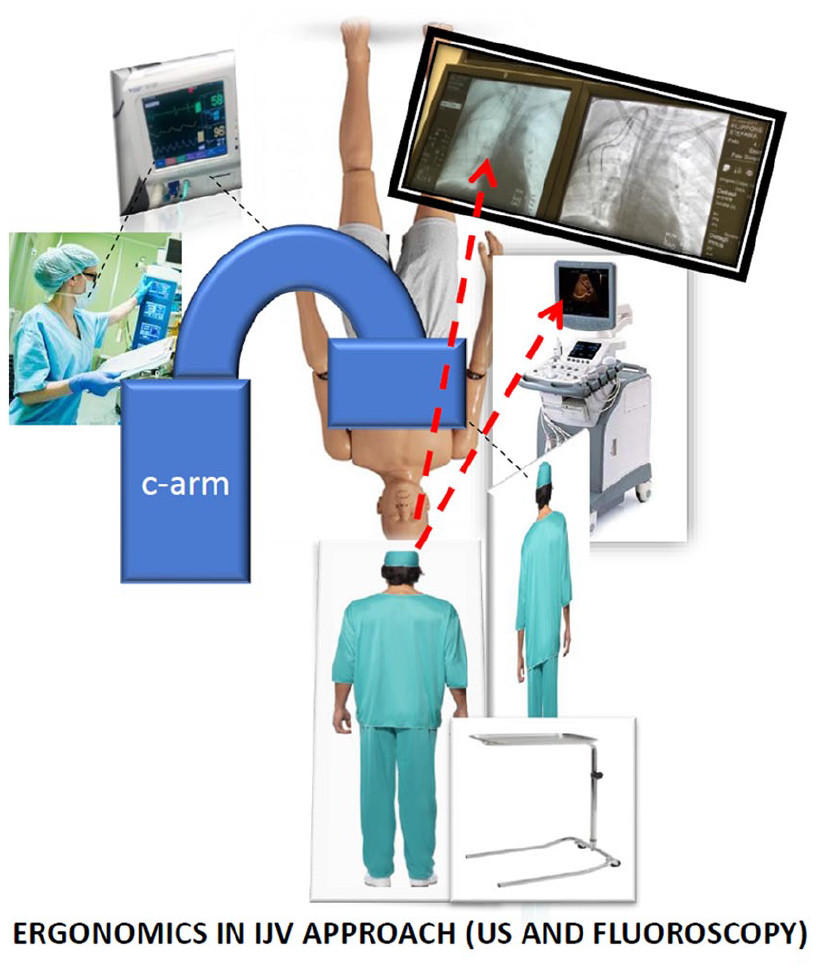
Ergonomics during the procedure for the internal jugular vein approach.
Ultrasound-guided cannulation techniques
From a procedural point of view, it is useful to list the following methods: a static echo-assisted procedure which can locate the target vessel, check the patency, and set a reference mark on the skin (landmark) to guide a blind puncture; a dynamic echo-guided procedure with brackets by which the needle follows a predetermined path on the screen; a dynamic echo-controlled freehand method in real-time in which the path of the needle moving to the target is continuously tracked by the operator and followed on the screen.
The use of a real-time technique is associated with a decrease in complication rates, which are, however, still reported as being between 2% and 40% in the “landmark” technique. 21
Needle guides are not widely available. Although they may be useful for beginners lacking the necessary manual dexterity with 2D imaging, experienced operators may prefer the maneuverability of the freehand technique.
How the maneuver is performed entails good knowledge of well-coded terminology, which refers to the position of the probe relative to the vessel and the needle.
The geometric probe/vessel relationship defines the scanning axis: the short axis view refers to a cross-sectional image of the vessel, while the long axis corresponds to the parallel position of the probe to the longitudinal course.
On the contrary, the probe/needle scanning plane defines the different approaches “out-of-plane” (OOP) and “in-plane” (IP) to the puncture, which should not be mistaken for short axis and long axis (see Figure 2). The preliminary scanning evaluation of the vessels is illustrated in Figure 3(A).
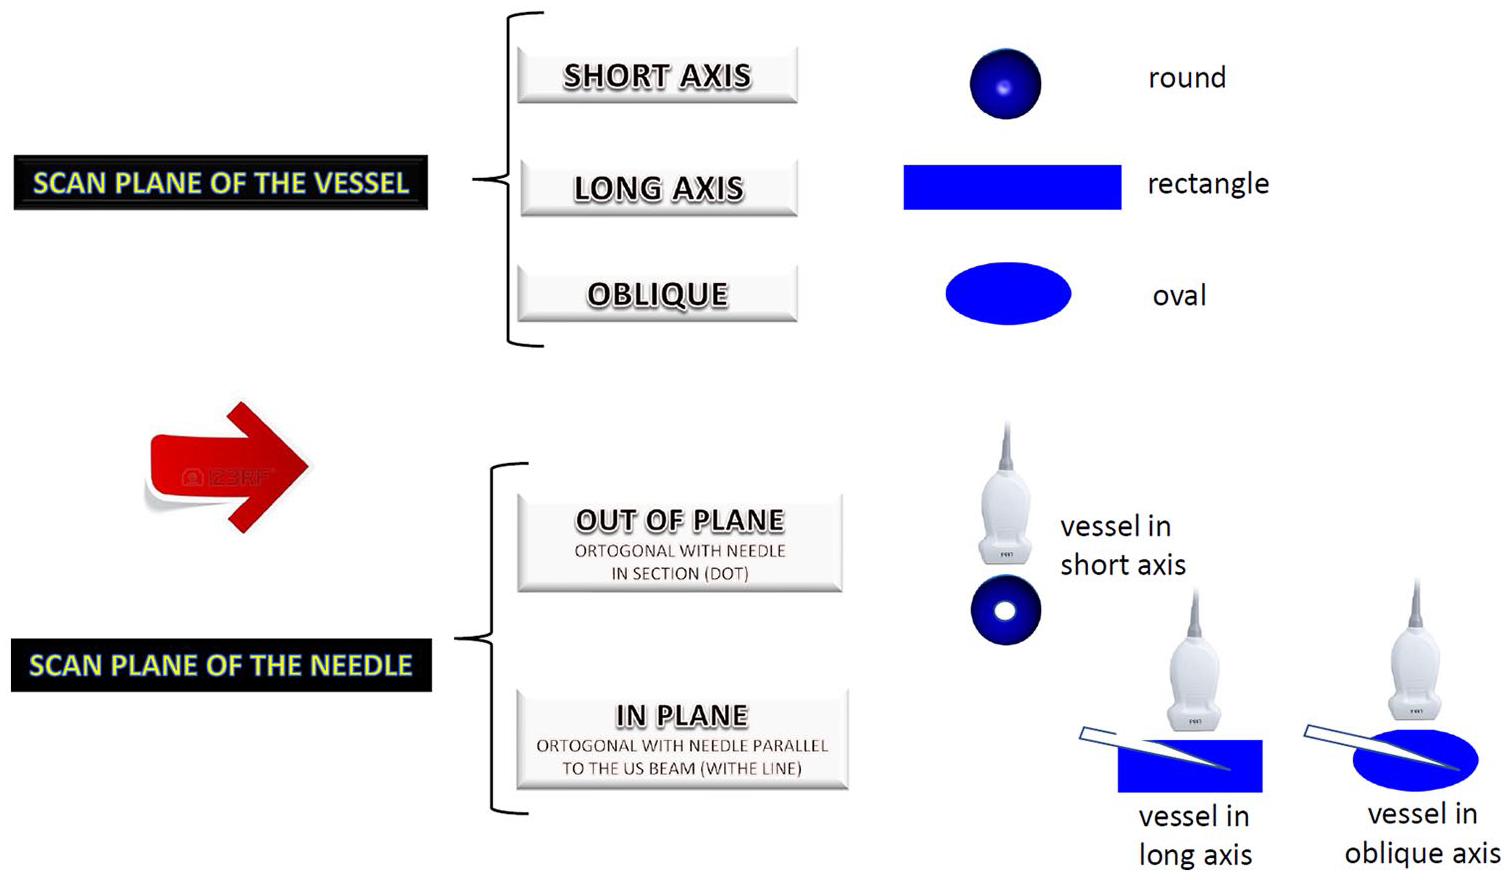
Scan terminology for vein and needle US manipulation.
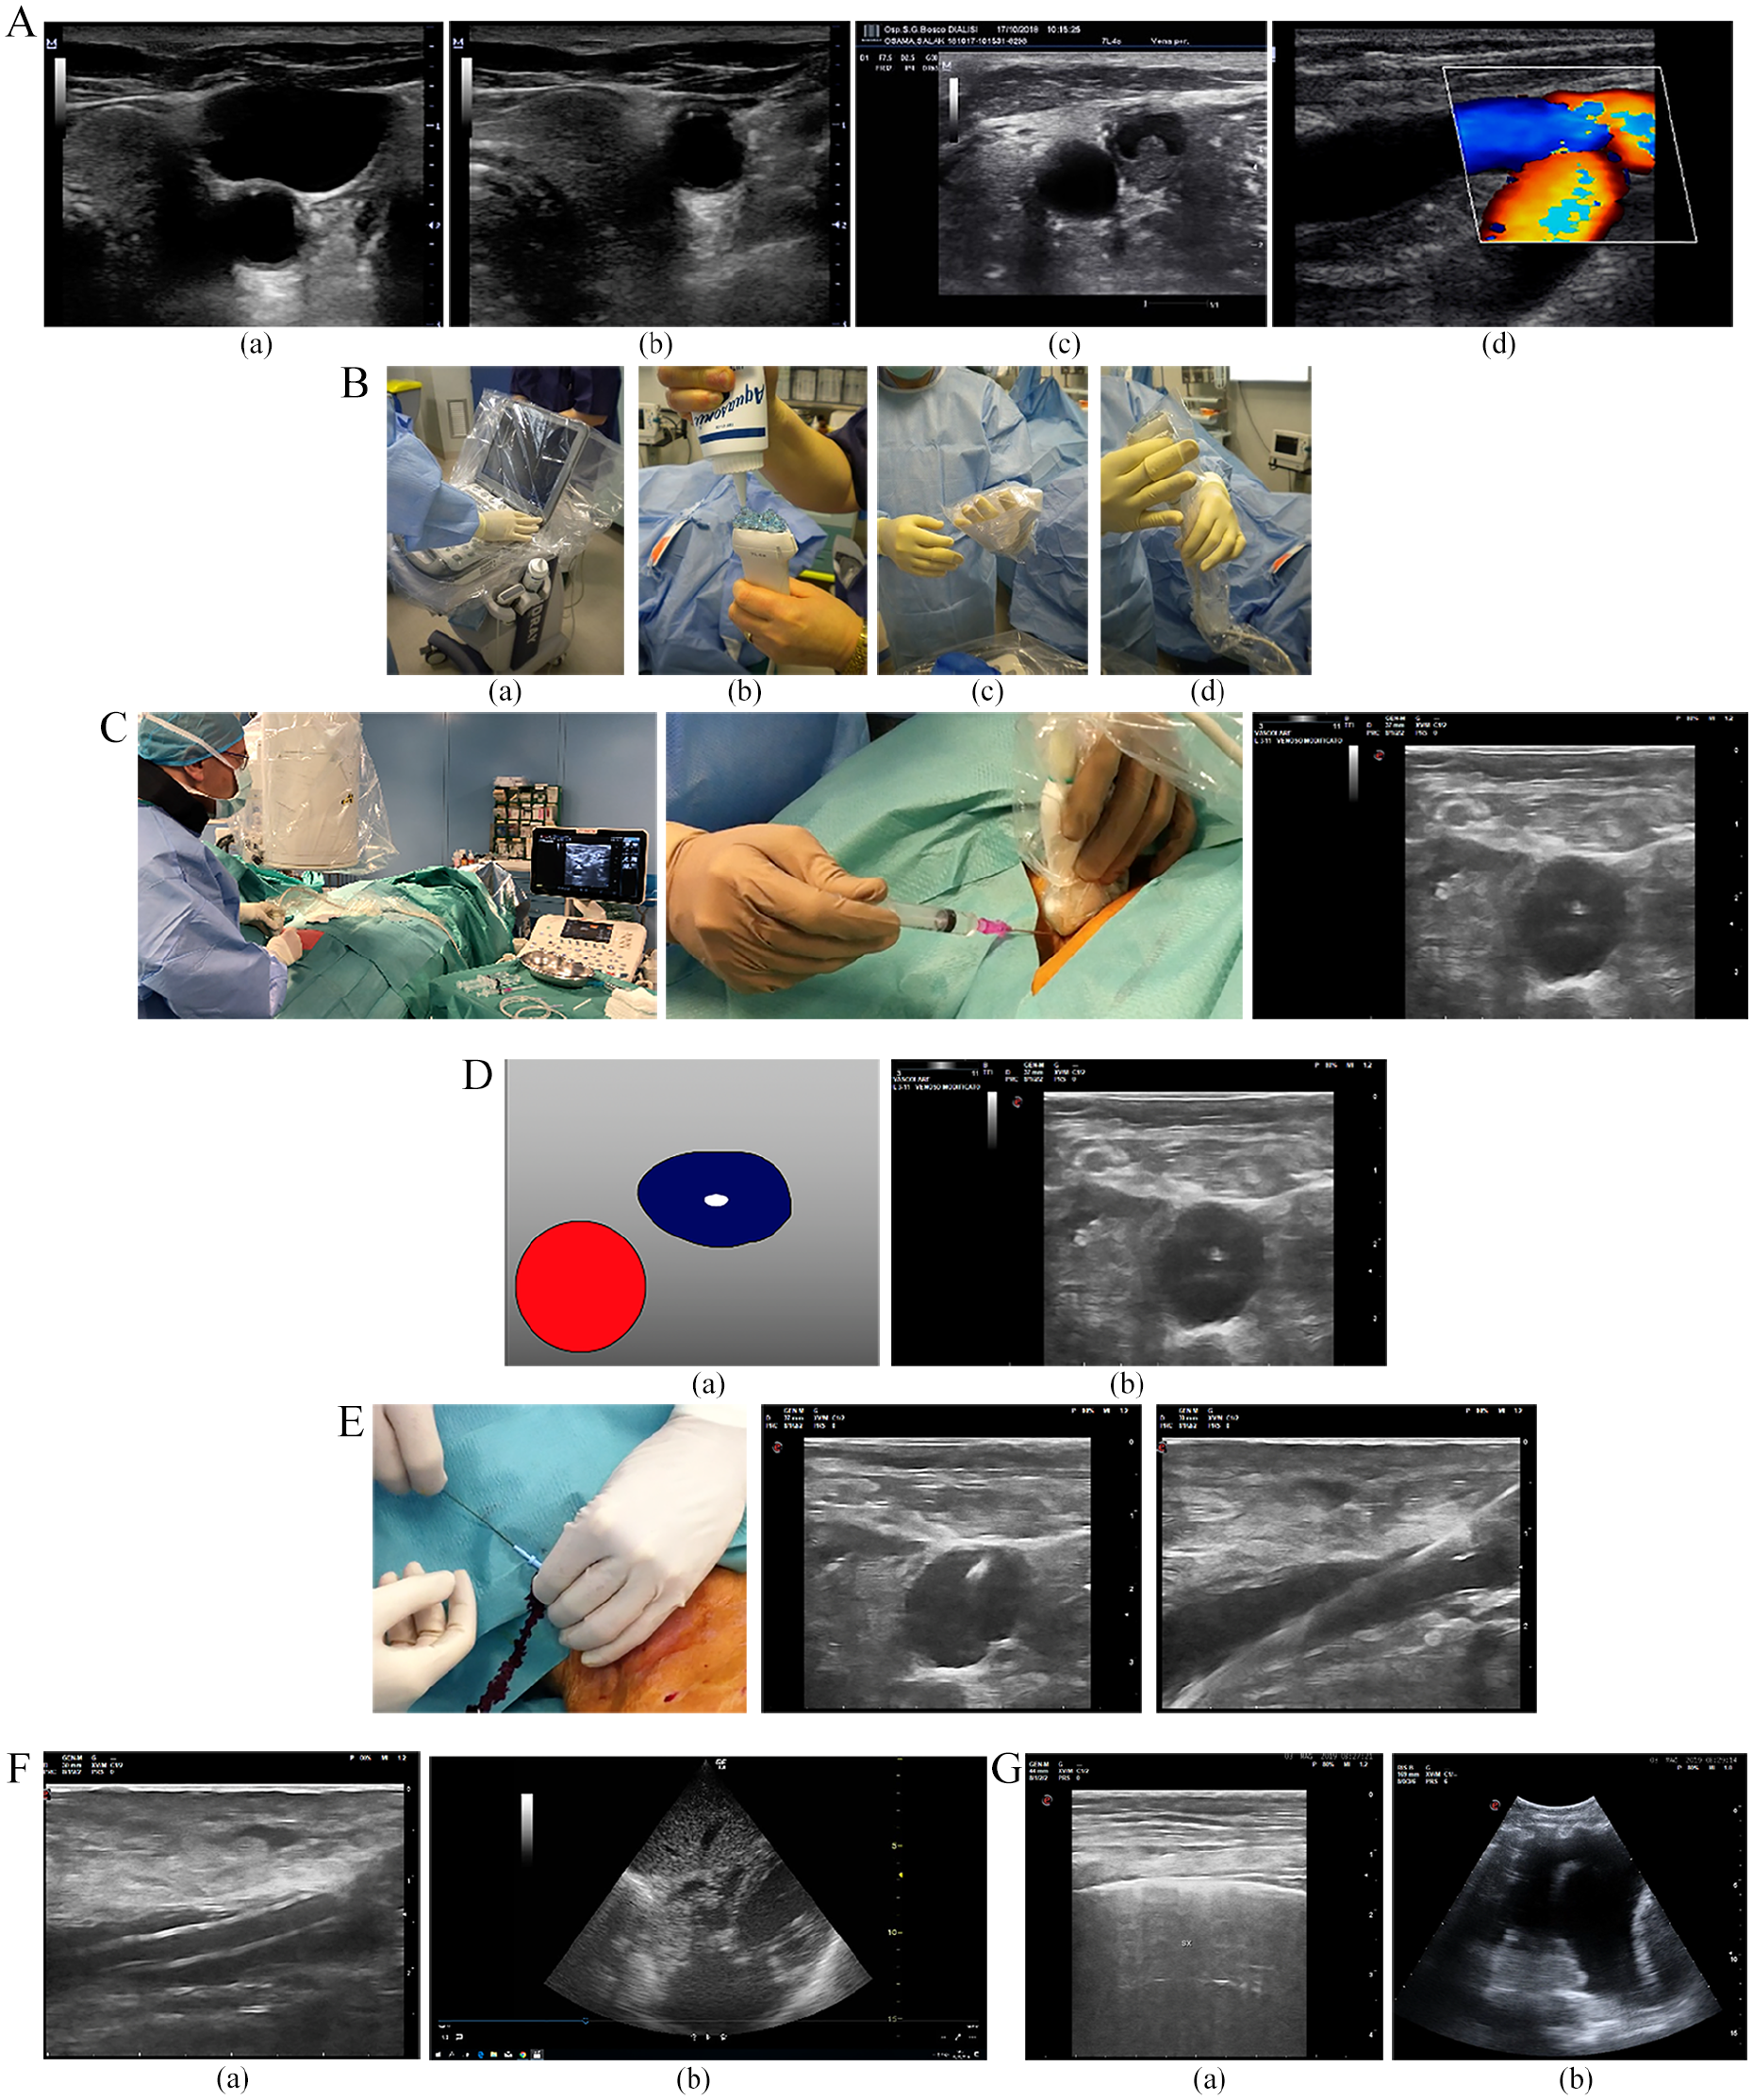
Main steps of central vein US guided cannulation. (A) Pre-US evaluation (a) with compression of the vein (b) to confirm patency; thrombosis of the vein (c) compression of the vein by the artery (d). (B) Sterile preparation of the ultrasound machine and probe. (C) Echo guided puncture: (a) out-of-plane, (b) oblique in-plane, and (c) tent effect. (D) US check of the needle inside the vein. (E) Guidewire insertion and US control of its position inside the vein. (F) US control of catheter placementin the vein (a) and bubble effect in right atrium (b). (G) Post procedural US check for complications. Gliding side (a) and pleural effusion (hemothorax) (b).
Venipuncture by a single operator allows for better needle control. The lower part of the probe is usually held with the non-dominant hand just to avoid inaccurate movements. The dominant hand performs needle manipulation with perfect hand-eye coordination and maintains alignment with the US beam to obtain a good visualization of the needle entering the central vein (Figure 3(C)).
The “out-of-plane” approach
The probe is orthogonal to the vessel, depicting its section in the short axis. The vein appears anechogenic, and the needle is introduced perpendicular to the plane of the ultrasound beam, directed toward the central part of the anterior wall.
The probe is orthogonal to the short axis of the vessel being scanned, which appears on the screen as a circular image. The needle is introduced perpendicularly to the ultrasound beam generated by the probe and is directed towards the upper wall of the vein. Only a short segment of the needle is visualized. It is advanced through subtle “snap” movements to be displayed (even indirectly) in the subcutaneous tissue by slight probe adjustments (tilting). In freehand puncture, the ultrasound beam precedes the tip advancement step by step. The target is reached when a hyperechogenic dot is seen inside the anechogenic lumen, and the flashback of blood in the syringe occurs. The reverberation image in the vessel may confirm the tip position inside the lumen, and the freedom the needle has to move within the lumen away from the vessel walls can be verified by slightly moving the needle sideways (see procedural algorithm).
This OOP approach offers better visualization of the anatomical relationships between vessels and the surrounding structures. It can be used in the presence of small-caliber veins and is ideal for beginners, thanks to a shorter learning curve. Furthermore, it is feasible with the “two-operator technique,” and it is appropriate for use in short-necked patients. 21
The key to the safe use of this technique is to pay attention to the exact position of the tip (mistaking the tip for the shaft is frequent in inexperienced hands) since it requires perfect alignment between the US and the needle plane. Untimely advancement beyond the US beam must be avoided as it increases the risk of puncturing the posterior wall of the vein, the artery, or other deeper structures (i.e. pleura). 22
The “in-plane” approach
The probe is placed orthogonally to the long axis of the vessel, which is displayed as a “rectangle” (that ideally should occupy the entire screen), while the needle is seen as an echogenic white line. The needle is inserted at the probe placement site (0–0.5 cm) and must be set parallel to the transducer. While advancing, it must be kept within the thin US beam at the most appropriate angle as regards vein depth. The operator’s skill in aligning the probe and the needle is the most crucial variable influencing needle visualization. This alignment should not be changed in order not to incur in an erroneous display of a false tip. The intravascular position of the needle is confirmed by the possibility for the operator to move it up and down. This technique requires a larger surface area and a sufficiently straight vascular tract; therefore, it is not ideal in an IJV approach at the gold standard site of the Sedillot triangle base. The use of coaxial systems makes IP cannulation easier, but, as mentioned above, the advantage of freehand puncture flexibility is partially lost when using brackets. Finally, the IP puncture can be enabled by the sky-lift technique. 23
The oblique approach
The probe is placed orthogonally to the vascular axis, but the transducer is rotated in-between the short and long axis: the vessel shape becomes elliptical, and needle insertion is performed by the “in-plane” technique, combining the advantages of both the IP and OOP, (i.e. better visualization of the needle and the safety of having images of the surrounding structures).
This method is particularly useful in the posterior approach to the internal jugular vein, when the anatomical position is below the lateral head of the sternocleidomastoid muscle or in case of direct puncture of the innominate vein. 24
Procedure algorithm
After establishing the anatomical location for the insertion of the CVC, the following steps are suggested:
1. Patient placement
a. comfortable for the patient and the operator
b. Trendelenburg when appropriate (neck vessels)
c. safety measures (i.v. access, air supply, monitoring ECG, etc.)
2. Placement and setting of the ultrasound machine
a. screen aligned with the direct view of the field
b. setting gain, depth, focal zone to needle tip depth, spatial compounding, harmonic imaging
3. Preliminary ultrasound assessment (pre-scan)
a. evaluation of the target vessel (short and long axis evaluation)
i. presence
ii. patency (compressibility)
iii. collapsibility in relation to the respiratory activity or fluid status
iv. response to Valsalva maneuver
v. diameter
vi. depth
vii. relationship with surrounding structures
viii. running direction and dangerous hurdles (e.g. large arteries and branches)
4. Setting up a sterile operating field
5. Sterile transducer coverage and, if possible, of the ultrasound machine as well
a. Put on gel between the probe and the sterile cover
b. Acoustic pairing with sterile gel. If not available, use sterile saline or chlorhexidine 0.2%
6. Local anesthesia with a small gauge needle under dynamic ultrasound guidance, avoiding air insufflation; the infiltration around the vessel aims to reduce pain during dilatation
7. A preliminary short transverse incision of the skin in the case of tunneled CVC at the exact puncture site may reduce the friction of the needle advancing in the subcutaneous area, but it is not usually necessary
8. Echo-guided puncture in the short, oblique, or long axis as per the operator’s choice under real-time control of needle advancement along the path to the vessel
a. The angle of insertion of the needle varies depending on the depth of the vascular target (ranging from 45° to 70°)
b. The greater the inclination, the lower the ultrasound reflection of the needle shaft to the probe, thus resulting in less visibility
c. With the OOP approach, insert the 4–5 mm needle with subtle jiggling movements to confirm the orientation and then tilt the probe back to locate the body of the needle
d. vanishing sign: tilt the probe forward until the disappearance of the dot image that identifies the position of the tip 25
e. the needle can then be advanced with the same sequence of movements (identification of the tip and step-by-step needle advancement preceded by tilting the probe) up to the anterior vessel wall
f. the compression of the superior wall (tent effect) is often visible
9. Check the correct placement of the needle by US (the visibility of the needle inside the anechogenic lumen increases and the vanishing target can easily be obtained)
a. through lateral (in OOP) or anteroposterior (in IP) movements, the needle tip flashes
10. Blood flashback in the syringe and aspiration
11. Careful disconnection of the syringe (no pulsatile flow must be present)
12. Insertion of the guidewire (do not insert the guidewire before checking the correct placement of the needle or in case of difficulties in blood aspiration)
a. insert the J side of the guidewire(or the soft end of a straight guidewire) to avoid the risk of vascular drilling
b. if the guidewire does not advance, do not force it, try to reduce the angle of the needle, rotate the J tip, and be careful when pulling it back due to the risk of locking, breaking, or fraying the distal portion of the guidewire
13. Check the correct placement of the guidewire inside the vein,26,27 first in the short axis, then in the long axis (Figure 3(D) and (E)). Save the image
a. in the short axis, the guidewire is visible as a hyperechogenic spot within an anechogenic area
b. in the long axis, the guidewire is visible as a hyperechogenic line within an anechogenic rectangle, almost parallel to the vascular walls
c. the compression of the vessel by a probe can allow differentiating the guidewire in the vein vs. artery
d. if any doubt arises, activate the color flow Doppler to confirm the pulsed flow in the artery
14. Dilatation
a. perform the skin-vessel tract dilatation maneuver depending on the type of CVC, particularly when inserting a large bore CVC
b. perform dilatation only after an ultrasound check of the guidewire in the venous lumen
c. in the absence of fluoroscopy, ascertain the fluency of the guidewire inside the vessel by using the pull-and-through maneuver
15. Insert the catheter (use stylets or peel-away sheaths when necessary)
16. Ultrasound check of the catheter within the vascular stream when possible (Figure 3(F))
17. Ultrasound final check to exclude complications (Figure 3(G))
Further explanations may be useful and relate to procedural “tips and tricks” and advanced knowledge of materials and accessories. Some characteristics, such as the physical characteristics of the needle (length, caliber, type of bevel, flexibility), may change the quality of the imaging significantly. The needle tip may be seen even when the shaft is not because of its beveled and irregular surface. On the contrary, the use of a micro puncture set with a 21G introducer needle reduces the risk of vascular damage. Still, at the same time, it decreases the ability to distinguish the tip and the shaft because of the “vague acoustic shadow.”
At the very beginning of the procedure, the target vessel should be kept in the middle of the screen. Employing the OOP technique, the puncture should target the center of the vessel to reduce the sidelobe artifact. If the needle deflects out of the image plane, rock or slide the transducer back into the needle path (rather than trying to move the needle). In the presence of a significant collapse of the vessel, favored by hypovolemia or a stiff wall and difficult entrance (tent effect), it is advantageous to apply the “push and stick” technique. 28
Checking the correct CVC placement
Ultrasound can provide direct and indirect peri- and post-procedural support for checking the correct placement of the catheter. In the former case, we have a direct view of the catheter within the vascular compartment, but with some limitations:
- in the IJV or the subclavian vein (SV), the first endovascular tract of the CVC can be visualized
- in the femoral vein (FV), the first endovascular tract of the CVC can be visualized, but it can also be seen in the inferior vena cava (IVC) if the catheter is long enough.
With long-term catheters, it is sometimes possible to detect the tip of the CVC in the right atrium (RA) with the B-mode subxiphoid sonography of the heart.
An indirect method is performing the agitated saline bubble–enhanced ultrasound, in which intra-catheter flushing of a small (1 ml) amount of air mixed with a saline or blood solution (9 ml) results in a hyperechogenic cloud image in the RA or the IVC. If microbubbles produced by shaking appear immediately, the CVC should be in the correct position, while in the absence of, or with a delay >2 s in the RA, the CVC may be considered incorrectly positioned. This method has recently been acknowledged for hemodialysis catheterization 29 and may be valuable when fluoroscopy or endocavitary ECG are not available. Some limitations include: the acquisition of inaccurate information if the tip is positioned in the superior vena cava (SVC), the need to change the probe after cannulation, the need for dedicated training.
Evaluation and treatment of complications
Ultrasound is acknowledged as a fundamental, rapid, accurate, and minimally invasive tool for the early detection of complications related to hemodialysis central vein cannulation, such as hematoma, arterial puncture, pseudoaneurysm, hemothorax, and pneumothorax. 30
Hematoma
A perivascular hematoma can be the result of local bleeding caused by a vascular lesion in the adjacent soft tissues where US can easily detect blood extravasation. It appears as a non-pulsatile mass or ecchymosis at the puncture site. Gray-scale sonographic images show a soft tissue mass with varying echogenicity, and pulsed wave color Doppler typically demonstrates no inner flow, which is what differentiates it from pseudoaneurysm.
Arterial puncture
The puncture of an arterial vessel may still occur despite the use of ultrasonographic guidance. The consequences can range from a mild hematoma to more severe complications such as stroke, obstruction of the airways, up to the need for surgical or endovascular repair. Recognizing an arterial puncture makes it possible to apply direct compression with the transducer, thus leading to a better result than with manual compression alone. 31
Pseudoaneurysm
This iatrogenic complication is the result of high-pressure blood flow typical of an arterial or arterialized vessel into a perivascular space and can easily be recognized. The most common sign is the presence of systolic and diastolic turbulent flow with to-and-fro movements at duplex waveform, indicating bidirectional flow from the swirling of blood within a false aneurysm. The yin-yang sign is named after the symbol representing the Chinese philosophers’ thoughts to describe how opposing forces are interconnected and interdependent. Sometimes, in the presence of a small neck between the artery and the pouch, it can be treated and resolved by direct probe compression 31 or by an echo-guided percutaneous injection of thrombin. 32
Arteriovenous fistula
The appearance of an AV fistula may be the consequence of the concurrent puncture of the vein and the artery, resulting in active, constant communication. It is easily recognizable by echo color Doppler showing aliasing and low artery resistance indices and the loss of the typical triphasic Doppler morphology.
Pneumothorax
The efficacy of ultrasonography in the diagnosis of pneumothorax (PNX) is well established 33 Pneumothorax is a complication of catheter insertion into the neck vessels, and US assessment is superior to a standard X-ray of the patient in a supine position. 34 The diagnosis rests on the recognition or exclusion of some dynamic artifacts. It is performed by a high-frequency probe (5-12 MHz) for the evaluation of the superficial pleural line. A slight horizontal movement of the pleural line with respiratory movements (lung sliding or gliding) proves the absence of PNX, with a negative predictive value and sensitivity close to 100%. Scans in the parasternal site are the most appropriate for diagnosing PNX. 35 When using M-mode imaging, lung sliding appears as a homogeneous granular pattern below the pleural line. However, the absence of sliding does not necessarily confirm PNX because other pathological conditions may interfere. The search for PNX is mainly indicated at the end of complex procedures (e.g. after several ineffective and deep punctures).
Hemothorax
US assessment is especially useful in case of vascular injuries with suspected bleeding inside the thoracic cavity since it can identify small amounts of liquid (up to 20 ml) as compared to 50-100 ml that may be observed in a standard X-ray. 36 The US technique is as accurate as computed tomography (CT). 37 Pleural effusions must be searched for at the costal-frenic level using a convex probe. An analysis of the internal echogenicity, homogeneity, pleural thickness, and pulmonary parenchyma allow differentiating hemothorax from exudate, transudate, or empyema. 38 Lastly, US can support the placement of pleural drainage (as in the case of PNX).
Training
There is broad consensus about the need, in the future, to both standardize US central venous cannulation and to license professionals to carry out these procedures after formal training that certifies he/she has attained the necessary competences. The training must provide theoretical notions of ultrasound, anatomy, operational field preparation, pre-procedural controls, real-time echo-guided venipuncture, and post-procedural controls. Competence (based on a reasoned approach inferred from a defined grid) is more important than the number of performed procedures. 39 Training programs, including those provided by Universities during specialty training, may lead to rapid learning in beginners and to bring them closer to the level of performance of experienced operators.40,41 A recent guideline from the European Society of Anesthesiology has a detailed chapter on how the training and competencies should be performed and evaluated. 42 However, an ultrasound course does not guarantee an absence of complications, and in particular, of puncturing the posterior wall in the OOP approach. 43 Moreover, there should be periodic refresher programs based on assessments of the operator’s knowledge and procedural checklists to redefine the required steps accurately. 44
Conclusions
Ultrasonographic assistance in HD central vein cannulation is no longer merely an option. Instead, it is a necessary condition to significantly reduce the risks related to the procedure. Different ultrasound approaches allow us to come up with the most convenient solution in any clinical setting for a safe and successful procedure.
The availability of the ultrasound and its proper use do not entirely guarantee the operator from the possibility of adverse events. However, it counteracts them adequately, especially when the operator’s skill level is high. Twardowsky suggested that “the lower the skill, the higher the rate of complications,” so the correct use of US for implantation will increase the operator’s skills. 45
Footnotes
Declaration of conflicting interests
The author(s) declared no potential conflicts of interest with respect to the research, authorship, and/or publication of this article.
Funding
The author(s) received no financial support for the research, authorship, and/or publication of this article.