
Abstract

Introduction
Simulation in cardiac surgery has had a profound role in resident education, particularly with the advent of mechanical simulators in the 1990s and the launch of the Thoracic Surgery Directors Association Resident (TSDA) Bootcamp in 2008. Results from structured simulation of the TSDA Bootcamp showed that in the experience of 33 trainees with 4 h of structured coronary simulation, objective scores in 8 technical areas significantly improved. 1 In a recent meta-analysis, with 28 studies on adult cardiac surgery simulation, all studies showed improvement in surgical skill for junior and senior participants. 2 Simulation has a major role not just in mastering basics such as cannulation and anastomosis technique but also in more complex cases in which trainees may not be given the opportunity to participate in the surgeries unless they can show technical proficiency. This author has presented on the creation of a an affordable, easy-assembly simulator for the practice of minimally invasive mitral valve surgery. Set forth herein are my suggestions to produce a “self-made simulation” construct.
1. Build an Inexpensive Model
For coronary anastomosis practice, there are ample opportunities for trainees to obtain a free simulator (e.g., Pocket Vessel Anastomosis Trainer offered at TSDA Boot Camp, The Chamberlain Group, Great Barrington, MA, USA). Therefore, a homemade simulator is not necessary. However, for valve repair and for minimally invasive valve surgery, simulators are pricey. The following setup can be assembled in less than 5 min for under $5 to simulate mini-mitral repair. This same setup can be used to practice cannulation stitches, annulus stitches, and so forth. The tissue box configuration mimics the difficulty of suturing within the chest cavity and can be configured to duplicate challenging needle angles.
This model is constructed inside of a tissue box. The steps to build are as follows:
i. Purchase adhesive foam sheets (Hello Hobby adhesive foam sheets, 40 pack for $5.83 at Walmart).
ii. Take 3 pieces of foam. Cut the foam to the width of a tissue box.
iii. Remove the plastic peripherally from the tissue box.
iv. Place 1 foam sheet inside the box.
v. Using a permanent marker, outline the working area.
vi. Draw a practice template; see Figure 1 for a schematic of the template. To practice mitral valve repair, draw an L for the retraction sutures, 4 lines for the antegrade cardioplegia U-stitches, 2 lines for the left ventricular vent U-stitch, and an oval for the annulus stitches. For the 4 neochords, draw 8 dots and finally 1 long line for the atriotomy closure.
vii. Affix the foam to the bottom of the box either with the adhesive or a stapler.
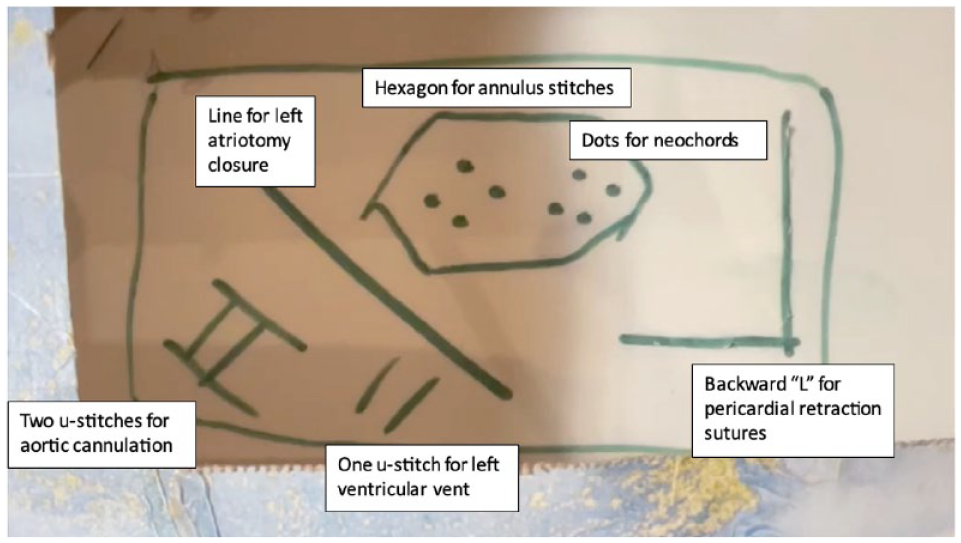
Template created for practice of minimally invasive mitral valve repair. Foam sheet should be secured to the bottom of the tissue box.
2. Have All Instruments at Home
A trainee needs a set of practice instruments at home, not in the operating room or a far-off room in the hospital. In the example of minimally invasive surgery, long-shafted instruments can be expensive. There are 3 ways to obtain reasonably priced instruments: (1) email the local device representative and ask for a demo set, (2) ask the surgical nurses if they will let you take home a set (it is not sufficient to use instruments only after a case in the operating room; it is crucial to have the instruments at home), and (3) if all else fails, buy used instruments (for example, on eBay). With regard to minimally invasive surgery, a full instrument set is not necessary; a needle driver, grasping forceps, and knot pusher are sufficient.
3. Keep Detailed Operating Room Notes
It is crucial before performing any part of a case to know the exact steps and suture selection of the surgeon with whom you are working. Inquire of the operating room nurses if you can borrow their “pick list” or their setup notes particular to each surgeon and each case. This will provide a list of the materials the surgeon uses and often the exact order of the surgical steps. Take notes from your own observations—the notes should be typed and frequently updated as you learn every detail of a surgeon’s technique including needle angle, retraction stitches, and table setup. Often a surgeon will ask a trainee, “What’s next?” before performing portions of a case; a trainee should always be able to answer that question. The surgical steps should be committed to memory.
4. Practice Every Step
A common mistake is to only practice the “critical portions” of a case, for example, the actual anastomosis suturing step of coronary artery bypass or the annulus and valve repair stitches for a mitral valve repair. However, in the incipient phases a trainee is never started on the “critical” step, which is typically technically challenging. A trainee will begin to learn a case with cannulation, as for coronary bypass surgery, or pericardial retraction sutures for a minimally invasive valve surgery. Refer to notes taken on the details of the surgery (as discussed in Pillar #3), highlight the steps that actually require suturing, and create a numerical list of the steps to practice. For example, in my fellowship training, minimally invasive mitral valve repair was performed in 6 main steps and thus I practiced all 6 suture techniques for (1) pericardial retraction sutures, (2) antegrade cardioplegia (2 u-stitches), (3) left ventricular vent (1 u-stitch), (4) annulus stitches, (5) neochords, and (6) left atriotomy closure.
5. Deliberate Practice
In his 2016 best seller Peak, Anders Ericsson reveals to the world the findings of 30 years of research on how to best accomplish “deliberate practice.” When a college student attempts to memorize a list of numbers, deliberate practice 1 h with a coach 3x/week is crucial. 3 Deliberate practice is the Holy Grail in achieving success with simulation. Having the instruments at home and practicing at least once per week is key.
6. Monitor Improvement
In a skills lab, the most common method of monitoring surgical skill is through a Likert grading scale, referred to as the Objective Structured Assessment of Technical Skill (OSATS). 4 For example, needle angle, needle transfer, and size and spacing of suture bites are recorded on a 3-point scale. 1 However, such detailed grading is not needed to assess general improvement over time. From personal experience, 2 key metrics are sufficient to assess improvement: time and errors. With regard to time, measure start to finish on 1 anastomosis for coronary surgery practice, and measure start to finish on all 6 suture steps in mitral surgery practice. As an example, in training, I aimed to finish 1 coronary anastomosis in less than 10 min and all 6 steps of mitral simulation in less than 30 min. For recording of suture “errors,” the definition is somewhat subjective. One method is to keep track of the number of instances needed to adjust or reload the needle driver. Record the total time and number of errors or fumbles to monitor improvement.
7. Translate the Simulation Skills to the Surgery
The most critical outcome of surgical simulation is being able to translate the skills improved with simulation to the operating room. The best way to do this is to pick a part of the procedure that has been mastered, where the steps are well known, and that part has been practiced on a simulator with no or minimal fumbles. Explain to the attending surgeon you have practiced that portion multiple times and ask if you can perform that part of the operation. Gradually rotate the portions of the case you request to perform until you have been permitted to do every aspect of the operation. This is an excellent way for a trainee to work on short portions of a case safely and efficiently until the entire surgery is mastered (Fig. 2). This method works well for minimally invasive surgery where cross-clamp time is of particular relevance or outcomes are especially scrutinized.
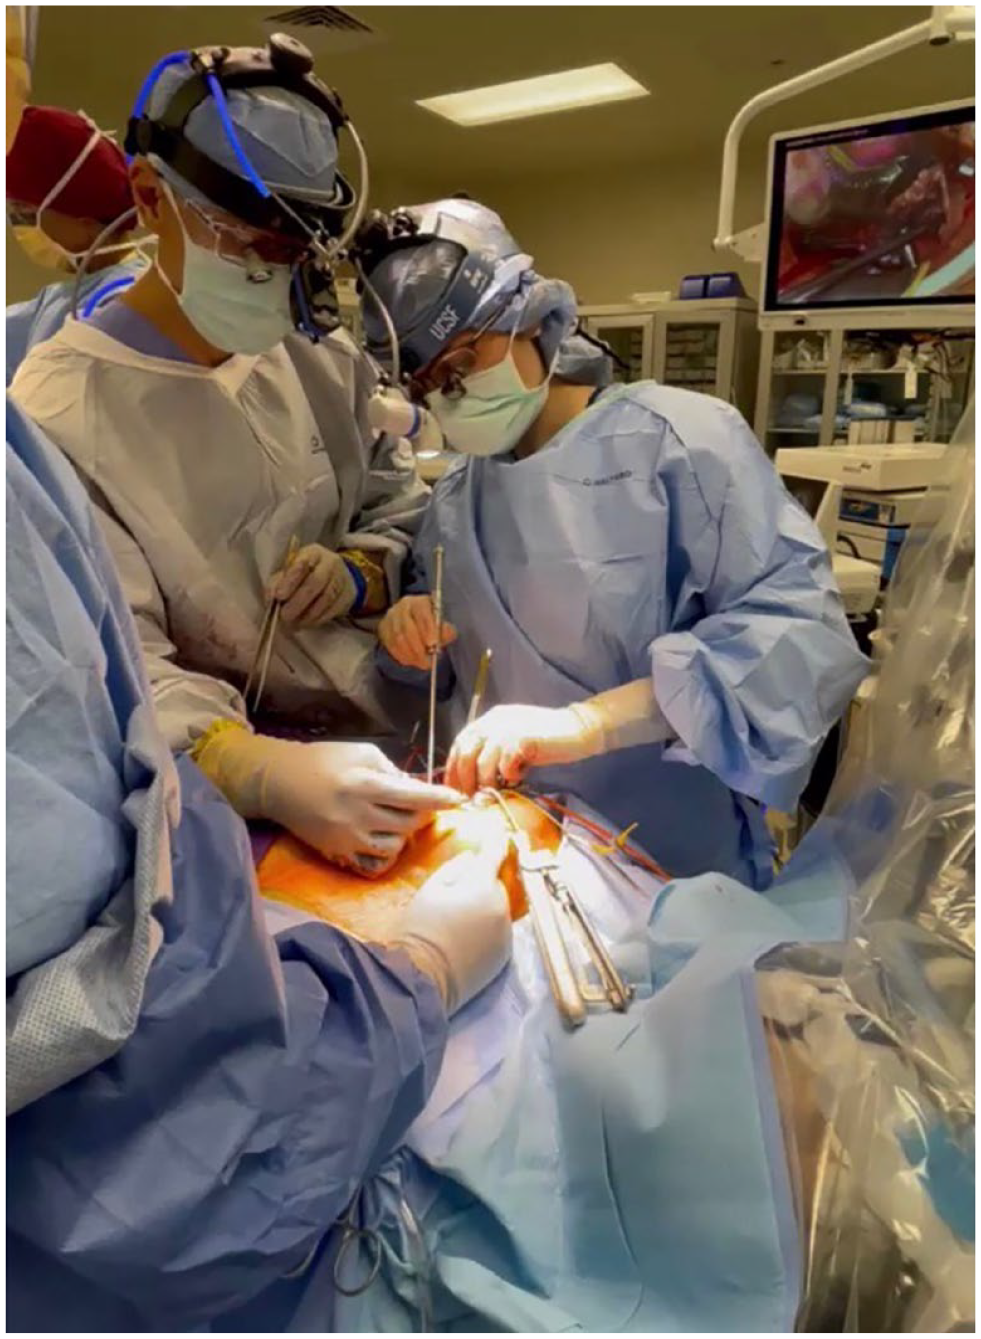
The author Dr. Jennifer L. Perri (right) as a third-year cardiothoracic surgery fellow pictured with her mentor Dr. Tom C. Nguyen (left) performing a minimally invasive patch repair closure of an atrial septal defect.
Conclusions
Simulation can be beneficial to practice suture placement, improve efficiency, and minimize technical errors. Do not forget to emphasize to the attending surgeon the amount of time and effort you expended honing these skills on a simulator, the results of which are now apparent in your ability to perform the individual steps in the actual surgery.
Footnotes
Declaration of Conflicting Interests
The author declared no potential conflicts of interest with respect to the research, authorship, and/or publication of this article.
Funding
The author received no financial support for the research, authorship, and/or publication of this article.