
Abstract

Introduction
Medical 3-dimensional (3D) printing refers to the creation of physical anatomical structures derived from volumetric datasets from various imaging modalities. Applications of this technology include advanced visualization and diagnosis, planning and simulation for surgery and interventions, research, education, and patient-physician communication. Documented benefits of medical 3D printing include reduction in intraoperative time as well as postoperative complications, from decreased blood loss and anesthesia time and fewer revision procedures. Other benefits specifically related to cardiothoracic surgical procedures include reduced cardiopulmonary bypass time, decreased fluoroscopy and contrast exposure, enhanced surgical precision, avoidance of unnecessary surgery, and enhanced training opportunities for surgeons. 1 These 10 Commandments summarize the steps and considerations to heed when creating 3D-printed models for surgical simulation and are focused on cardiac and thoracic surgical procedures.
1. Identify the Purpose for the 3D-Printed Model
The purpose of the 3D-printed model will dictate how the model is created and processed. Generic anatomical models to be used with the intention of education, for instance, do not qualify as medical products and therefore do not require industrial standard quality control. On the other hand, patient-specific anatomical models and surgical guides that are intended for presurgical simulation require intentional planning with regard to accurate model segmentation using Food and Drug Administration (FDA)–cleared software. For models that are intended to enter the surgical field, care must be taken to 3D print the model using biocompatible material that is approved to withstand appropriate sterilization, and therefore the kind of material must be chosen accordingly. The resolution and complexity of the model will also determine the appropriate type of printer that can be utilized. A rigid rib cage model, for example, can easily be printed on a home desktop printer, while a more complex model will require a higher resolution printer.
2. Acquire Appropriate Imaging Data
The majority of 3D models are derived from computed tomography (CT) and magnetic resonance imaging (MRI) scans. The ideal scanned imaging data provide visuals in which the anatomy of interest can be differentiated from surrounding structures and have adequate signal intensity and contrast with minimal artifact. Models of tissue architecture, such as ventricles and atria, are created using CT or MRI, while models of the vascular lumen—created for intravascular intervention planning purposes, for example—can be derived from any 3D angiographic modality such as CT angiography or magnetic resonance angiography. Although less common, 3D ultrasonography data may also be used to create 3D printable cardiac models—for instance, of valvular models and even fetal heart models—although the resolution of ultrasound data may pose a limit to the practicality of such models (Fig. 1). 2
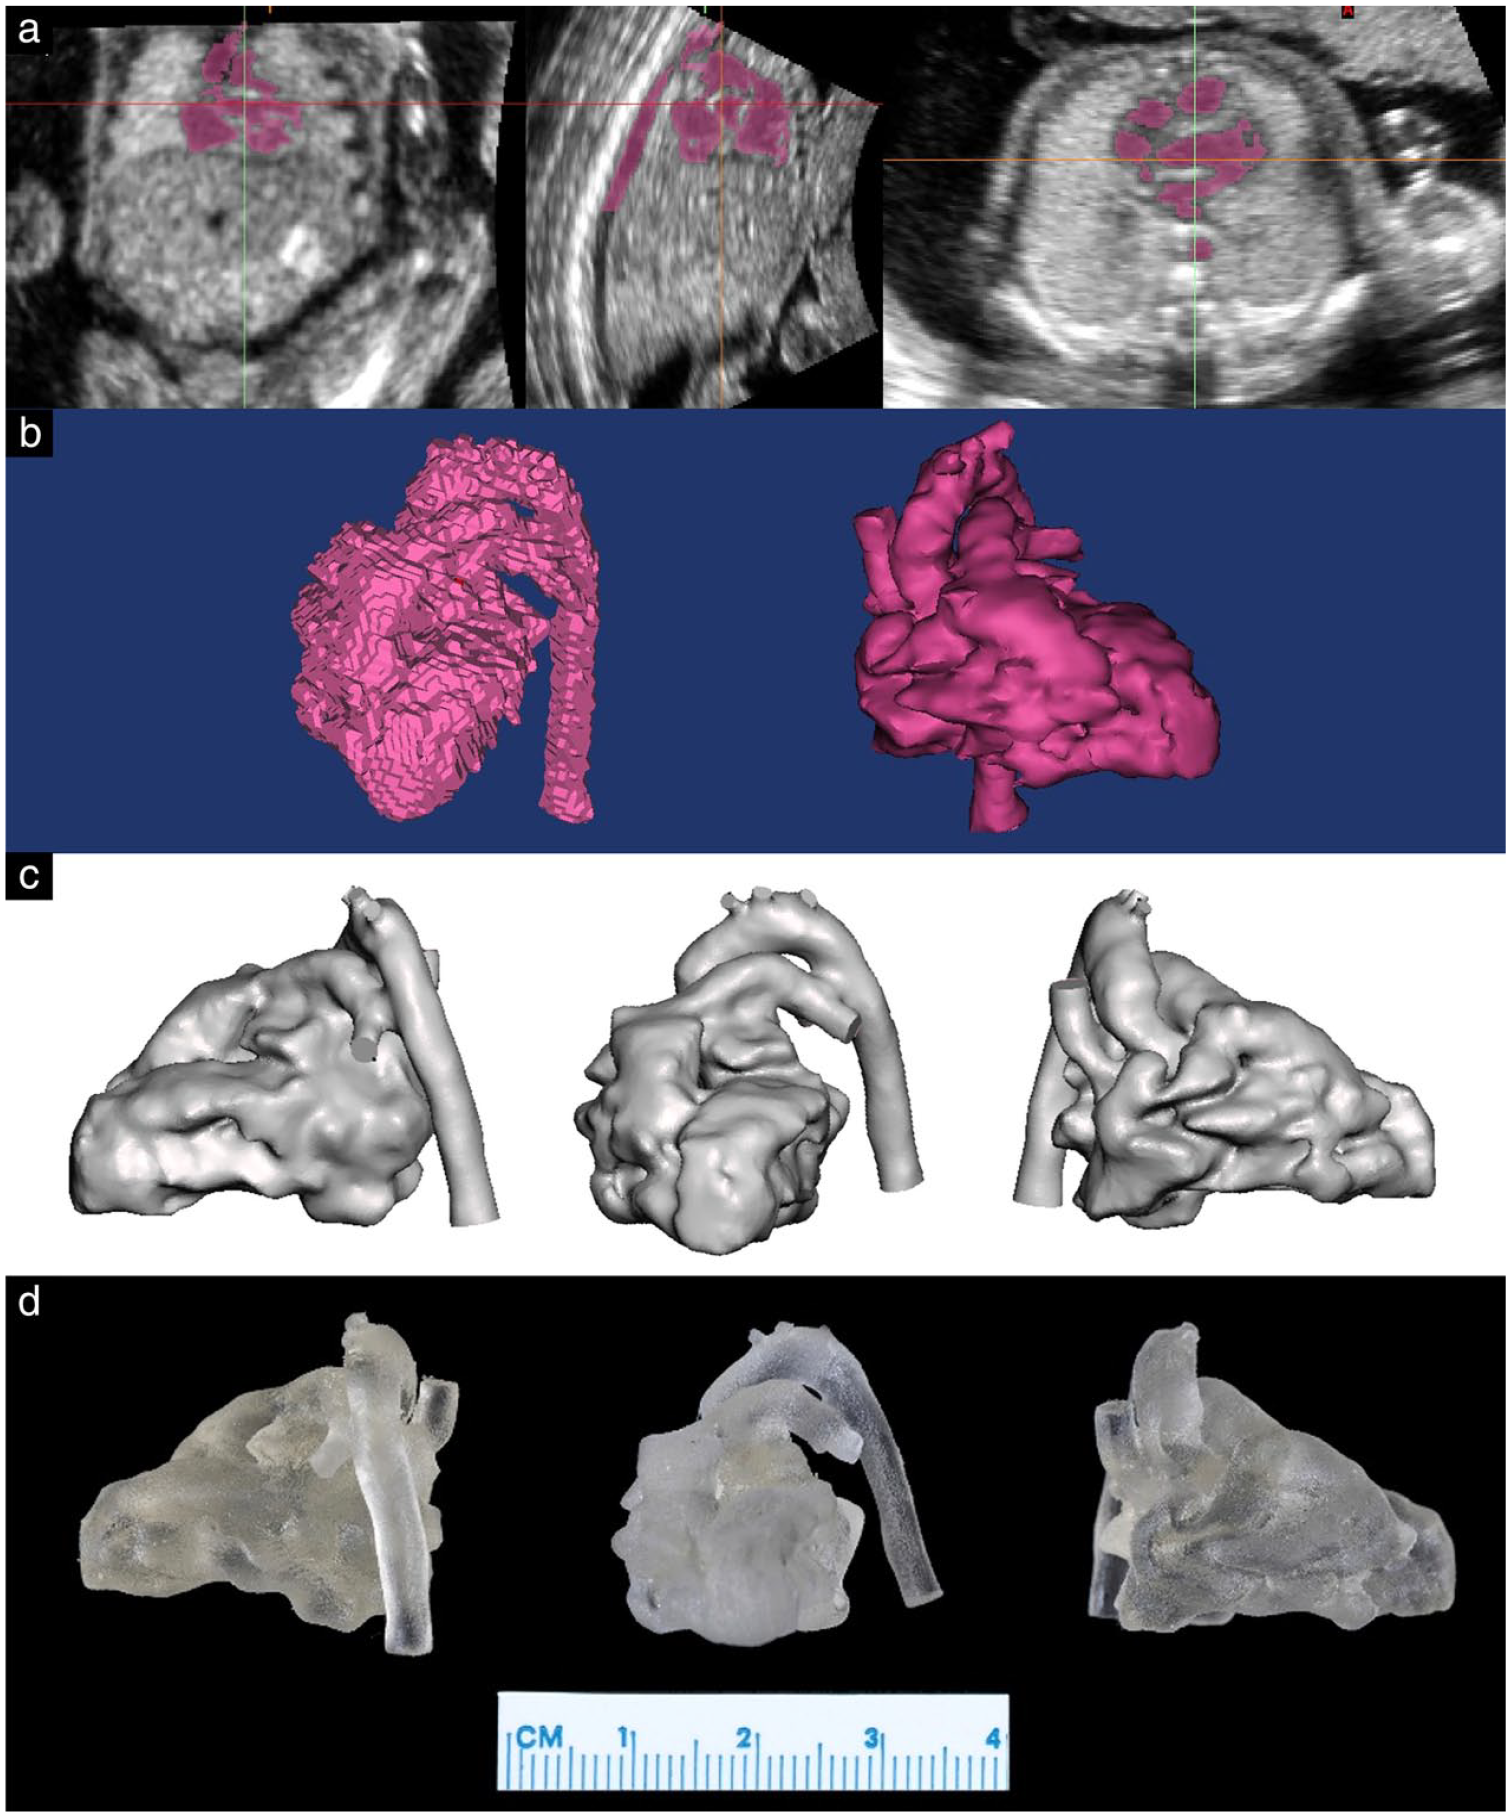
Generation of a 3D ultrasound-derived model of a fetal heart. (a) 3D segmentation. (b) Postprocessing. Left, anterior and right views (from left to right) of (c) digital model and (d) 3D-printed model. Reprinted from Chen SA et al., “3D printing of fetal heart using 3D ultrasound imaging data,” Ultrasound Obstet Gynecol, © 2018 ISUOG, with permission from John Wiley & Sons Ltd. 2 3D, 3-dimensional.
Medical images are almost universally stored in Digital Imaging and Communications in Medicine (DICOM) format, which is a standard for handling, storing, and transmitting imaging data from several modalities including MRI, CT, and ultrasonography. The DICOM file format allows for integration of medical imaging devices, from scanners and servers to workstations and printers, from several manufacturers. The quality of the model and ease of 3D segmentation is heavily dependent on the properties of the imaging source data.
The Radiological Society of North America (RSNA) 3D Printing Special Interest Group has published imaging parameters for medical 3D-printing purposes. 3 For cross-sectional imaging, the spatial resolution should be adequate in order to accurately capture the anatomy of interest, and the optimal value depends on the size of the anatomy to be printed. Typically, accurate models can be created when the slice thickness of the images is 0.50 to 1.25 mm. The smallest anatomy of interest should be represented on multiple sequential DICOM images. For instance, if the anatomy of interest is 3 mm, ideally this should be captured on at least 3 sequential image slices; therefore, the slice thickness should be a minimum of 1 mm and preferentially even smaller. If the slice thickness of the images is too large, the 3D model may have a stair-step appearance.
3. Segment the Anatomic Region of Interest
The next step in the 3D-printing workflow after imaging data are acquired is image segmentation, which refers to the delineation of the desired anatomy, or region of interest (ROI). Specialized software is needed to perform the segmentation, and discrimination of the anatomy of interest from surrounding tissues often requires expertise and time. However, some software options do offer algorithms and protocols that are tailored for more efficiently defining certain anatomical regions. No standardized approach to image segmentation exists, and the segmentation process can be automated or manual, but many systems promote a semi-automated approach. A common approach involves automated brightness thresholding and region growing, followed by manual editing. 4 Thresholding is a method in which voxels—which are 3D pixels representing a very small cube of the scanned anatomy—are partitioned based on their intensity or brightness value. Region growing evaluates the relationship of neighboring voxels to an initial seed point and determines whether those adjacent voxels should be included as part of the region. Manual editing may be necessary to smooth, crop, or repair the results of the segmentation.
To create a model that a 3D printer will recognize, DICOM data from a CT, MRI, or ultrasound scan must first be converted to surface mesh polygons. Volumetric data from DICOM files are stored as voxels, but 3D printers do not interpret voxel data; instead, the file must be converted to vector shapes or polygons (usually triangles) that define the outer surface of the ROI volume. During the segmentation process, the boundaries of the ROI are outlined on successive 2-dimensional slices that are subsequently assembled to create a 3D model (not unlike slices of bread creating a loaf), and the outer “shell” of the model is composed of a surface mesh of small polygons. The most common file format for this mesh is Standard Tessellation Language (STL). The 3D printers reinterpret data in an STL file to manufacture a physical object (Fig. 2).
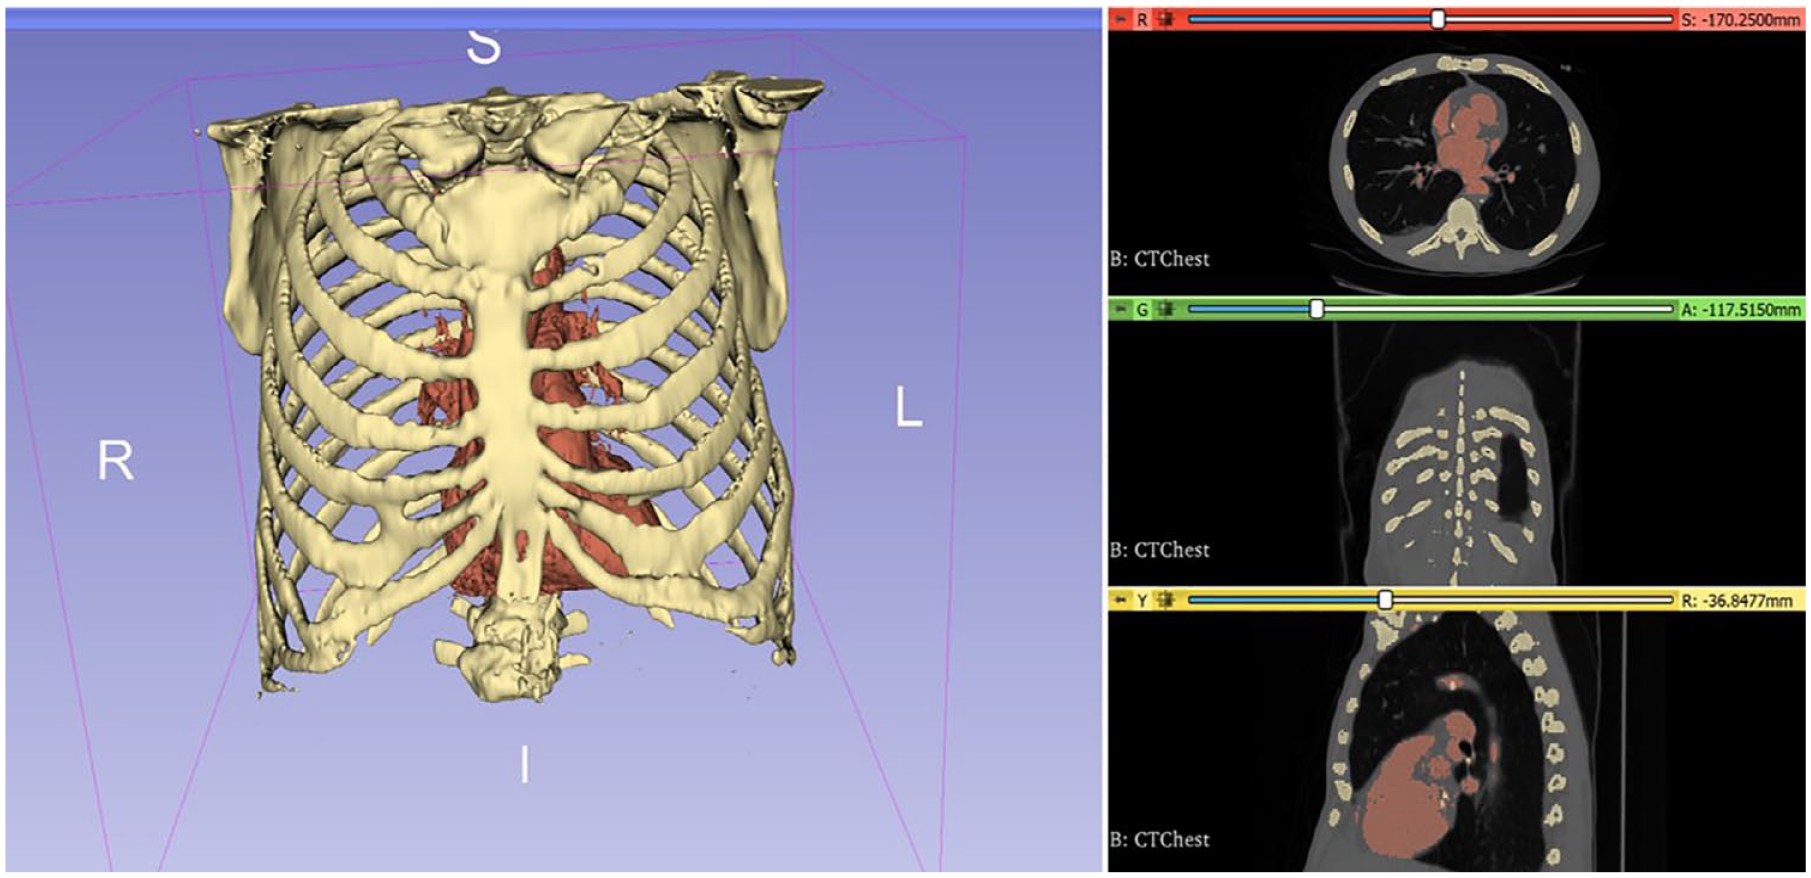
Multiplanar reconstruction of bony chest anatomy and heart segmented from a computed tomography scan, using 3D Slicer (www.slicer.org). The rendered virtual model (left) is exported as a Standard Tessellation Language file.
One of the most widely used image segmentation software used for medical 3D printing is Materialise’s Interactive Medical Image Control System (Mimics) and inPrint (Materialise NV, Leuven, Belgium). Other proprietary software options include Vitrea (Vital Images, Inc., Minnetonka, MN, USA), OsiriX MD (Pixmeo, Geneva, Switzerland), and Caresteam Vue PACS (Carestream Health, Inc., Rochester, NY, USA). Open-source software options are also available and include 3D Slicer (www.slicer.org), ITK-SNAP (www.itksnap.org), and Horos (Purview, Annapolis, MD, USA). For models that are to be used for patient-specific diagnostic use, software used for segmentation should be FDA cleared. in March 2018, Materialise became the first company to receive FDA clearance for 3D-printed anatomical model software intended for diagnostic use.
4. Postprocess the STL File to Create the Desired Model
Most STL files generated directly from the segmentation step require some additional optimization or clean up. Computer-aided design (CAD) software is used to refine the STL file, and the necessary CAD functions required depend on the outcome of the segmentation and the intended use of the model. Common CAD manipulations include smoothing or wrapping, patching, surface mesh topological correction, trimming, adding connectors such as cylinders between separate anatomical regions, or hollowing. In cardiovascular applications, the hollowing function is crucial in cases in which a blood pool (the volume within a vessel or chamber of the heart obtained using a contrast agent) was segmented. In such instances, a vessel wall of a given thickness must be generated to encompass the volume defined by the blood pool. In general, solid models provide insights into details of the anatomy, whereas hollow models are useful for simulating surgical steps.
Some of the aforementioned segmentation software—including Mimics, inPrint, and Vitrea—do offer some additional postprocessing functions within the same software interface. It is worth noting that any manipulation of an STL mesh outside of FDA-cleared software can void the certification. Additional manipulations of the 3D model can be made in a range of other 3D mesh and modeling software. Some options include Meshmixer (Autodesk Inc., San Rafael, CA, USA), MeshLab (meshlab.net), ZBrush (Pixologic, Los Angeles, CA, USA), Cinema 4D (MAXON Computer, Friedrichsdorf, Germany), and Blender (blender.org), among many others (Fig. 3). Of these listed, Meshmixer, MeshLab, and Blender are free options.
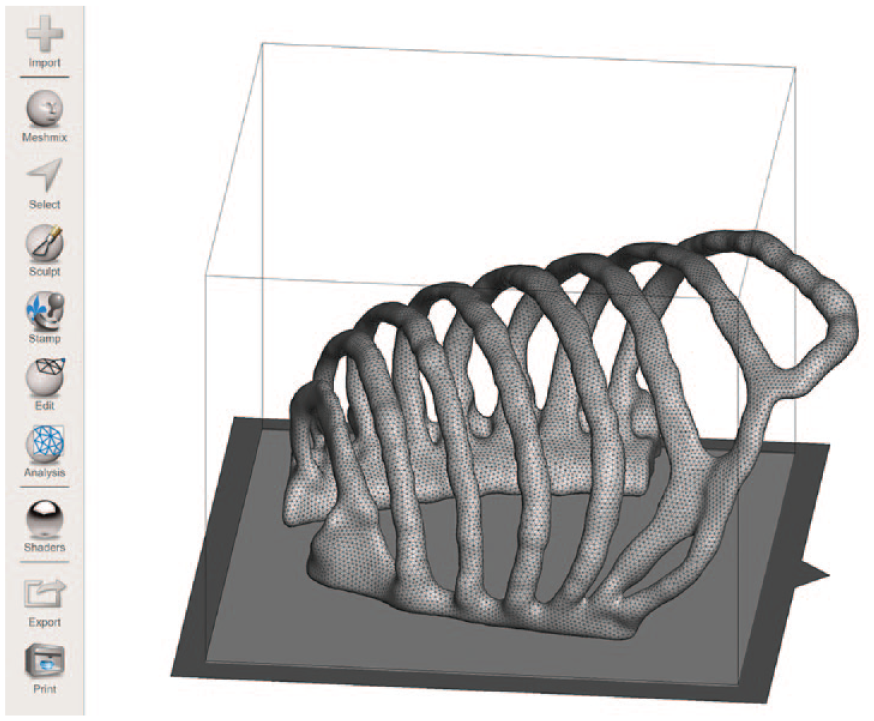
Example of a completed hemi-rib cage model. The STL file was refined in Meshmixer, and the screenshot shows how the model sits on the build plate of a designated 3D printer type. 3D, 3-dimensional; STL, Standard Tessellation Language.
5. Choose the Appropriate 3D Printer
Options for 3D-printing hardware, materials, and postprint processing are important to evaluate. Factors to consider when selecting a 3D printer include cost, the type of technology used to print, material options, print resolution, time (required to set up the print job, actual time to print the model, and post-processing clean up time), ease of use, and required maintenance.
The cost of 3D printers varies dramatically from desktop printers to industrial quality machines, and each machine comes with different pros and cons. The most commonly reported 3D printing technologies used for medical 3D-printing applications include Fused Deposition Modeling (FDM), Selective Laser Sintering (SLS), Stereo Lithography Apparatus (SLA), and Multi-Jet Printing (MJP), which are described below.
FDM (Material Extrusion)
The print materials are softened with heat, extruded layer by layer on a build tray, and immediately solidified to create the object. Plastics such as acrylonitrile butadiene styrene or polylactide are used to create sturdy, durable models in a fairly short time period. FDM is one of the most popular medical 3D-printing technologies due to its lower cost and shallow learning curve, but the finish quality and resolution of the prints are also lower compared with other technologies. Typical consumer FDM printers have a layer thickness of 0.2 to 0.3 mm, although higher-end models can support a vertical resolution of 0.02 mm.
SLS (Powder Bed Fusion)
SLS uses an energy source, such as a high-power laser, to selectively sinter (fuse) successive layers of a powdered material. Supports are not required, and a variety of materials can be used, such as plastic, glass, ceramic, and metal. SLS is ideal for sterilizable metal implants. Hardware and material costs are high, and printer handling and maintenance requires training. Typical layer thicknesses of SLS printers range from 0.08 to 0.15 mm.
SLA (Vat Photopolymerization)
In SLA printing, layers of photosensitive liquid resin in a vat are hardened using a high-intensity ultraviolet (UV) light source. Successive layers of liquid are exposed to the UV light and solidified as the vat is lowered or raised following the build tray movement. The resulting model is cured with UV light. SLA models have high accuracy with smooth finishes, but materials are expensive and not durable over time. SLA models are good for surgical planning and simulation. SLA printers can print with a layer thickness as thin as 0.025 mm.
MJP
Printer jet heads deposit an acrylic photopolymer onto a build tray that is cured with UV light. Wax or gel support holds together the layers of the build polymer. MJP hardware and materials are expensive but allow for versatile, multicolored prints. MJP is one of the highest-precision 3D-printing techniques, and the ability to mix materials with different properties allows for models with variable rigidity, enabling a more realistic recreation of the physical properties of human anatomical models. MJP printers can build in layers as thin as 0.016 mm.
6. Choose the Appropriate Material
A variety of materials are used in medical 3D printing, ranging from plastic (resin) to nylon and even metals. Factors to consider when selecting materials include physical and mechanical properties, flexibility, color, transparency, biocompatibility, cost, recyclability, and durability. A major advancement in cardiovascular 3D-printing applications in particular has been the ability to print in transparent, flexible material. Flexible models can be bent and cut, enabling assessment of the pathology and selection of ideal viewing planes for complex cases. Pliable materials have been used to create vascular models for catheter-based interventional planning, and 3D-printed congenital heart models in flexible material have allowed hands-on training of surgical repair, including suturing of cardiac defects. 5 Compared with flexible cardiovascular models—which often require higher-resolution printers to accommodate potentially thin-walled and pliable models—rigid models, such as those showing bony anatomy, can be more easily printed using lower-resolution desktop printers.
7. Determine Where to 3D Print the Model
Costs of 3D printers vary substantially, from several hundred dollars to purchase a home desktop printer, to high-end industry models that are in the range of hundreds of thousands of dollars. There are advantages to owning a personal 3D printer versus utilizing a dedicated 3D-printing service, depending on the resolution, size, and complexity of the builds, as well as frequency of use. A number of academic institutions also come equipped with a dedicated 3D-printing service, which specializes in working with surgeons to create specific models.
8. Postprocess the 3D-Printed Model
The 3D-printed models often require postprint processing. This can include removal of support material, further processing of the model (e.g., grinding, drilling, additional conventional machining), and sterilization as needed for guides intended to enter the surgical field. For patient-specific presurgical planning models, postprocessing steps should not alter the intended morphology and desired accuracy of the anatomy.
9. Be Creative With Simulation
The application of medical 3D printing is endless. Simulation with 3D-printed anatomical models is especially useful for rare cases and uncommon surgeries and therefore can be particularly useful for congenital heart disease within the realm of cardiothoracic surgery (Fig. 4). 6 With simulation, surgeons are able to learn new techniques and prepare for specific cases without risking injury to patients or utilizing cadavers or animal models. There are also numerous opportunities for research utilizing customized models to advance surgical practice (Fig. 5). Oftentimes, 3D-printed anatomic models can also serve multiple purposes (Fig. 6).
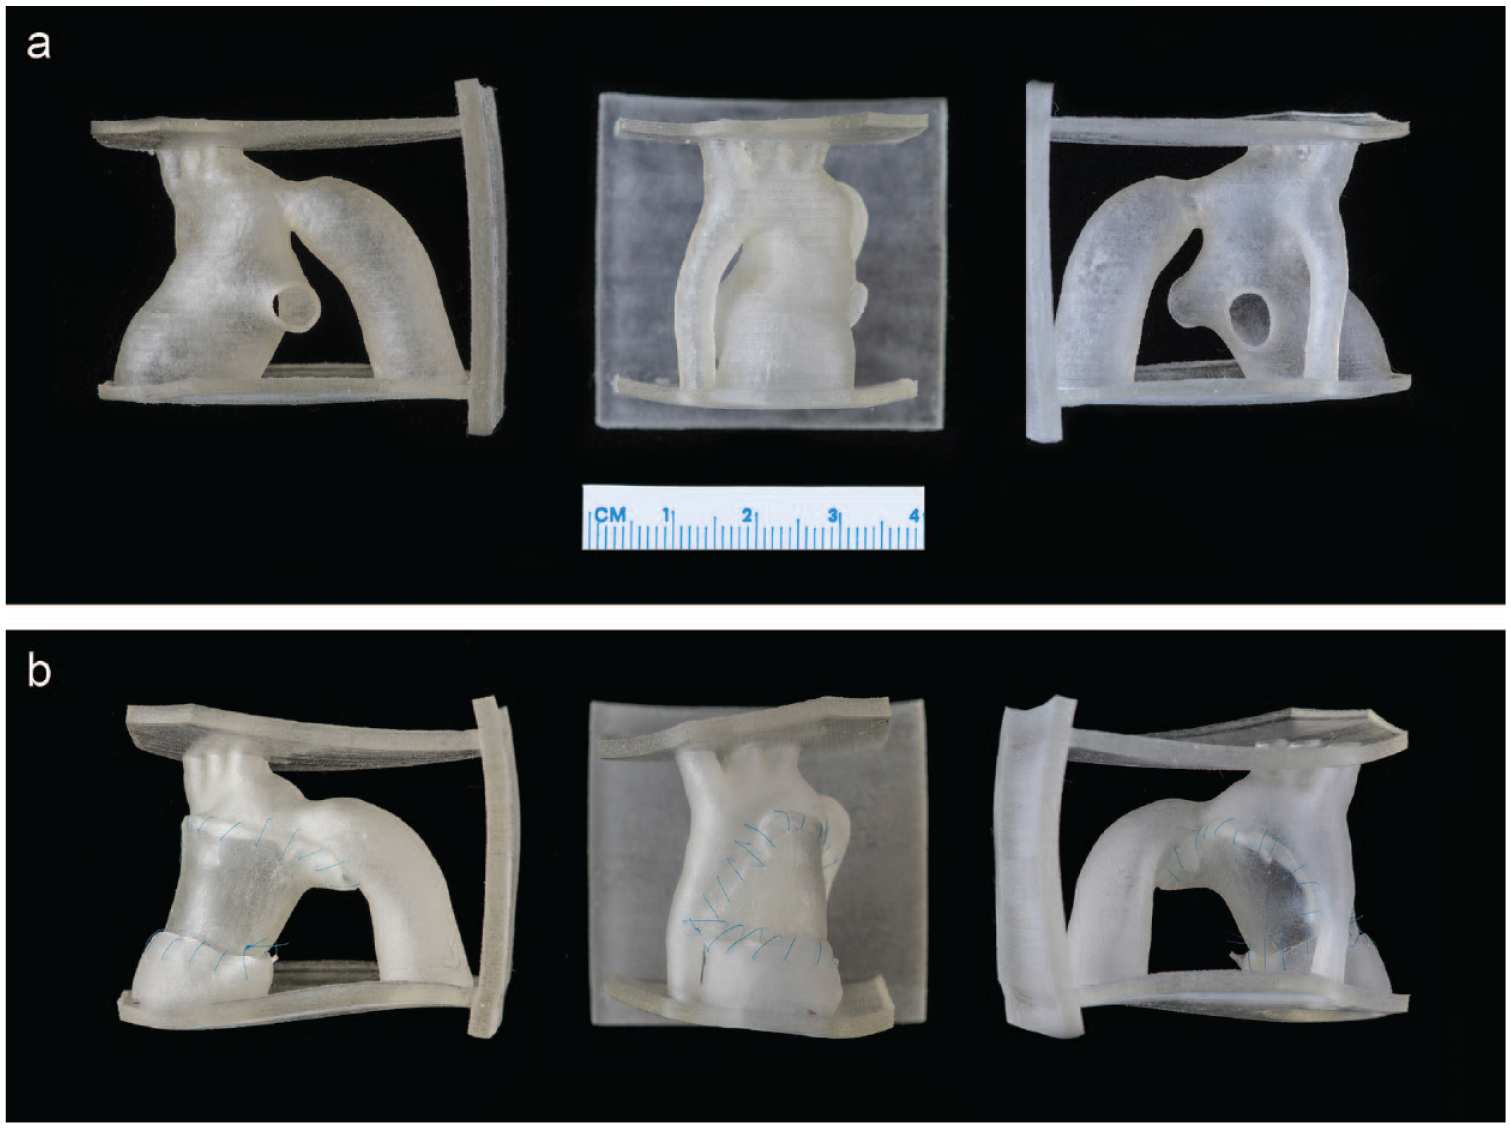
A 3D-printed hypoplastic left heart model, with supports to place it in surgical view. This particular model was printed with a 0.7 mm thickness, using a flexible material to mimic the tissue. (a) Preoperative model; (b) results of surgical simulation using a 3D-printed homograft patch—the model was thin enough to accommodate 7-0 Prolene monofilament sutures for the simulated repair. 3D, 3-dimensional.
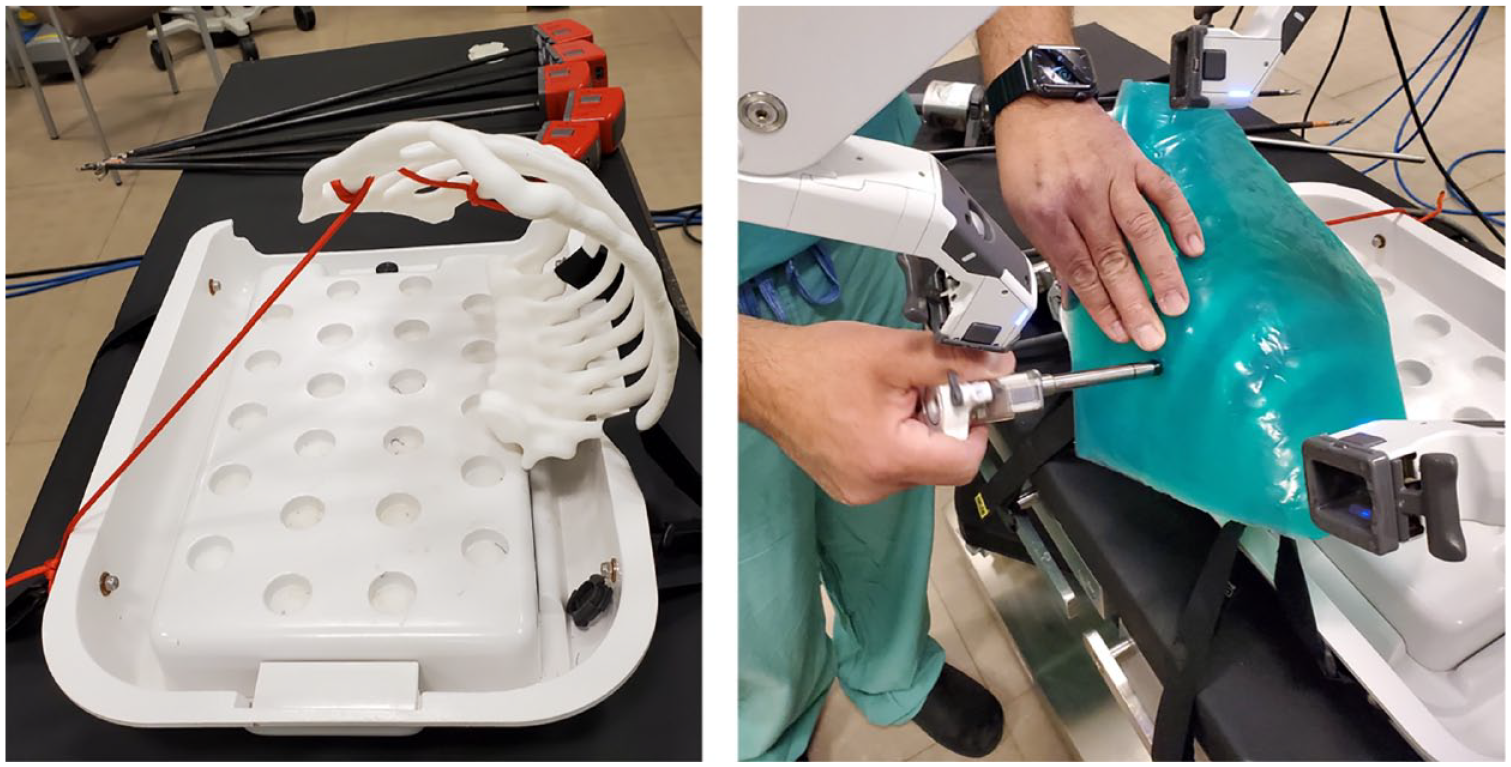
Use of a customized 3D-printed rib cage model to simulate positioning, port placement, and robotic LITA harvesting. The right image shows how a silicone overlay was placed over the printed rib cage model to simulate skin and secure the ports. Several rib cage models of different ratios were printed (not shown) to investigate intrathoracic ratios and anatomy conducive to robotic LITA take down. 3D, 3-dimensional; LITA, left internal thoracic artery.
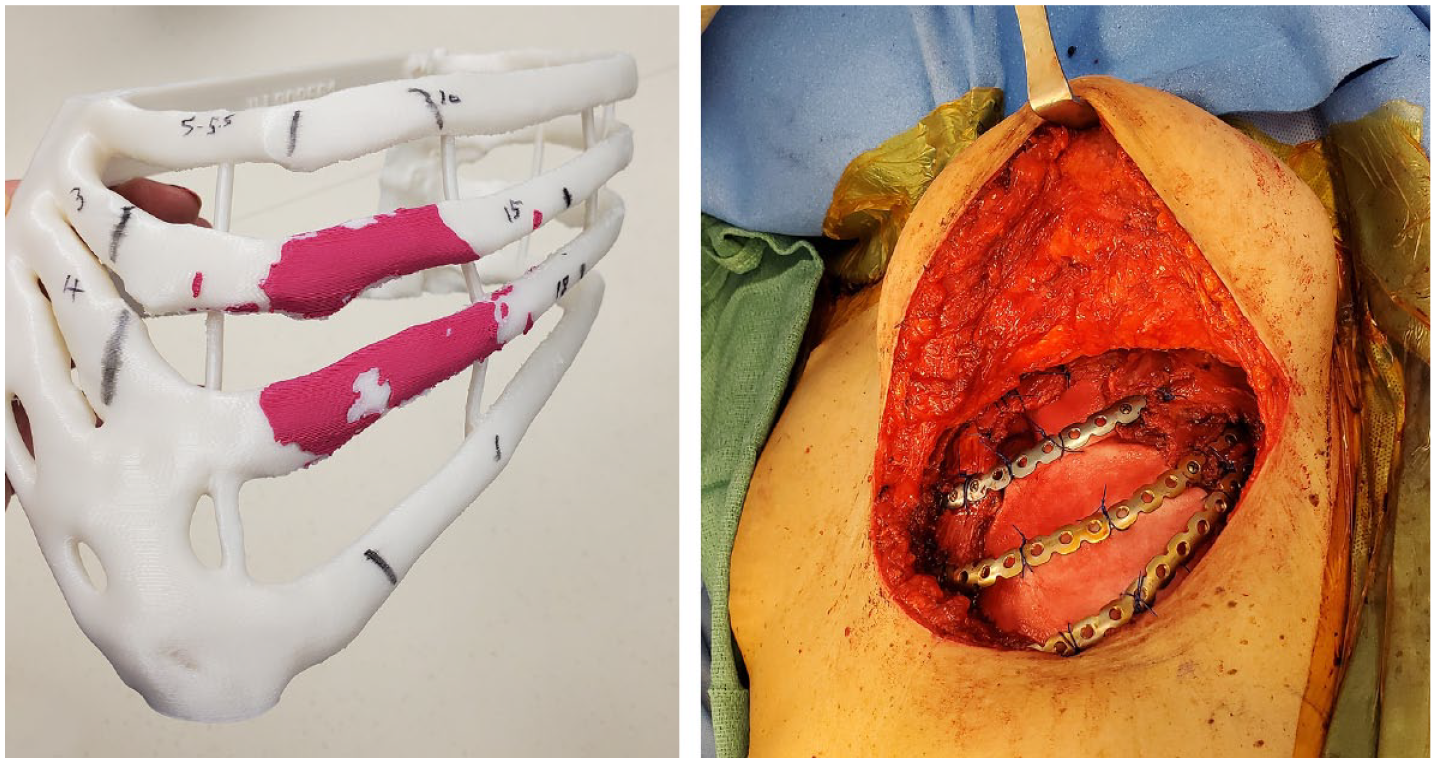
Example of a patient-specific 3D-printed rib cage model that was used to (1) delineate tumor adhesion, (2) define boundaries to ensure adequate resection, and (3) serve as a guide for molding rib plates prior to the operating room to facilitate more accurate and expeditious chest wall reconstruction (right image). 3D, 3-dimensional.
10. Know the Limitations of 3D Printing
Despite the many success stories and excitement surrounding the advent of medical 3D printing, several restrictions and technical challenges persist. Several, often time-consuming, steps are involved in the production of a 3D-printed model, and while several workflow protocols exist, there is still no standard or uniform way to create the models. Limitations also persist with regard to 3D printing reliable soft-tissue models with high-resolution anatomical detail, and models do not yet provide a true feel of soft biological tissue.
Conclusions
Medical 3D printing has revolutionized personalized medicine and has the potential to further improve patient-specific management, research, surgical education, development of clinical tools, and simulation. 3D printing can play a significant part in the multidisciplinary and collaborative efforts involved in cardiothoracic diagnoses and treatment strategies.
Footnotes
Declaration of Conflicting Interests
The author declared no potential conflicts of interest with respect to the research, authorship, and/or publication of this article.
Funding
The author received no financial support for the research, authorship, and/or publication of this article.