
Abstract

Dear Sir,
Ulnar shortening osteotomy is reported to have good results and is increasingly used for distal radial malunion. Often a larger degree of shortening is required than standard jigs allow; particularly following post-traumatic radial shortening. The DePuySynthes® 2.7 mm locking compression plate (LCP) Ulna Osteotomy System normally allows up to a 5 mm shortening. Using this system, we report a step-by-step technical description able to achieve accurate, reliable and reproducible shortenings of up to 12.5 mm.
Following distal radius malunion with often significant ulnar positive variance, ulnar shortening with or without simultaneous radial closing wedge osteotomy is an attractive alternative to distal radial opening wedge osteotomy with bone grafting (Srinivasan et al., 2013; Wada et al., 2011). It has been shown to generate comparable and some superior clinical and functional outcomes scores while, with the advent of low profile locking plates, having a reasonably low complication rate (Srinivasan et al., 2013; Tatebe et al., 2012). In addition, ulnar shortening osteotomy is technically easier with lower operative time and less soft tissue dissection. Trends exist towards higher non-union rates in free hand techniques and thus, these should be avoided when there are now readily available jigs (Sunil et al., 2006).
The 2.7 mm LCP Ulna Osteotomy System (DePuySynthes®) utilizes jigs attached with three 2 mm drill-tip Kirschner wires (K-wires) that are subsequently replaced by the screws for the low profile plate. The system only requires a single cut as it employs a double saw blade for use in conjunction with a Colibri drill (DePuySynthes®), which resects the required bone in a single cut. We describe a technique, using this system, to achieve shortenings of 6, 7, 8, 9.5, 10, 10.5, 11.5 and 12.5 mm. Shortenings are achieved using one of two techniques that will be described. For each technique, we provide a step-by-step operative description alongside saw-bone figures for 8 mm (Technique A) and 10 mm (Technique B). We also provide a table showing the hole positions of each shortening, which can be used in non-locking, locking or lag options.
Preoperatively, a standardized postero-anterior (PA) wrist radiograph is taken with zero forearm rotation and a calibration device, to measure the required shortening. If the shortening required is greater than 5 mm then the following techniques are used, depending on the amount of shortening required. We recommend a 45° osteotomy to increase the surface contact area and allow lag screw placement in each case. We utilize the eight-hole plate for larger shortenings to ensure adequate non-locking and locking options, especially in osteopenic bone.
Surgical Technique A is used for ulnar shortenings of 6, 7 and 8 mm. The 5 mm jig is attached to the ulna with three 2 mm drill-tip K-wires (Figure 1(a)). A 5 mm wedge of bone is then resected utilizing the 5 mm 45° double saw blade (532.095S) using the Colibri drill with copious irrigation (Figure 1(b) and (c)). The 5 mm jig is removed and replaced with the second jig (see ‘Jig 2’ in Table 1) over the originally placed guide drills. This serves to maintain the rotation and angulation of the ulna, while reducing the interfragmentary distance (Figure 1(d) and (e)) prior to the second cut using the same 5 mm double saw blade (Figure 1(f) and (g)), which will achieve the required shortening after reduction. The eight-hole plate is placed over the K-wires (Figure 1(h)), into specific holes of the plate (Figure 2), and provisionally clamped in place before definitive fixation (Figure 1(i) and (j)). We recommend inserting the most distal screw first, followed by the proximal screw to achieve provisional length and stability. The osteotomy site is then accurately reduced prior to lag screw placement through the purpose-built lag hole. The holes are then filled as required for a stable balanced fixation to allow early range of movement.
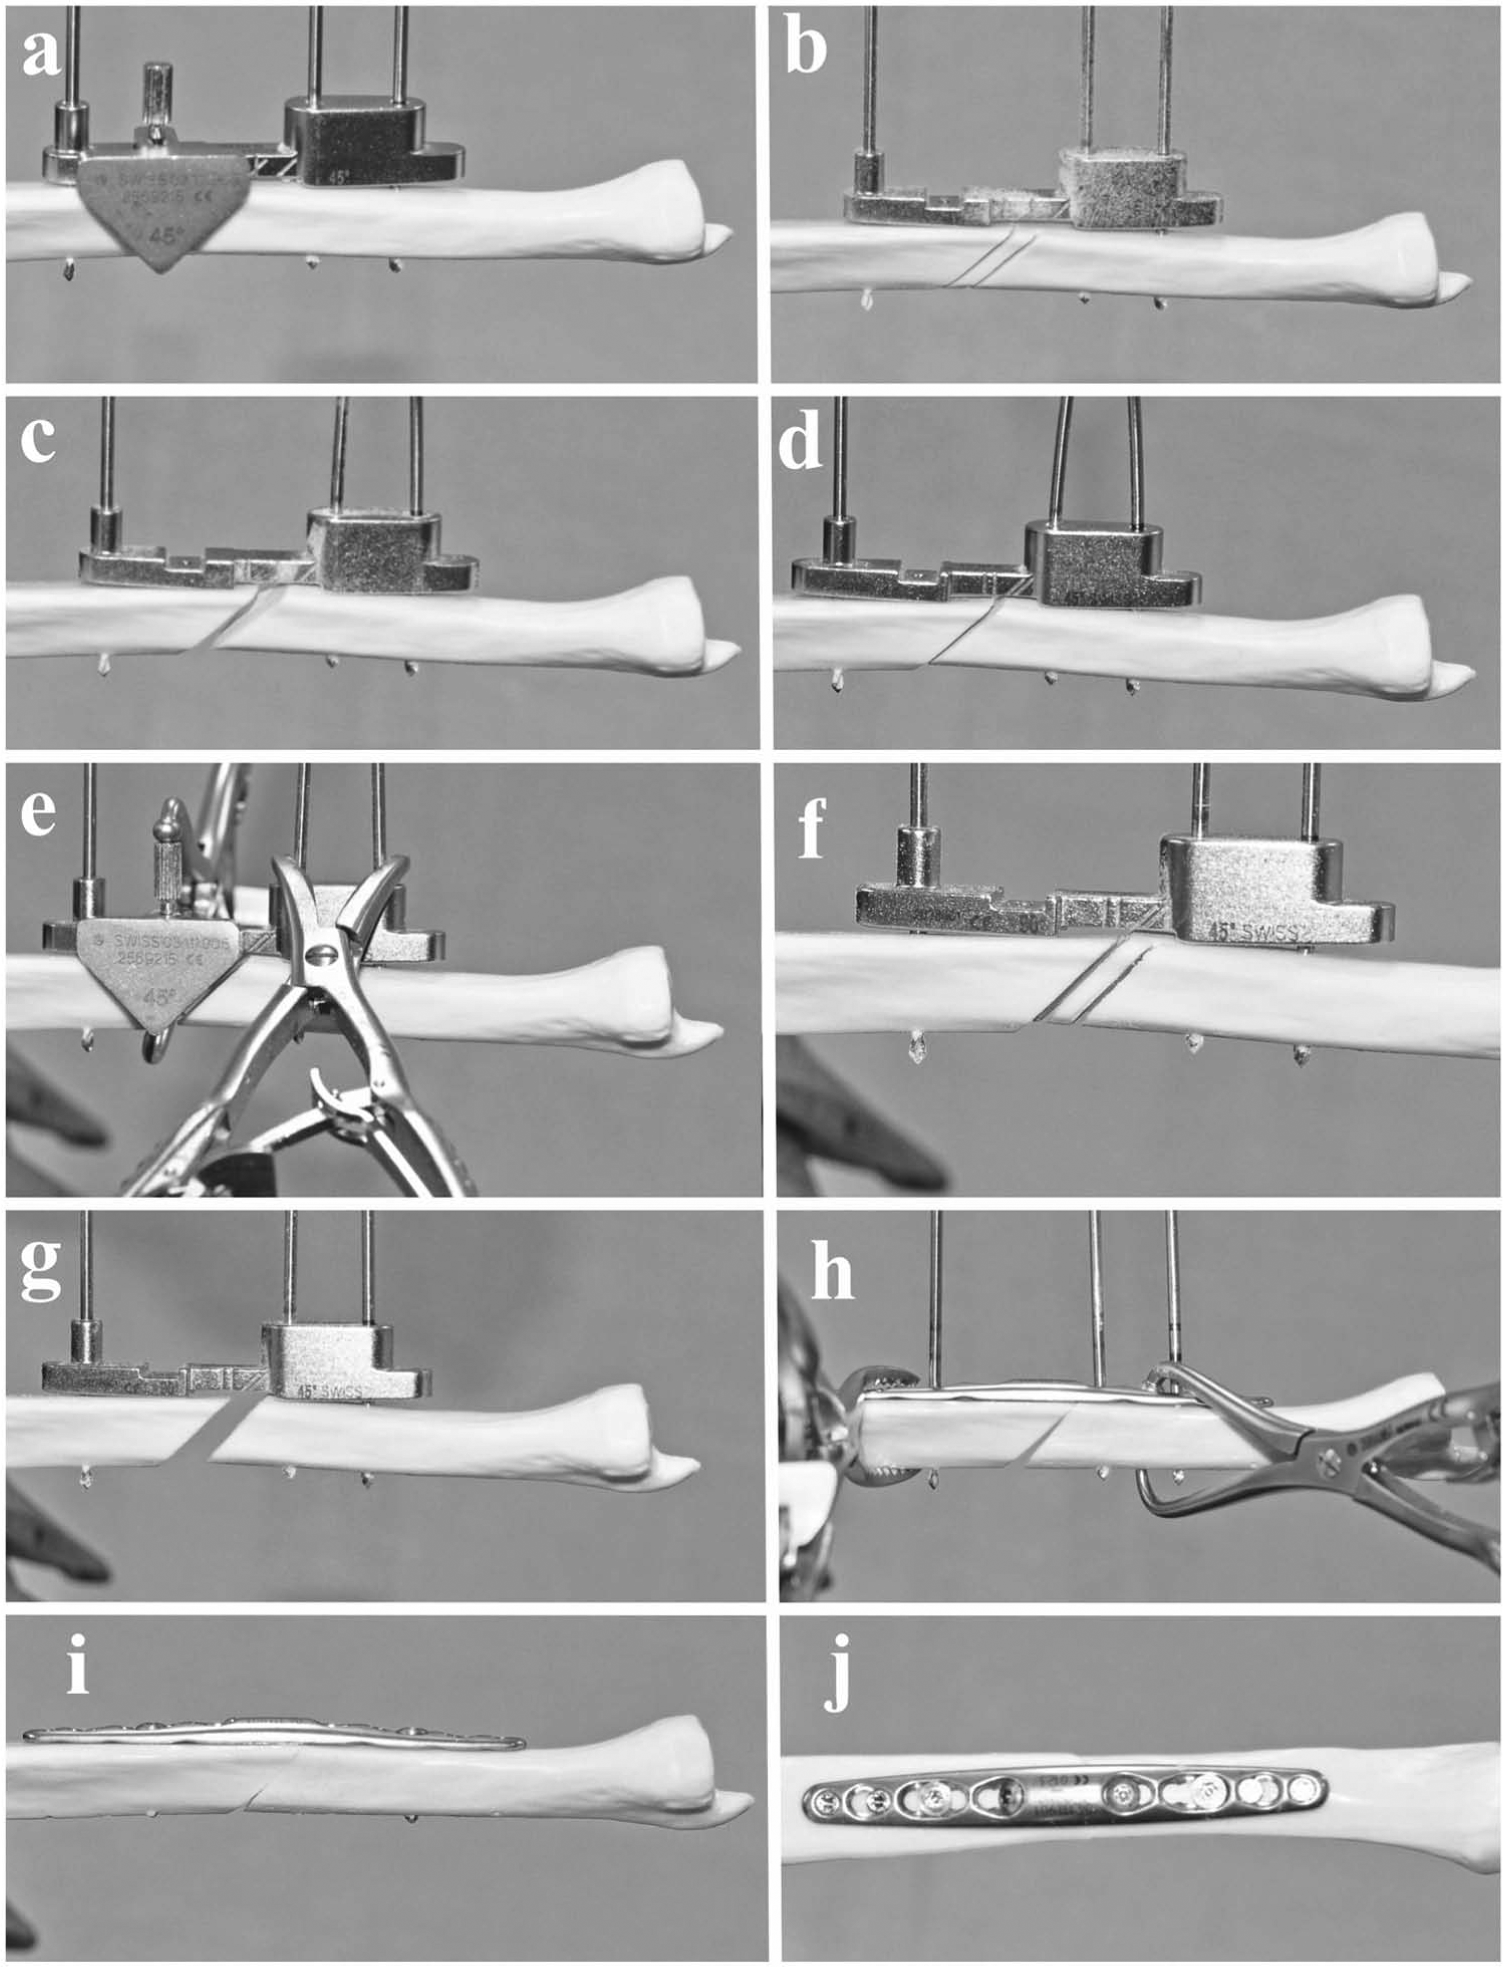
Step-by-step technique of an 8 mm ulnar shortening (Surgical Technique A). The first 5 mm saw blade cut is with the 5 mm jig (a, b, c), which is subsequently replaced by a 2 mm jig (d) before a second 5 mm saw blade cut achieving 8 mm total shortening.
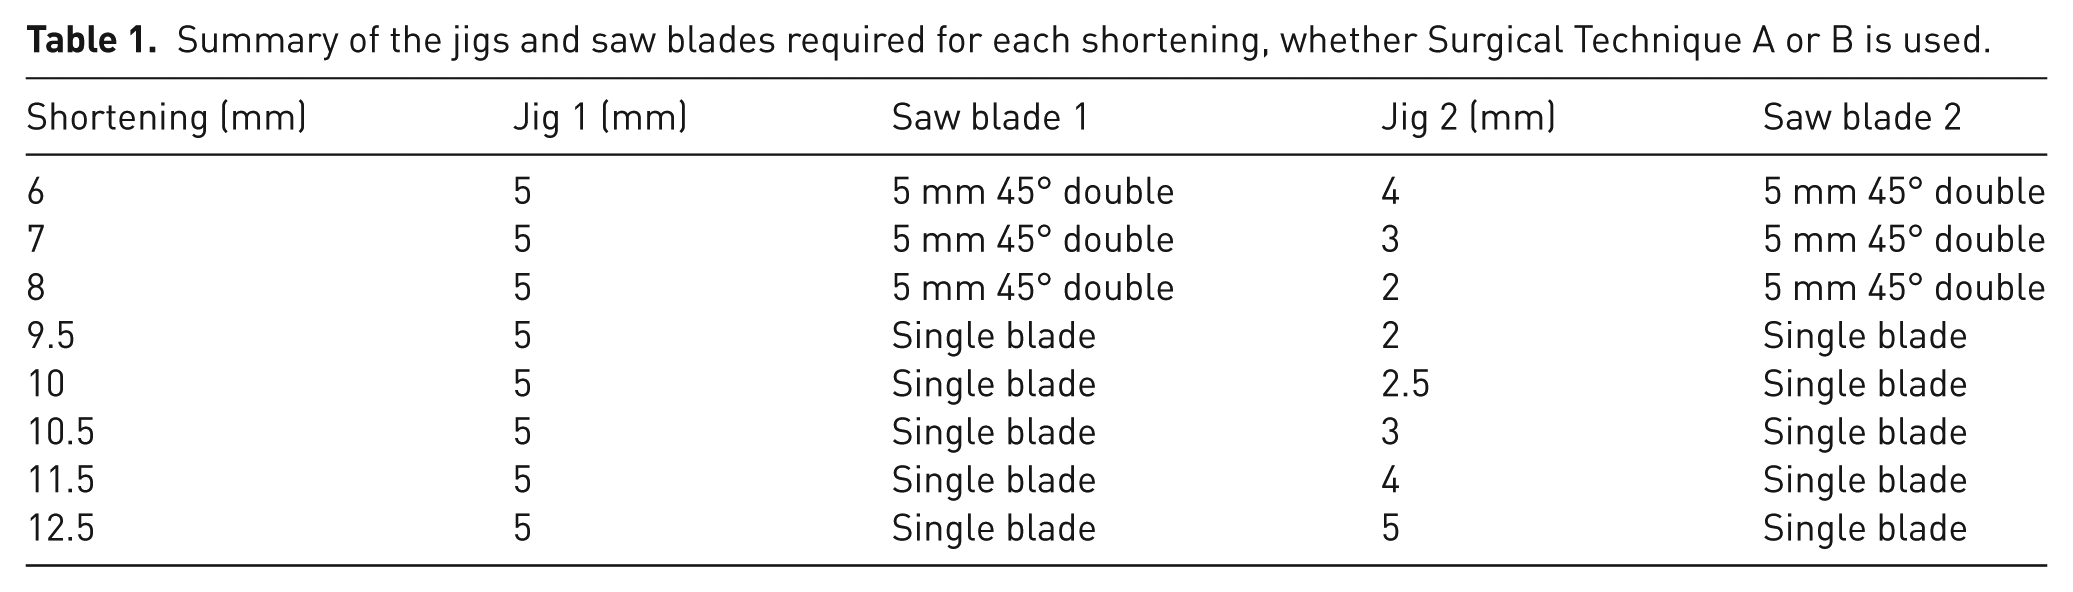
Summary of the jigs and saw blades required for each shortening, whether Surgical Technique A or B is used.
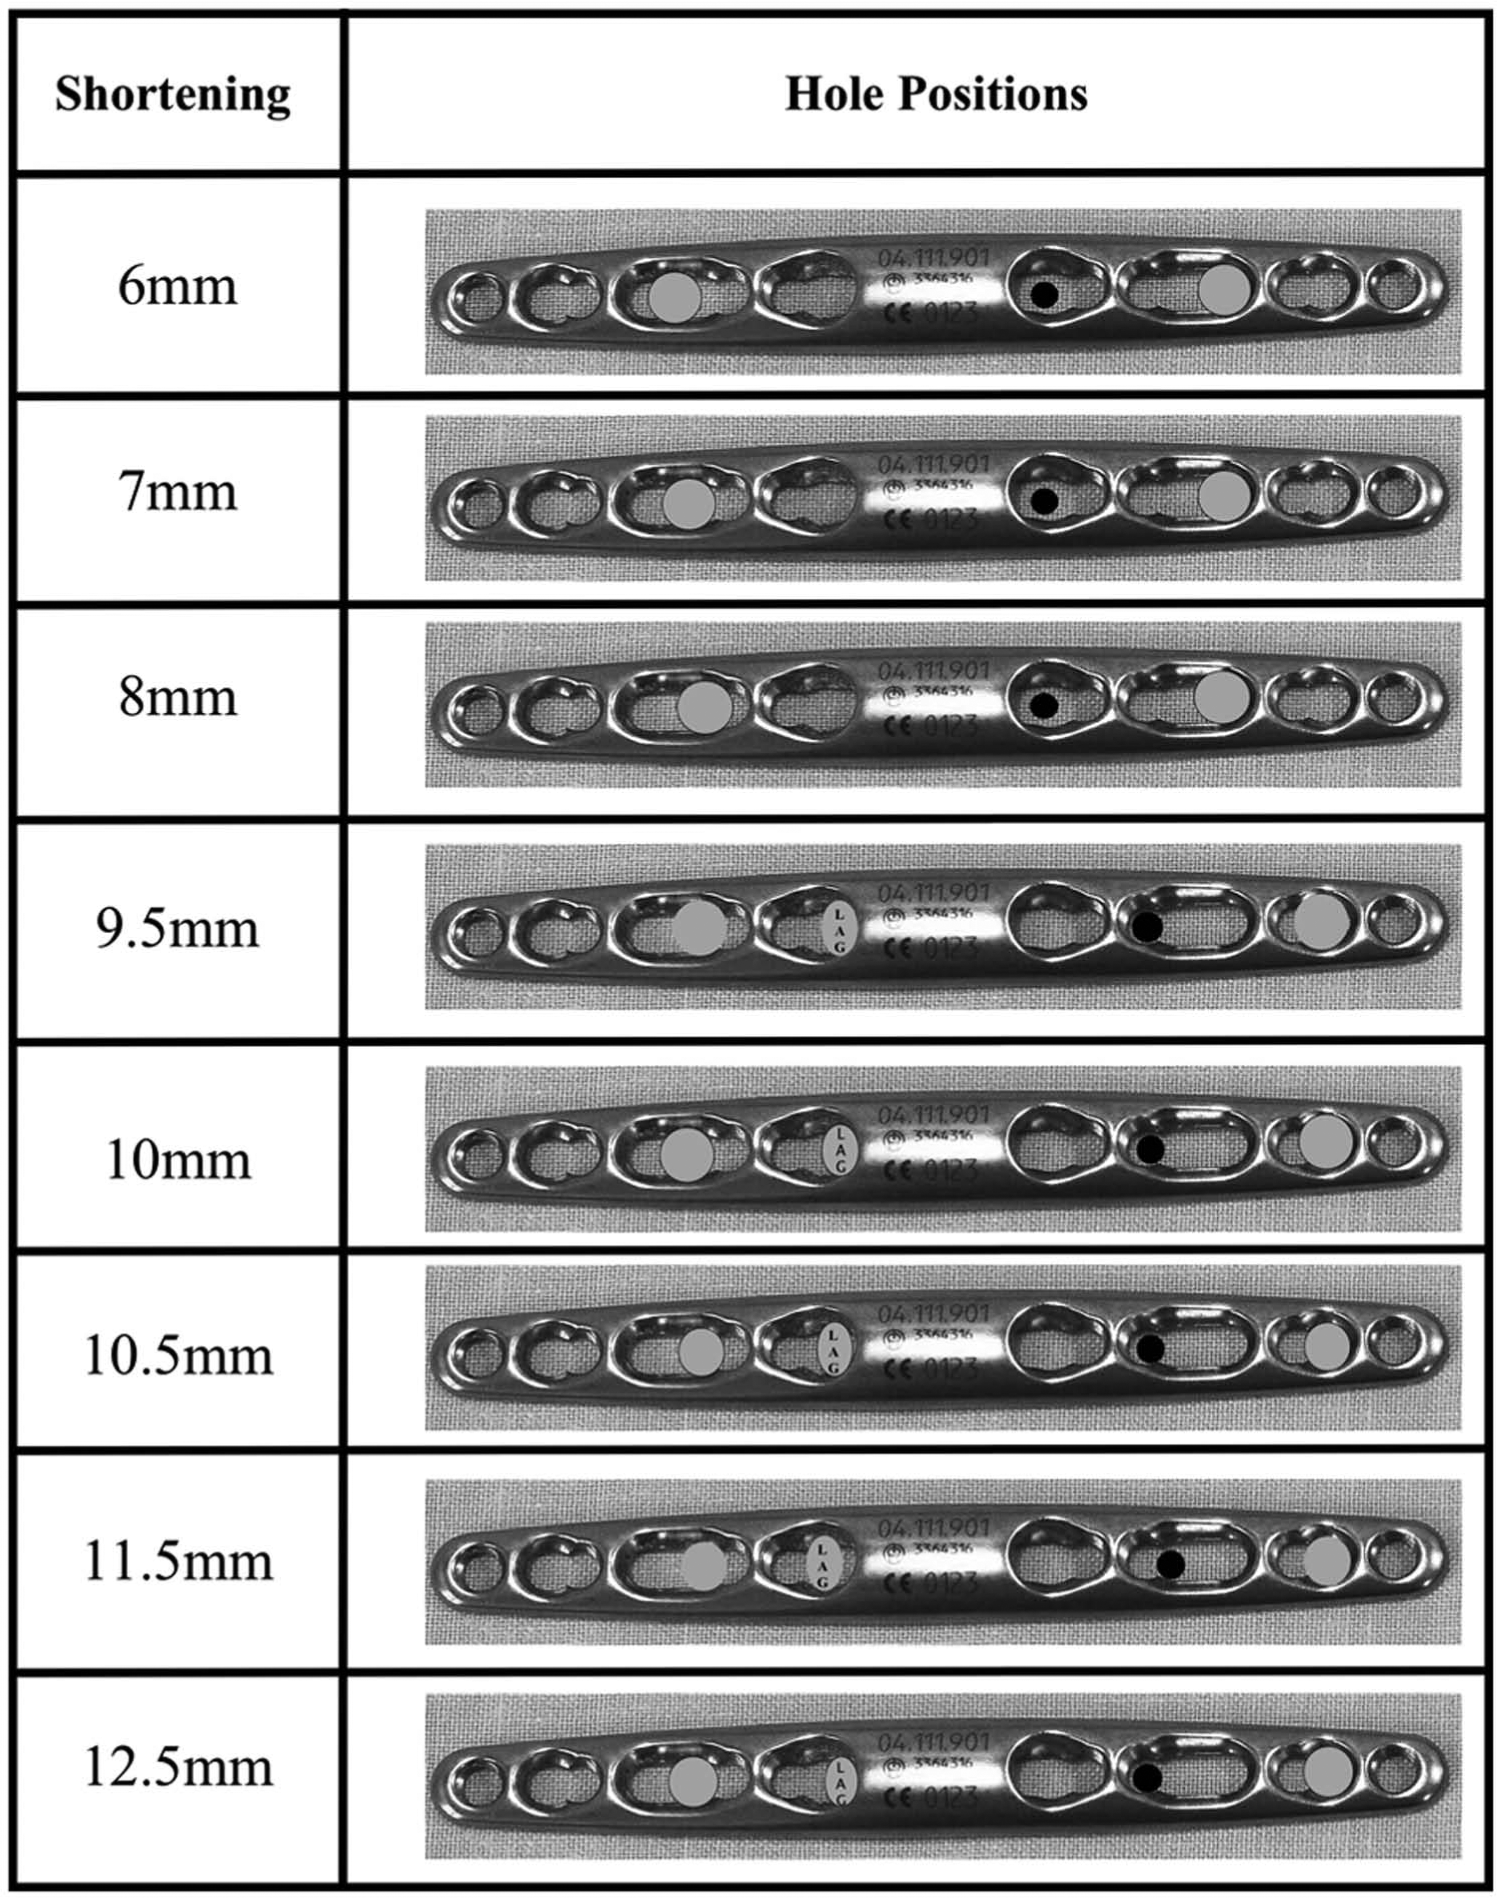
Showing the final K-wire hole positions within the eight-hole plate. Lighter coloured circles; non-locking screws (lag screw labelled). Black circles; drill-tip K-wire hole either used in non-locking or locking mode.
Surgical Technique B is used for ulnar shortenings of 9.5, 10, 10.5, 11.5 and 12.5 mm. This technique utilizes a single thickness microsurgical saw blade (532.062S) with the Colibri, or any other equivalent system, as the double saw blade is not required. We would recommend its use over thicker saw blades, to prevent the possibility of thermal bone necrosis. The 5 mm jig is attached with three 2 mm drill-tip K-wires. On this occasion, the proximal K-wire is inserted unicortically or to the first laser-etched mark (Figure 3(a)). The single 45° cut is made using copious irrigation, but not completed, leaving the far cortex intact (Figure 3(b)). The jig is then removed, as well as the single unicortical proximal K-wire. Jig 2 (Table 1) is then used, but positioned on the more proximally located remaining K-wire. The 2 mm K-wire is now replaced bicortically in the proximal hole of the jig (Figure 3(c)). After final confirmation that the distance between the cuts will be adequate (Figure 3(d)), a single saw cut is now made and completed with copious irrigation (Figure 3(e)), before returning to the first cut to complete this and achieve the desired shortening (Figure 3(f)). The plate is placed over the K-wires (Figure 3(g)), into the correct holes (Figure 2) and provisionally clamped in place. The screws are placed as before with the most proximal and distal screws first, prior to lagging (Figure 3(h)). The unicortical drill hole should line up with the intended lag screw plate hole and thus, being unicortical, does not act as a stress riser and is incorporated in the fixation. Definitive fixation with non-locking and locking screws as appropriate can then proceed (Figure 3(i) and (j)).
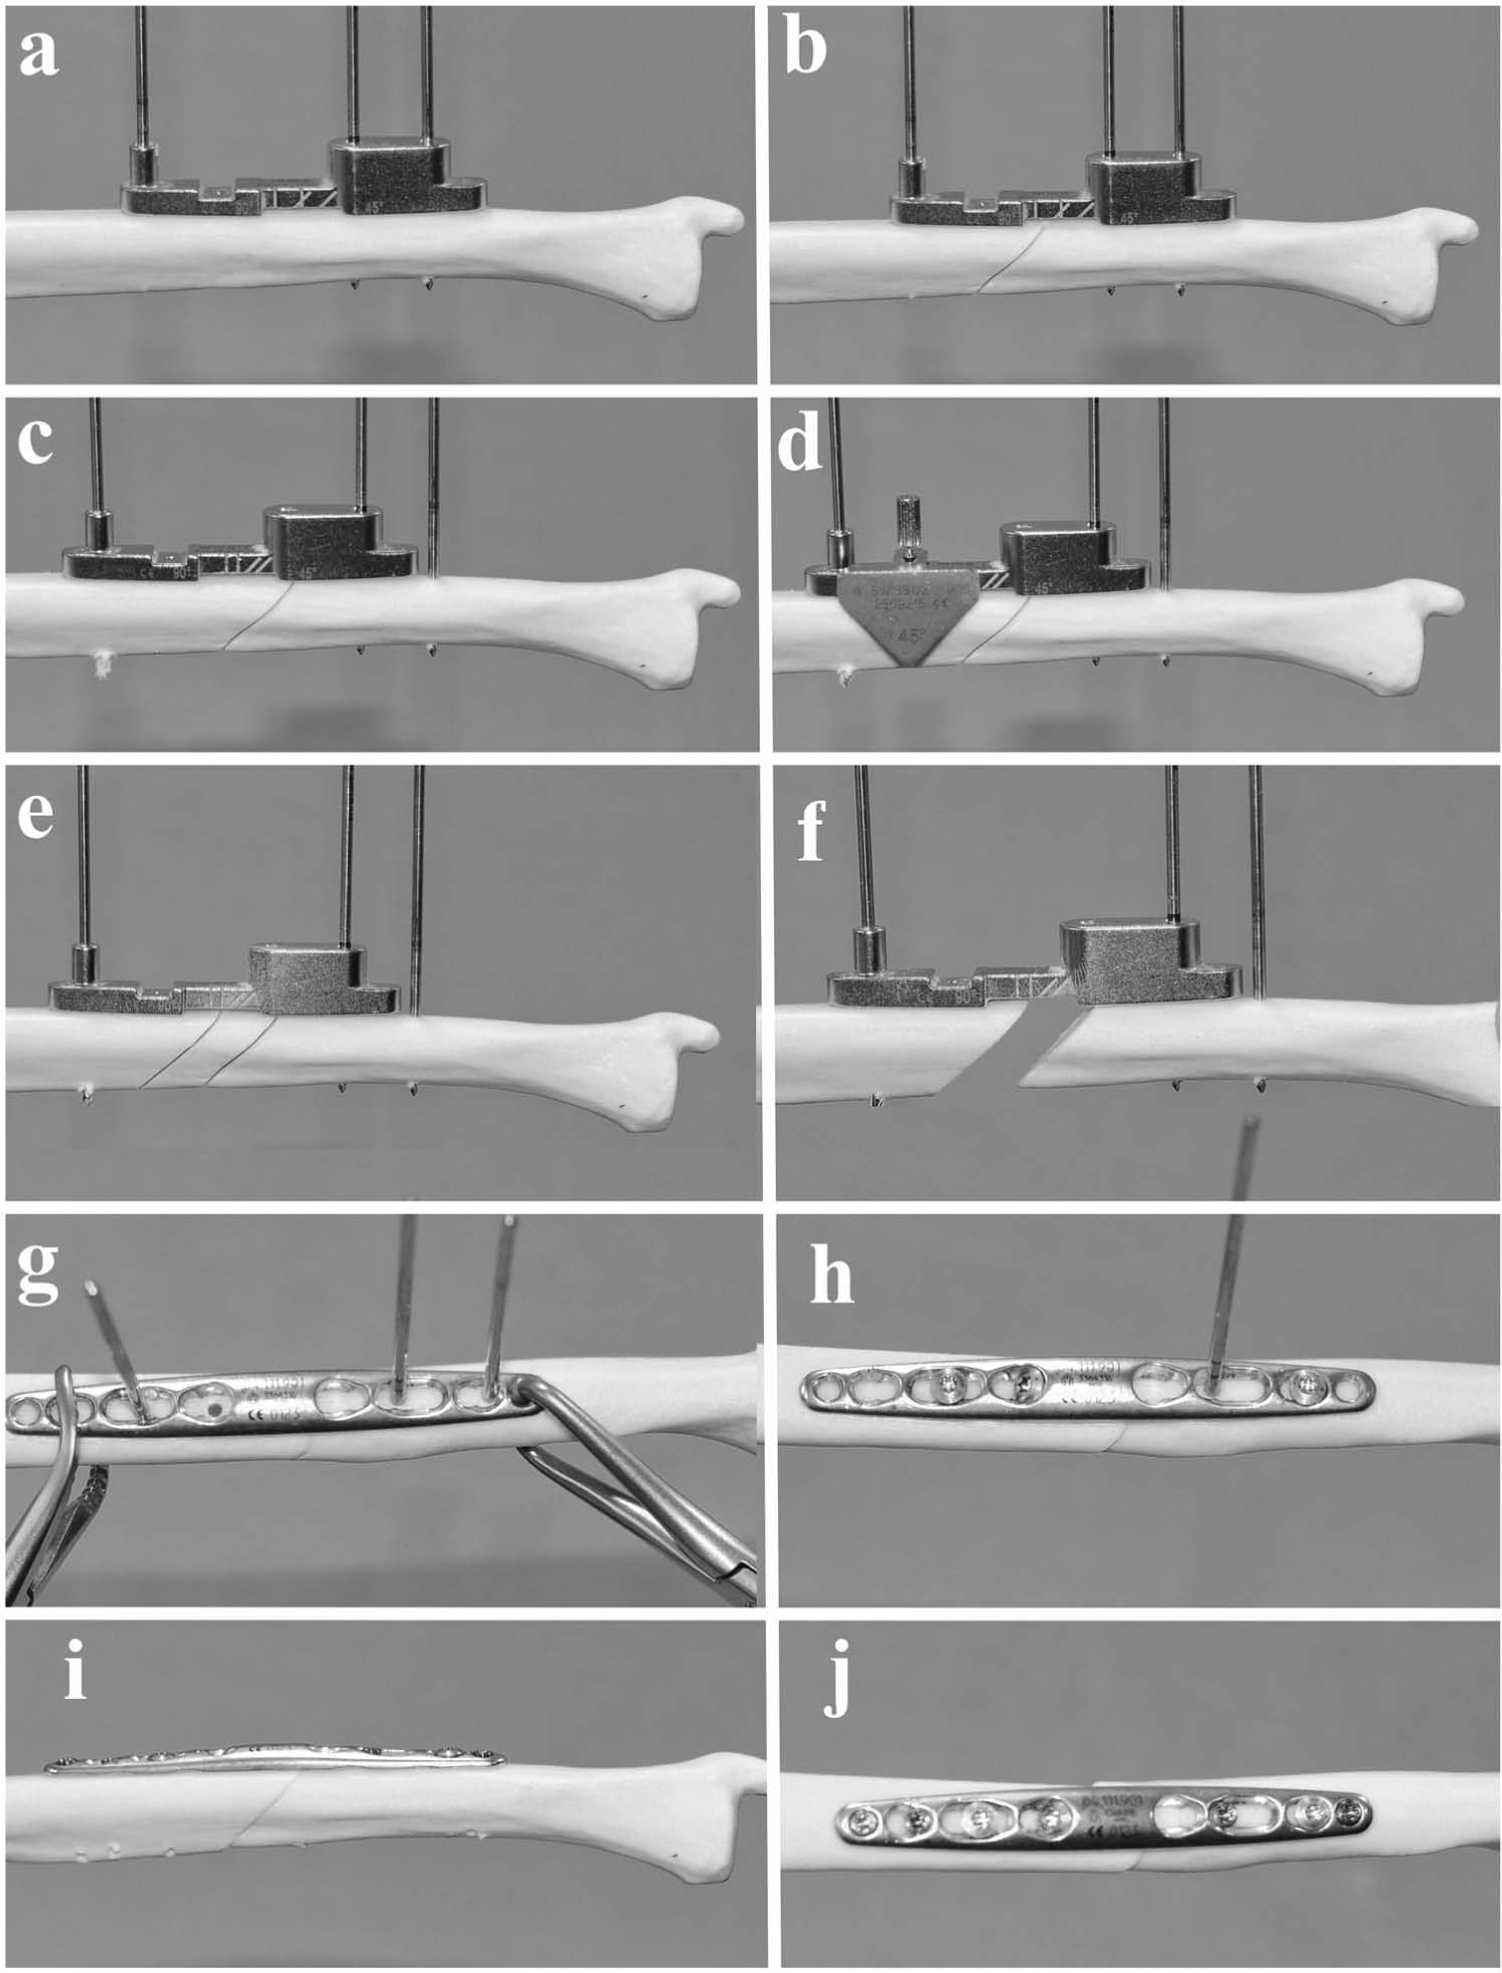
Step-by-step technique of a 10 mm ulnar shortening (Surgical Technique B). The first single saw cut is with the 5 mm jig (a, b), which is subsequently moved proximally and replaced by a 2.5 mm jig (c, d) before a second cut achieving 10 mm total shortening (e, f).
We have now completed a number of large ulnar shortenings using this reliable and accurate technique. We hope that this short correspondence will enable the reader to confidently attempt larger ulnar shortenings using the DePuySynthes® 2.7 mm LCP Ulna Osteotomy System, alongside achieving a stable balanced fixation even in osteopenic bone.
Footnotes
Conflict of interests
The demonstration kit, sawbones and engineering diagrams were provided by DePuySynthes for the research. This research received no grants or funding at any stage, nor had prior contact from DePuySynthes or any other public, commercial or not-for-profit sector to formulate the research.