
Abstract
Many students who have Extensive Support Needs (ESN) struggle with increasing their independence in inclusive classrooms. Federal law is clear that all students—including students with ESN—should be educated alongside their peers without disabilities in regular education classrooms to the “maximum extent appropriate.” Self-directed video prompting is an evidence-based practice that has been proven to fade adult support while building student independence. This article provides a practical how-to guide for how teachers can support their paraeducators in using self-directed video prompting. It introduces a framework for implementation called TAP To SKILL and describes what this approach looks like in action.
Keywords
“The TAP To SKILL framework is desi gned to supp ort the implementation of self-directed video prompting as well as other formats of VBI.”
Lucas is a third-grade student who loves to talk with friends, watch movies, play with his dog, and go bowling. Lucas receives special education services under the category of multiple disabilities and communicates primarily by using Proloquo2Go on his iPad. Lucas’s family has advocated for him to be included in the regular education classroom so that he can learn alongside his peers without disabilities. A paraeducator, Mr. Cooper, helps support Lucas in the regular education classroom.
Lucas’s parents observe Lucas in his new classroom. On the one hand, they are thrilled that Lucas is participating in the regular education classroom and making progress on goals related to math and reading. On the contrary, they are concerned that Lucas has grown increasingly dependent on Mr. Cooper to get through any classroom routine. For example, when entering the classroom, Mr. Cooper puts Lucas’s jacket and backpack in his cubby, puts his school folder on his desk, retrieves the morning work page from the front of the room, and leads Lucas to his desk to get started on his work. Lucas waits passively for Mr. Cooper, then follows him to his desk, and again waits passively until Mr. Cooper directs him to get started.
Lucas’s parents share their concerns with Lucas’s teacher, Ms. Erin. They share that they appreciate that Mr. Cooper is there to support Lucas but would like to look for ways to build Lucas’s independence.
Many students who have Extensive Support Needs (ESN) like Lucas struggle with increasing their independence in inclusive classrooms. Federal law is clear that all students—including students with ESN—should be educated alongside their peers without disabilities in regular education classrooms to the “maximum extent appropriate” (Individuals With Disabilities Education Improvement Act [IDEIA], 2004). However, students with ESN continue to have limited access to inclusive classrooms (Brock, 2018). Even when students with ESN are included, they often receive most of their support from paraeducators who have very limited training—and often no formal training in supporting students with ESN in inclusive classrooms (Brock & Carter, 2015). In many cases, teachers do not clearly communicate expectations for paraeducators regarding how students should be supported (Uitto et al., 2017). This situation is unfair to both the student and the paraeducator. Often, paraeducators like Mr. Cooper mistakenly infer that their job is to remain in constant proximity to the student, perform tasks for them, and prompt them through classroom routines. These paraeducators do not understand that their job is to fade support, and they rarely receive training on how to fade their support over time (Gifford et al., 2018).
Fortunately, there are many evidence-based practices that have been proven to fade adult support while building student independence. One such practice is self-directed video prompting. This practice is particularly compelling because it involves students delivering their own prompts to navigate tasks and routines (Wong et al., 2015). Self-directed video prompting involves breaking a multi-step skill or routine into its component steps, recording video clips that demonstrate exemplars of each step, and teaching the student to play clips one at a time and perform that step before proceeding to the next (Cannella-Malone et al., 2006). Self-directed video prompting can be used as a standalone approach or combined with ancillary strategies such as error correction and reinforcement (Collins, 2012). This approach can transform situations in which students like Lucas are passive receivers of support and empowers them to direct their own learning.
Despite the exciting potential of self-directed video prompting, this approach is not commonly used in schools (Wynkoop et al., 2020). This article provides a practical how-to guide for how teachers can support their paraeducators in implementing self-directed video prompting. It introduces a framework for implementation called TAP To SKILL and describes what this approach looks like in action for Lucas.
TAP to SKILL
TAP To SKILL is an acronym that describes all steps needed to implement self-directed video prompting successfully. It stands for Target a skill; Assess the current level of performance; Prepare the videos; Teach device operation; Select ancillary strategies; Know the implementation steps; Implement the intervention; Lead to independence. A summary of TAP To SKILL steps is provided in Table 1, and detailed descriptions of each step are included subsequently.
TAP To SKILL: Overview.
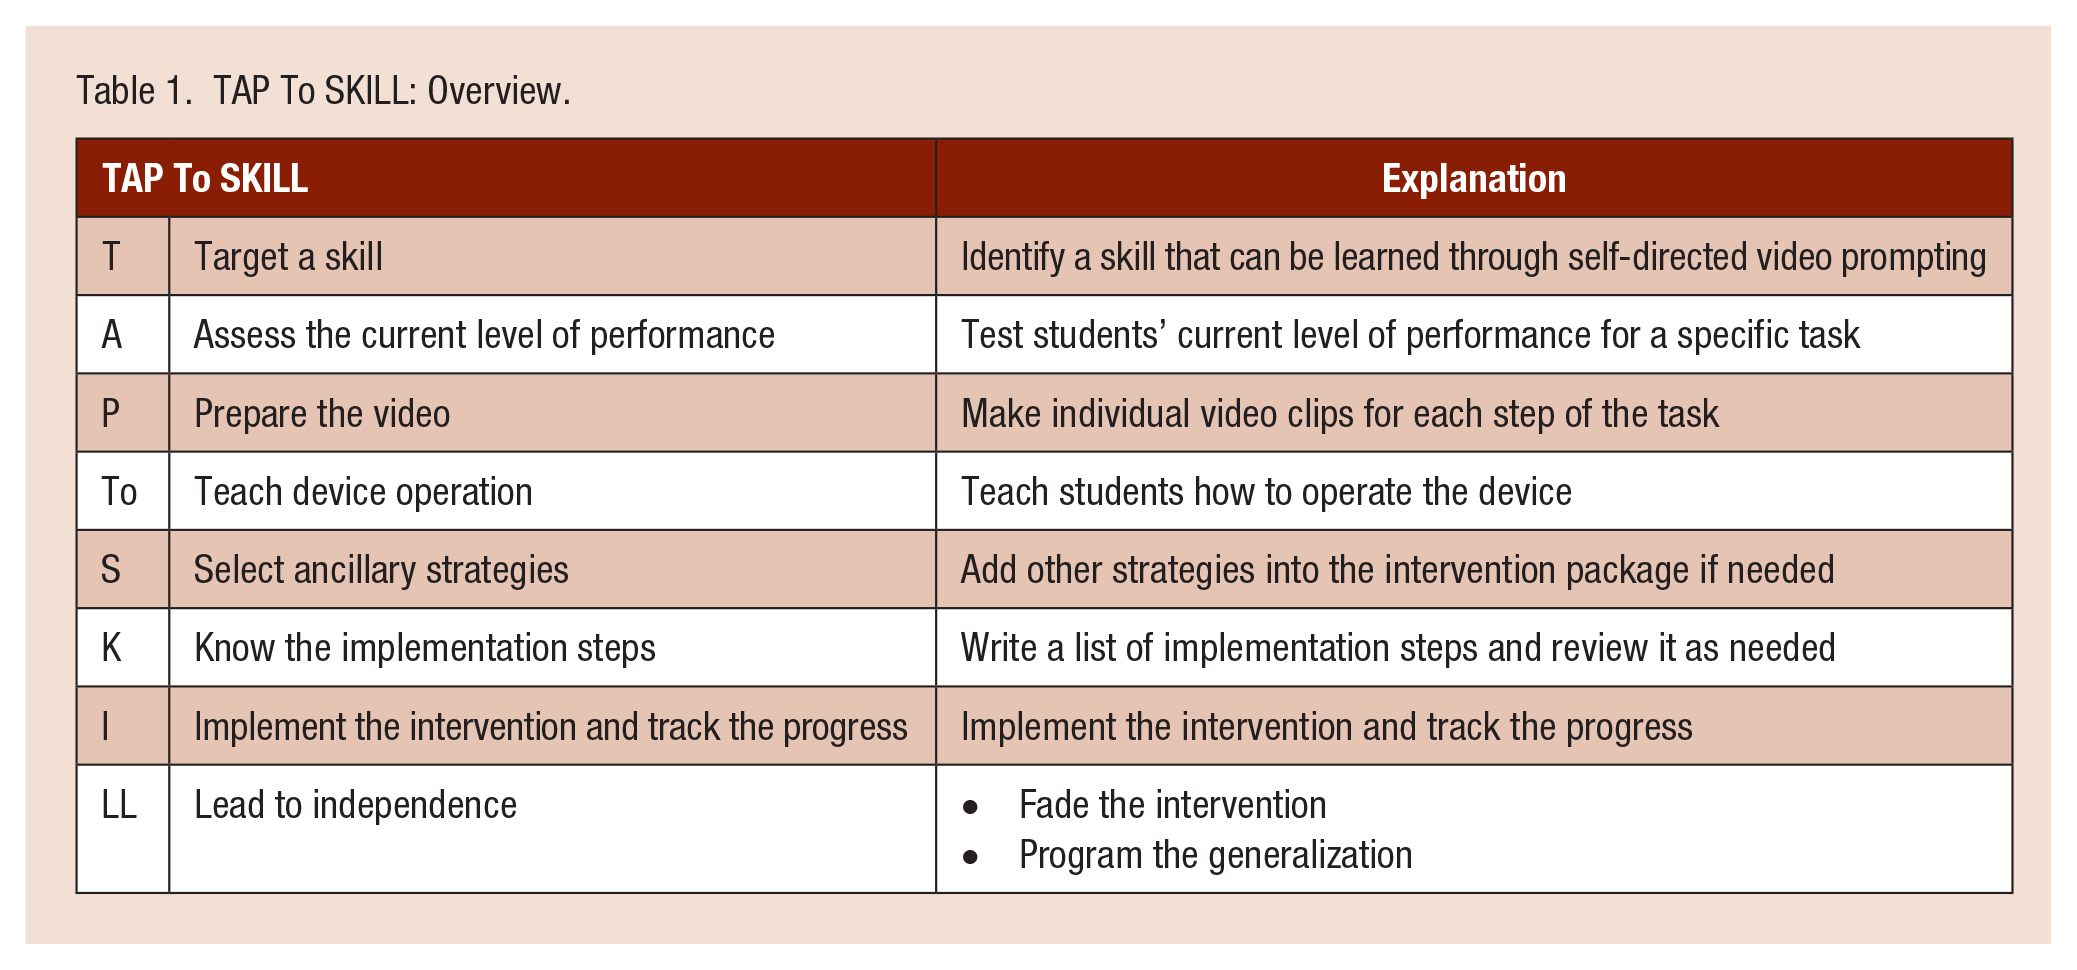
T: Target a Skill
Video prompting is best suited for chained tasks or tasks that have multiple steps. It is critical for teachers to break down the chained skill into a checklist of its component steps. This will enable teachers to assess the student’s performance on each component step and record separate video clips for each component step.
When identifying a target skill, it can be helpful to observe the student as they navigate the school day. Any routine that peers complete independently—but the student depends on adult support—could be an opportunity to embed self-directed video modeling. In addition to navigating a morning routine, examples of skills include logging in to a computer workstation, opening a locker, packing up at the end of a class period or at the end of the school day, changing into athletic clothes for a physical education class, or navigating the lunch line. Collaborating with other professionals is helpful, as other team members (e.g., therapists, paraeducators, general education teachers) might naturally have opportunities to observe the student at different times of the school day. In addition, occupational therapists may have suggestions for adaptive equipment when steps of a routine pose a challenge for students with physical disabilities. Without this valuable input, teachers and paraeducators may mistakenly presume that students must depend on staff for physically demanding tasks.
Some tasks are not well-suited for video prompting. For example, social interactions can be awkward if the student stops to watch a video clip between each interaction. Also, it can sometimes be challenging for a student to use the same video model for a task that has variability. For example, a student might struggle to navigate the lunch line on pizza day when the video prompts show a student getting a salad. This is not a reason to avoid using video prompting on variable tasks like navigating the lunch line. Instead, a teacher might first ensure the student is successful on days in which the task is an exact match for the video clips before asking the student to handle variations.
To address parents’ concerns and boost Lucas’s independent learning, Ms. Erin and Mr. Cooper list all of Lucas’s potential learning needs by reviewing the daily schedule. They agree that Lucas should be more independent during morning transition (e.g., opening a locker, retrieving materials for class), during lunchtime (e.g., navigating the lunch line), making a choice during free choice time, and during the dismissal routine (e.g., packing up the school bag). Given that Lucas can operate his iPad when watching videos, Ms. Erin suggests introducing self-directed video prompting in the morning transition, monitoring his progress, and extending this intervention to other routines if it is effective. Mr. Cooper is excited about the idea of supporting Lucas to be more independent but has no experience with video prompting. Ms. Erin assures him that she will support him every step of the way. She starts by helping Mr. Cooper to task analyze the morning routine and create a checklist that includes each step of the routine (see Table 2 for task analysis).
Task Analysis for Morning Transition.
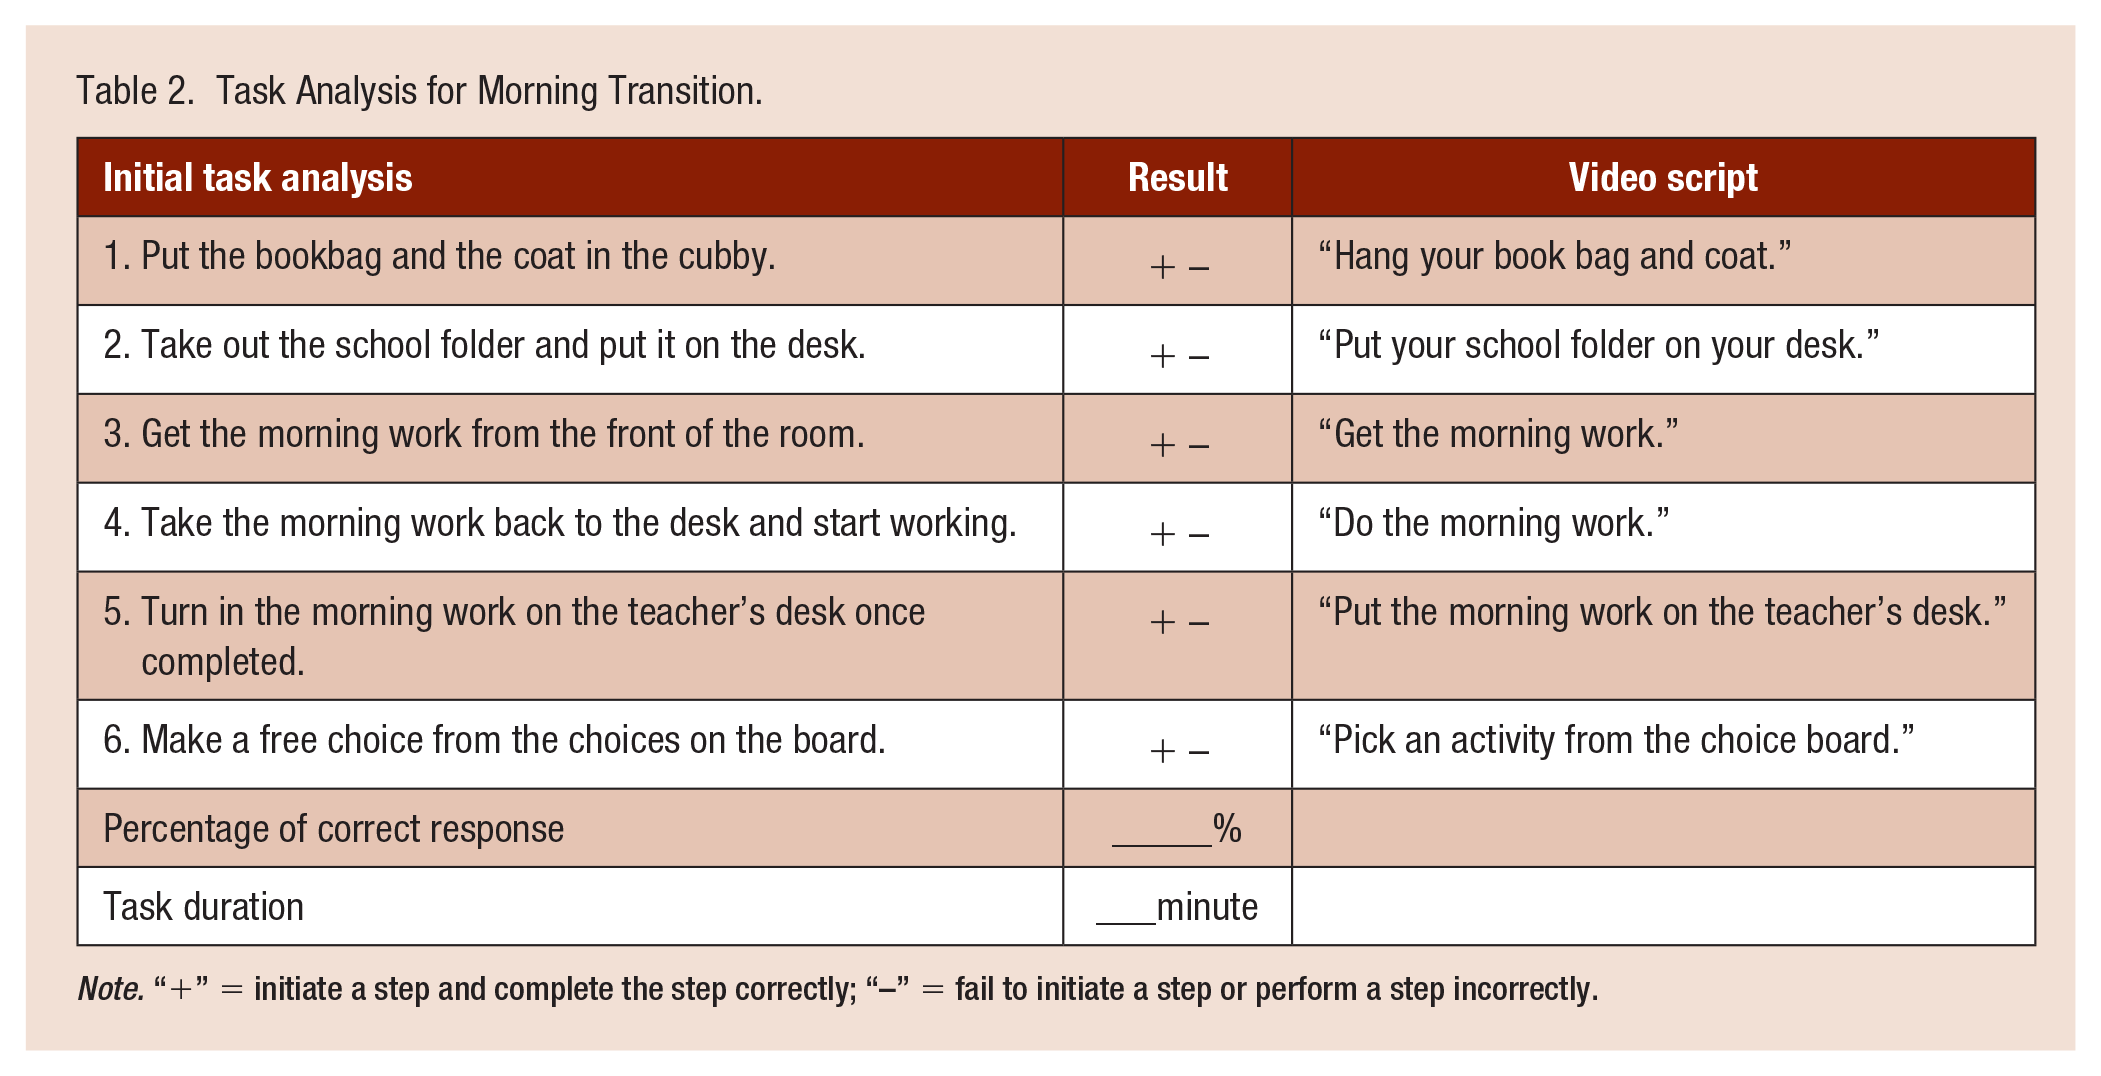
Note. “+” = initiate a step and complete the step correctly; “–” = fail to initiate a step or perform a step incorrectly.
A: Assess the Current Level of Performance
Once a skill has been identified, it is essential to assess the current level of skill performance in a natural setting. This means directing the student to complete the task without providing any prompts or support. During the evaluation, deliver a specific instructional direction without any other support or prompt. Meanwhile, collect data based on the initial task analysis sheet. After this assessment, consider revising the task analysis to match the individual’s learning needs. For example, for a brand-new task that students could not perform any step, the initial task analysis can be a good start. However, if students can perform some steps of the task, consider revising the task analysis and combining certain mastered steps to reduce over-prompting situations.
Before introducing the intervention, it is essential to evaluate Lucas’s current level of performance based on the task analysis. Ms. Erin explains to Mr. Cooper how to take the baseline data. During this session, if Lucas initiates a step within 5 s and completes the step correctly, Mr. Cooper marks “+”; if Lucas fails to initiate a step within 5 or performs a step incorrectly, then “–.” When there is an error, Mr. Cooper finishes that step for Lucas and asks Lucas to perform the next step. On one Monday, after greeting Lucas when he gets off the school bus, Mr. Cooper starts taking data on Lucas’s current performance on the morning transition. The result shows Lucas does not initiate any step within 5 seconds. Therefore, Mr. Cooper marks “–” for all steps.
P: Prepare the Video
Videos are created based on the final task analysis. Choose filming perspectives (i.e., first-person perspective, third-person perspective) and models (i.e., self, others) of videos based on task features and students’ level of skill performance. Videos with the first-person perspective present the task from the eye position of the modeler, allowing the learner to see the zoomed-in movement details. Videos with the third-person perspective present the task from an audience angle, allowing the learner to observe the entire scene (Rayner et al., 2009). There is no consistent conclusion on the superiority of one perspective over the other (Ayres & Langone, 2007; Fiorella et al., 2017; Spencer et al., 2015). However, Fiorella et al. (2017) found that videos with the first-person perspective generated significantly better results on an assembly task. Cannella-Malone et al. (2006) observed participants’ performance progress on sweeping and table-washing tasks with videos recorded from a third-person view. Therefore, consider using videos shot from a third-person perspective for a task that may involve whole-body movement; consider adopting videos with the first-person perspective for a task focusing more on fine motor skills. For the model used in videos, if a student is motivated by seeing himself/herself perform the task in videos and only needs to improve the fluency of the target skill, using self as a model may be a good option. However, if the target skill is a brand-new skill to a student, having a peer or another adult as a model may generate a better modeling effect. Common devices for recording videos are cameras, smartphones, and tablets. Videos can be edited in software such as iMovie or Movie Maker. All the edited video clips can be organized in Albums or Folders featured on devices (e.g., smartphones, tablets) or through applications such as PowerPoint and Keynote. The video player can be selected based on students’ vision needs, motor skills on click buttons, and device assess.
Next, Ms. Erin demonstrates how to prepare the video script and works with Mr. Cooper on making video clips based on the task analysis. Ms. Erin explains how to choose the video view and model. Given that Lucas can do the task with prompting, Mr. Cooper chooses to film Lucas as a self-model from a third-person perspective for videos. All video clips are arranged in the PowerPoint application on a classroom iPad.
To: Teach Device Operation
Device training goals should be individualized from multi-step manipulation (e.g., turn on the device, locate the app, play the video) to simply clicking the play or forward arrow buttons based on students’ fine motor and cognitive skill levels. Videos of a student’s mastered skill are recorded and installed into the player. Students are required to operate the device, watch videos and perform the task during the training. The training consists of two parts: errorless teaching with simultaneous prompting (i.e., pointing to the button before the student clicks it for each step) and probes with an error correction procedure (i.e., asking students to play the videos themselves and pointing to the button if students make an error). There are fewer chances for error occurrence in completing the task itself since it is a student’s mastered skill. However, if it does occur, offer a prompt that results in a correct response for correcting errors.
Mr. Cooper sets the device training goal that Lucas will initiate clicking the play or forward arrow button for every step independently for three consecutive sessions. Videos of a color sorting task mastered by Lucas are installed in the classroom iPad. During device training, Mr. Cooper points to a button for every step of video playing before Lucas clicks it. After prompting Lucas to play the videos and sorting the color for three rounds, Mr. Cooper asks Lucas to click the button himself. When there is an error for clicking the right button, Mr. Cooper points to the button again. Lucas completes the training within 2 days. Lucas sorts the color all correctly.
S: Select Ancillary Strategies
Strategies like prompting (e.g., most to least prompting, a system of least prompts), reinforcement (e.g., verbal praise, toy, iPad time), or error correction procedure (e.g., embedded with video feedback, prompting) are commonly seen in the self-directed video prompting intervention package (Sun & Brock, 2022). While there is no research evidence that concludes a certain order to apply these strategies, choices can be made based on the following factors. First, is this a new skill or a familiar skill with less fluency? If it is a new skill, consider incorporating most to least prompting (i.e., from most intensive support to less intensive support); if practicing for fluency (i.e., students may partially or fully perform the task with extra prompts), using a system of least prompts (i.e., from less intensive support to most intensive support) may better support students’ independent learning. Second, is the use of reinforcer important to this student? If so, how often should the reinforcer (e.g., for every correct response or by the end of the task) be offered? Third, is the error correction procedure necessary and beneficial to students? Some students have less flexibility toward an error correction procedure (e.g., having tantrums when they are told they are wrong), while others would have a quicker learning pace with this procedure.
Regarding ancillary strategies, Ms. Erin chooses video feedback (i.e., when there is an error, Lucas can watch the video again) during the error correction procedure. In this way, Lucas can still have one more chance to do the step with minimal adult support.
K: Know the Implementation Steps
Write an implementation checklist when teaching materials and an intervention package have been arranged. This form will list all the steps an instructor and a student should follow, such as the transcript of the instructional direction, and the steps that either the instructor or the student are expected to perform.
Once Ms. Erin finalizes the intervention package, she explains and models the implementation to Mr. Cooper (see Table 3 for the implementation checklist). When Lucas completes a step correctly, Mr. Cooper does not intervene. If Lucas makes an error on a step for the first time, Mr. Cooper points to the play button and asks Lucas to watch the video again and complete the step. If Lucas still makes an error after watching the video for the second time, Mr. Cooper finishes the step for him. When there is an error in the device operation procedure, Mr. Cooper points to the correct button. After observing the implementation, Mr. Cooper reviews the implementation checklist and role-plays with Ms. Erin on the procedure.
Implementation Checklist for Morning Transition.
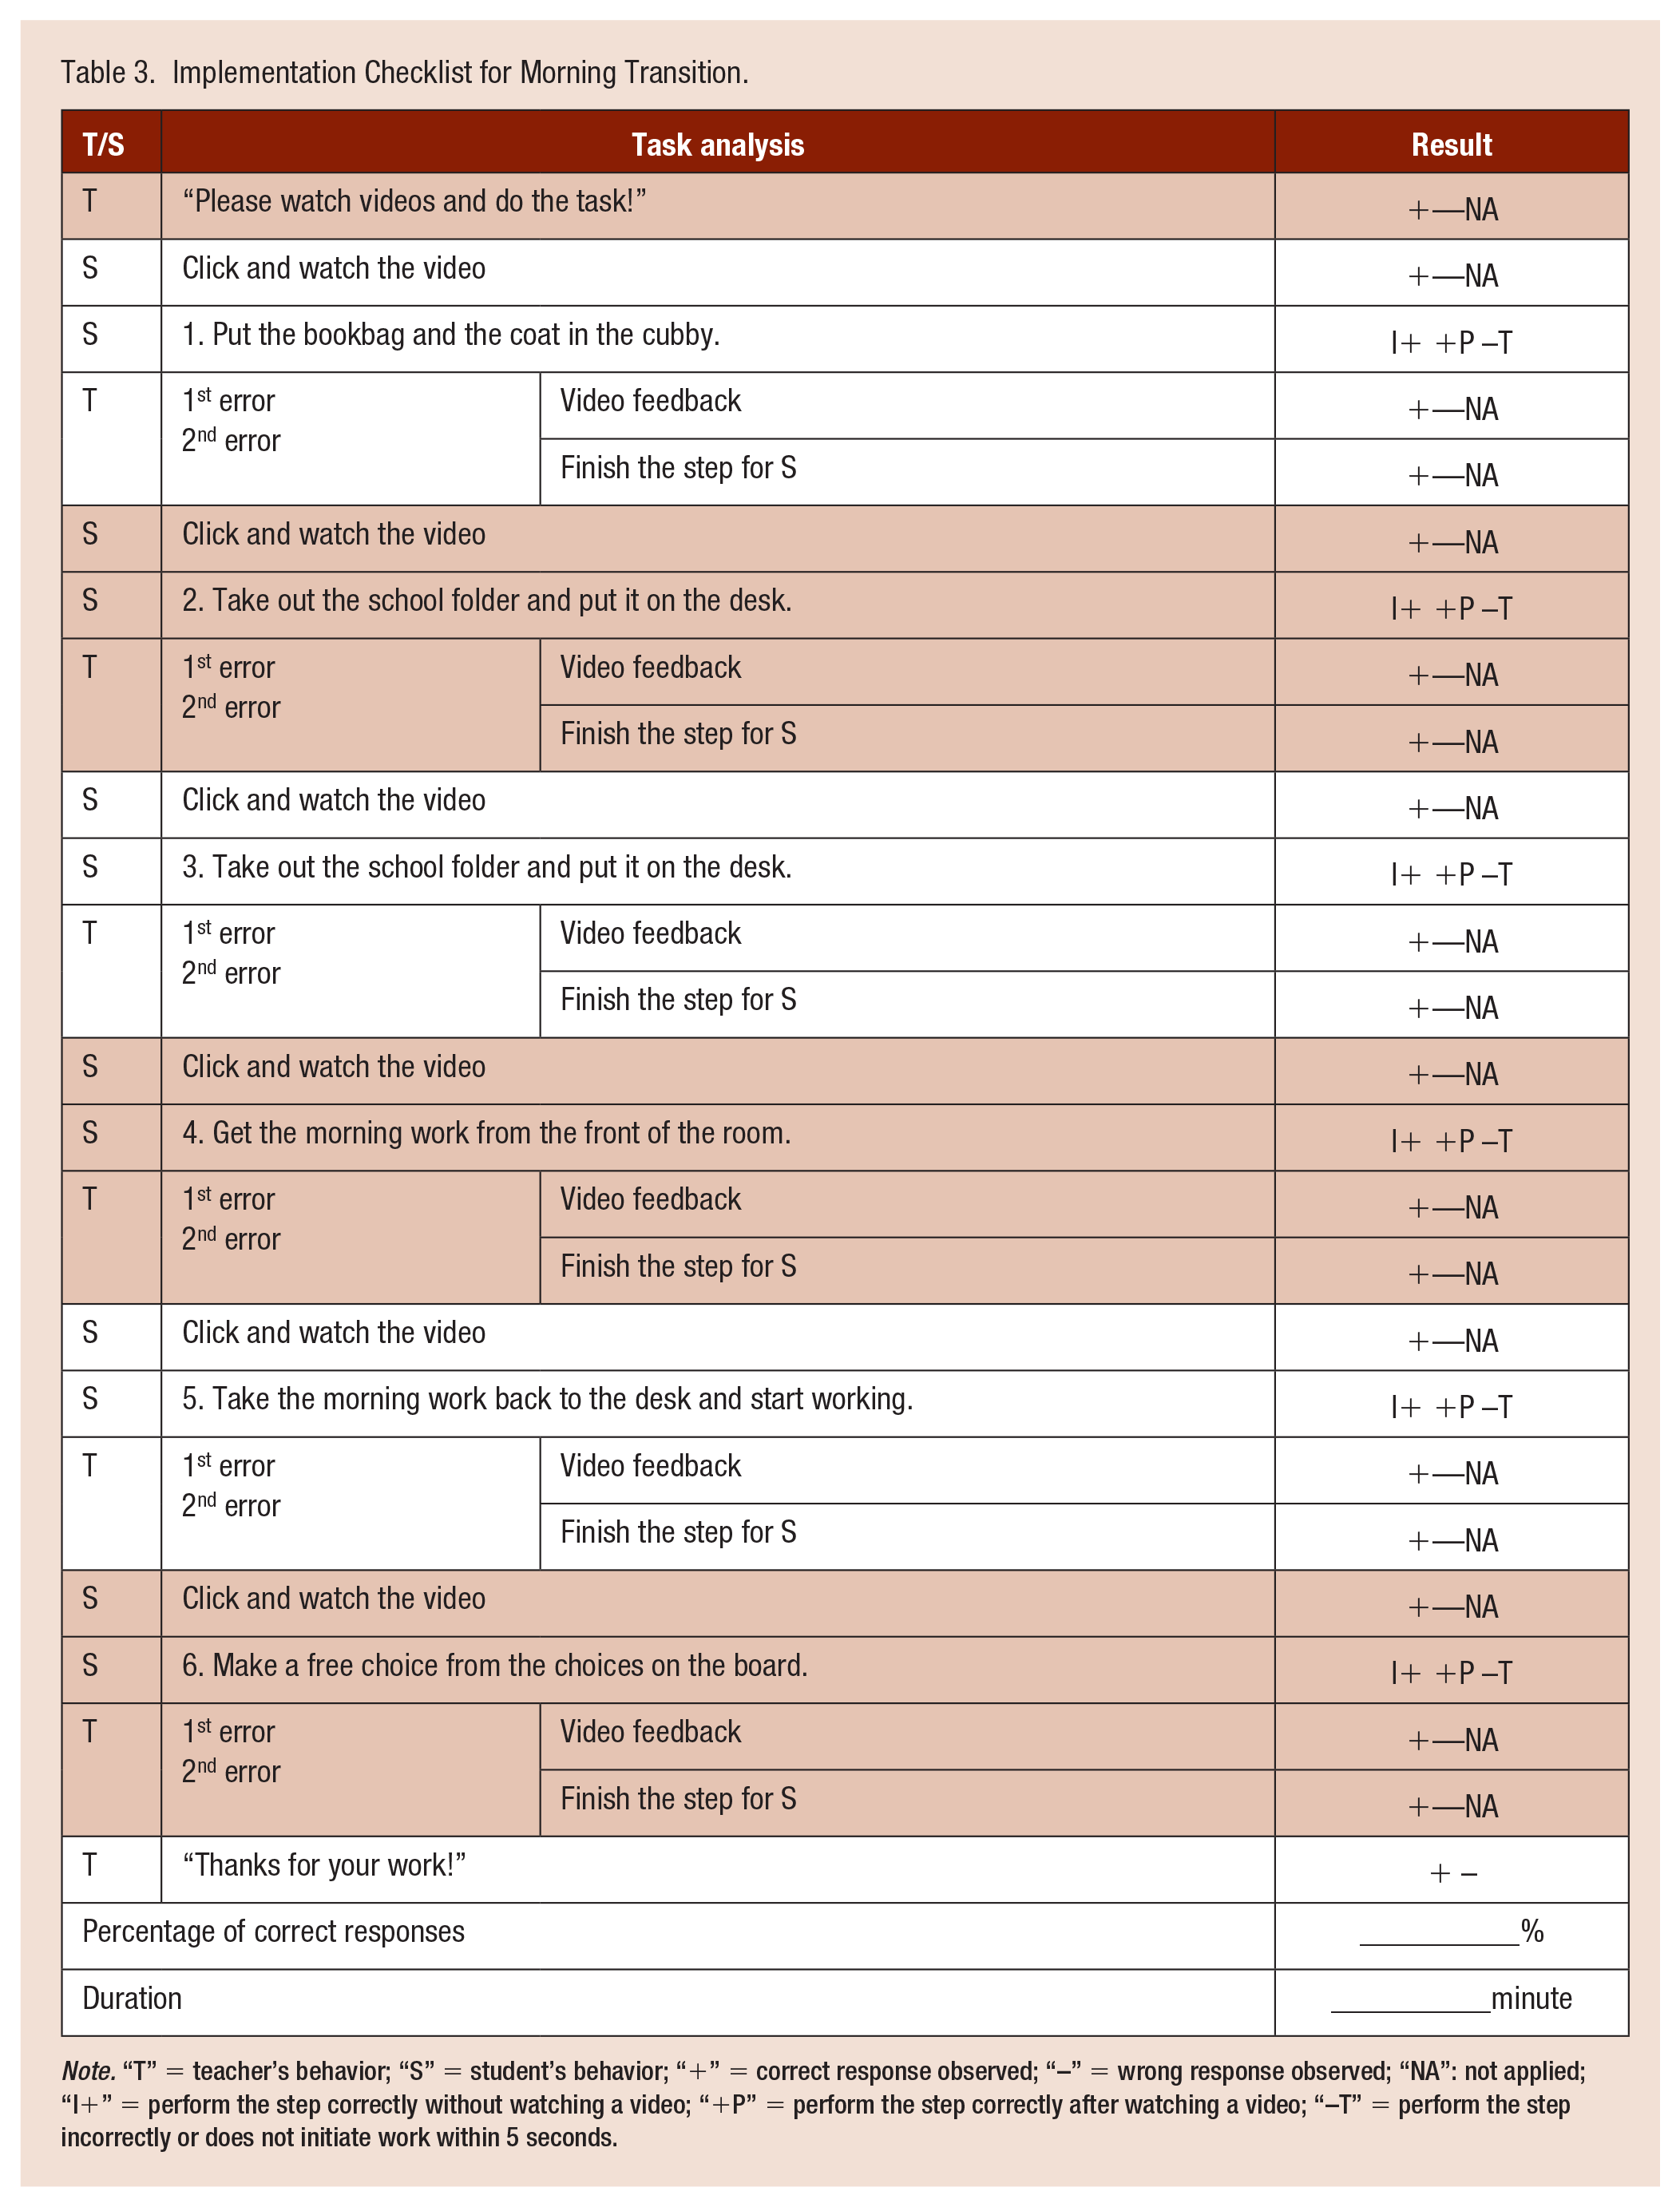
Note. “T” = teacher’s behavior; “S” = student’s behavior; “+” = correct response observed; “–” = wrong response observed; “NA”: not applied; “I+” = perform the step correctly without watching a video; “+P” = perform the step correctly after watching a video; “–T” = perform the step incorrectly or does not initiate work within 5 seconds.
I: Implement the Intervention and Track the Progress
Next, set a mastery criterion and implement the intervention as described in the implementation checklist. At the same time, consistently collect data on students’ performance. There are different ways of collecting data. For example, for a multi-step task (e.g., sorting and stocking books), record the percentage of correct steps. For a one-step skill (e.g., requesting help), count the total number of this skill’s occurrences within a certain period. Tracking students’ progress will help instructors adjust the intervention when students don’t make any improvement or advance to the next step when students meet the mastery criterion.
Next, Mr. Cooper introduces the intervention to Lucas during morning arrival time. Given that Lucas has deficits in initiating steps rather than not knowing how to perform the steps, Ms. Erin and Mr. Cooper decide to set the high mastery criterion that Lucas will operate the device and complete the task with 100% accuracy for three consecutive days. Lucas is excited about watching videos. For the first 3 days, though he makes errors in device operation, he performs the task perfectly after watching the videos. Mr. Cooper marks “I+” when Lucas performs the task correctly without watching a video; “+P” for a correct response after watching a video; “–T” for a wrong step or does not initiate work within 5 s. Starting from the fourth day, Lucas operates the device and performs the task with 100% accuracy. Six days later, Lucas masters the skill, and the transition time is greatly reduced.
LL: Lead to Independence
When students meet the mastery criterion with the intervention, they should be encouraged to practice the skills independently without prompts and move to the generalization phase. For students who heavily rely on video prompts, keep the video segments available to them when needed, and start the generalization procedure. There are two directions to program generalization procedures: generalizing the acquired skill across responses, settings, and experimenters; generalizing the learning method (i.e., self-directed video prompting) to another new skill learning.
Mr. Cooper is thrilled to share Lucas’s progress with Ms. Erin. To further promote Lucas’s independence, they decide to remove video prompts and observe Lucas’s performance the next day. Lucas initiates most of the steps on his own except the step of turning in the work. With a verbal reminder, Lucas completes the rest of the steps. After practicing for several days, Lucas could finish all the morning transition activities without video prompts. Later, Mr. Cooper uses this intervention for more skills training (e.g., packing up the school bag during the dismissal routine). At the same time, Mr. Cooper encourages Lucas’s parents to use this intervention at home for other routines and shares the implementation checklist with them. His mother agrees to try this intervention at home for his morning schedule and constantly updates Mr. Cooper and Ms. Erin on the progress. After using the video prompts at home for three weeks, his mother is excited to share that Lucas spends much less time in the morning care routine, and she is so grateful for Mr. Cooper’s suggestion.
Application of Self-Directed Video Prompting for Other Students and Skills
Lucas’s story illustrates how self-directed video prompting might be used to promote independence for elementary students in their morning routines. This is just one example of how this approach can be applied. Self-directed video prompting has been used to target a range of outcomes for students across the age span. For example, it can be used to improve context comprehension among elementary school students (Sartain et al., 2020); support daily living skill acquisition among secondary students (Payne et al., 2012); or for delivering vocational skill training both in school settings as well as the competitive integrated employment environments (Yakubov et al., 2019). The vignette below illustrates how this approach might be used to promote pre-vocational skills for a high school student.
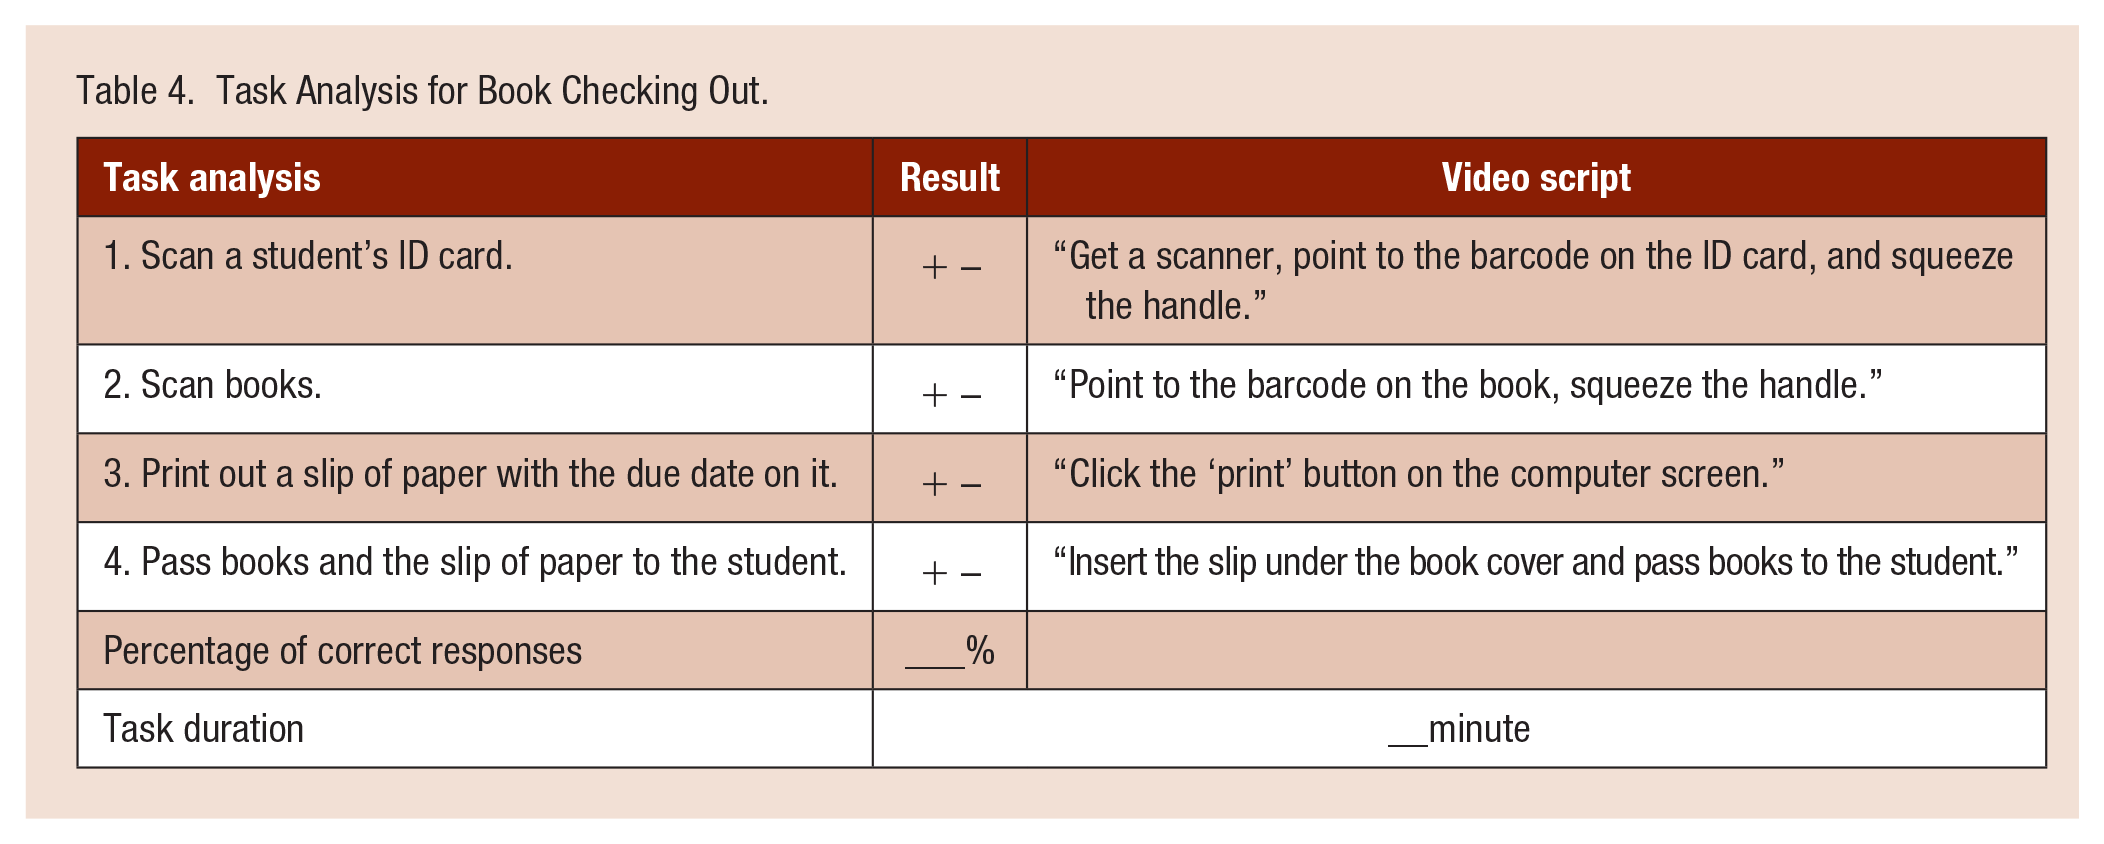
Sarah is a ninth-grade student who enjoys reading, pop music, and interacting with her peers. She receives special education services under the category of autism spectrum disorder. She can initiate greetings and express her needs in short phrases. To prepare her for future employment and create opportunities to practice social skills, her educational team agreed that she could learn to work at the circulation desk at the school library. They start by focusing on teaching Sara to check out books using an optical scanner and computer.
One of the challenges that her team anticipates is Sarah’s dependency on her one-to-one paraeducator, Ms. Johnson. Ms. Johnson has worked with Sara over the past 8 years. When Ms. Johnson is absent, Sarah refuses to follow other teachers’ directions. Realizing this over-dependency may hinder Sarah’s skill acquisition and generalization in other settings, Sarah’s teacher, Ms. Kim, decides to introduce self-directed video prompting to teach Sarah how to check out a book.
Ms. Kim and Ms. Johnson work together on writing task analysis (see Table 4), evaluating Sarah’s current skill level, making videos with an iPad, and editing them in the iMovie. Then the edited video clips are installed in Sarah’s iPhone and organized in an Album within the Photos application. Given the target skill requires more fine motor skills (e.g., scanning, squeezing, clicking) and it’s a brand-new skill, Ms. Kim and Ms. Johnson use a first-person view and a peer as a model to create videos for all four steps. In addition, a full physical prompt (i.e., hand over hand) will be embedded into the error correction procedure to help Sarah complete the step again (see Table 5 for the implementation checklist). A box folding task that Sarah mastered before is selected for the device training. After the device training, Sarah starts to use the self-directed video prompting to check out books at the school library. At the very beginning, Sarah is a little bit confused about the intervention and the task expectation. However, with one week’s practice, Sarah could complete the task on her own. Five weeks later, Sarah not only does the task fluently without watching videos but also starts interacting with peers when checking out books. For the next semester, Ms. Kim has arranged an internship for Sarah and she is going to work at the local public library.
Task Analysis for Book Checking Out.
Implementation Checklist for Checking out Books.

Note. “T” = teacher’s behavior; “S” = student’s behavior; “+” = correct response observed; “–” = wrong response observed; “NA” = not applied; “I+” = perform the step correctly without watching a video; “+P” = perform the step correctly after watching a video; “–T” = perform the step incorrectly or does not initiate work.
Concluding Thoughts
As a variation of video-based instruction, self-directed video prompting is a promising learning tool to reduce prompt dependency and improve the independent learning of students with severe disabilities in inclusive school settings. However, due to some barriers (e.g., lack of intervention implementation training, limited access to technology, and time-consuming video preparation, Wynkoop et al., 2020), the potential of video-based instruction has not been fully realized in schools. The TAP To SKILL framework is designed to address some of these concerns and aims to serve as a comprehensive guide to support the implementation of self-directed video prompting as well as other formats of VBI. For educational settings with limited access to video-based technology, teachers could consider using other voice output devices (e.g., voice recording buttons) or visual prompts (e.g., picture schedules) to support students’ independent learning. Like with any new teaching strategy, using self-directed video prompting for the first time can be challenging. But with practice, we think teachers will find that this strategy is well worth the effort. Self-directed video prompting is an effective way to teach students new skills while also supporting them to take ownership of their learning.
Footnotes
Declaration of Conflicting Interests
The author(s) declared no potential conflicts of interest with respect to the research, authorship, and/or publication of this article.
Funding
The author(s) received no financial support for the research, authorship, and/or publication of this article.
Author Biographies
Xiaoning Sun pursued her PhD in Educational Studies at the Ohio State University. She is currently transitioning to a faculty position at Missouri State University.
Matthew E. Brock is an associate professor of special education at the Ohio State University, a faculty fellow at the Crane Center for Early Childhood Research and Policy, and a faculty affiliate at the Nisonger Center.