






Abstract
Cylinder-Infinite-Connect-Four is Connect-Four played on a cylindrical square grid board with infinite row heights and columns that cycle about its width. In previous work, the first player’s cannot-lose strategies were discovered for all circumferences, and the second player’s cannot-lose strategies were discovered for all circumferences except for 6 and 11. In this paper, we show the second player’s cannot-lose strategy for circumference 11.
Introduction
We begin by introducing the two-player game of Cylinder-Infinite-Connect-Four. We call the first and second players Black and White, respectively. Cylinder-Infinite-Connect-Four is played on a square grid board that wraps about a semi-infinite cylinder (Fig. 1).
Let n be a natural number. Rows extend infinitely upward from the ground with indices that go upward from 1. Columns of a circumference n board cycle with indices that cycle rightward from 1 to n and back to 1. Players alternate by dropping disks of their colors to the lowest unoccupied grid cell of each drop column. Thus, a game position, i.e., a configuration of disks, is unambiguously determined and described as a sequence of column numbers. For clarity, we additionally prefix each column number with the first letter of the player color, so “Bn” or “Wn” means that Black or White, respectively, places a disk in column n.
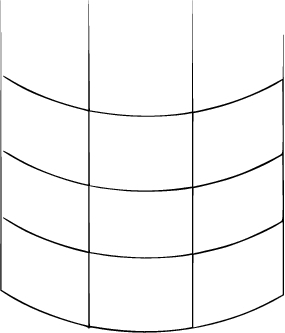
Board of Cylinder-Infinite-Connect-Four.
The object of the game is to be the first player to place four or more of one’s own disks in an adjacent line horizontally, vertically, or diagonally. I call such four-in-a-row Connect4. Because of the cylindrical nature of the board, Connect4 is further constrained to four different disks. Thus, horizontal Connect4 is not allowed for circumferences of less than 4. If, for a given state and given player strategies, it goes to prove that neither Black nor White can achieve Connect4, the value of the game is a draw.
When a player places a disk, the background of the cell is colored grey. We duplicate columns 1 through 3 to the right on wider boards drawing a bold line between columns n and 1 to allow wraparound Connect4 possibilities to be easily inspected. Figure 2 shows an example terminal game position after B1W1B3W3B2W4B6. A threat is defined as a single grid cell that would complete Connect4 (Allis, 1988; Allen, 2010). After B1W1B3W3B2, Black has a double threat on the bottom row. Although W4 removes one threat, Black can play the other threat, B6, and complete Connect4.
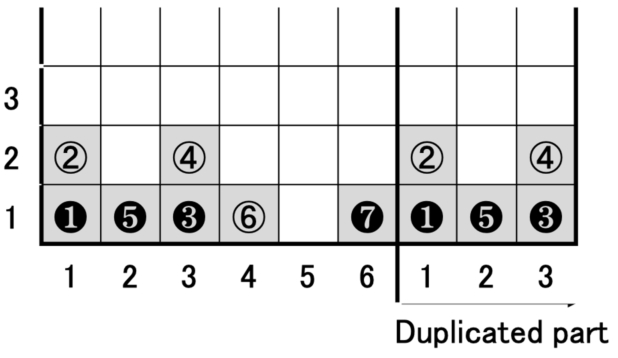
Example position.
In previous work, the first player’s cannot-lose strategies were discovered for all circumferences, and the second player’s cannot-lose strategies were discovered for all circumferences but 6 and 11 (Yamaguchi and Todd, 2015; Yamaguchi et al., 2014). In this paper, we show the second player’s cannot-lose strategy for circumference 11.
Second player’s cannot-lose strategy for Cylinder-Infinite-Connect-Four with circumference 11
First, we define follow-up, a tile, and a free-cell. Follow-up play is to play in the same column where the opponent just played. Figure 3 shows White’s follow-up play. A tile is a pair of cells used to block the cells to be occupied by opponents’ disks. A tile is denoted ‘A’, ‘B’, or ‘C’ as shown in Fig. 4. A Cell denoted ‘F’ is a free-cell that can be occupied by opponents’ disks as shown in Fig. 5.
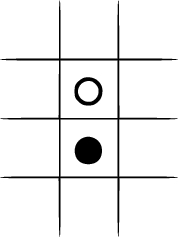
White’s follow-up play.
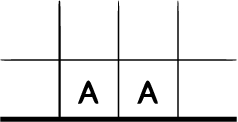
Tile.
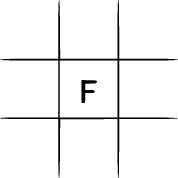
Free-cell.
We show White’s cannot-lose strategy for circumference 11. It can be assumed that Black plays in column 1 at first without loss of generality. Then, White plays in column 2 in response. After that, as long as Black does not play in row 2 of columns 1, 3, 7, 9, and 10, White plays as shown in Fig. 6. White plays only follow-up above the highest bold line in all board figures except for columns 1, 3, 7, 9, and 10 in Fig. 6.
If Black places a disk in one of two cells of a tile, White places a disk in the other cell. There is no Connect4 for Black in Fig. 6. We divide Black’s play in row 2 of columns 1, 3, 7, 9, or 10 from Fig. 6 into two cases. The first case is columns 1, 3, or 10 and the second is columns 3, 7, or 9. Column 3 belongs to both cases. White plays against both cases as follows.
Case that Black plays in row 2 of columns 3, 7, or 9 from Fig. 6: White plays in row 2 of column 1 and plays as shown in Fig. 7. Case that Black plays in row 2 of columns 1, 3, or 10 from Fig. 6: If both ‘B’ cell are occupied, White plays in row 2 of column 7. If both ‘B’ cells are unoccupied, White plays in row 1 of column 6 and plays only follow-up in column 7. Afterward, White plays as shown in Fig. 8.
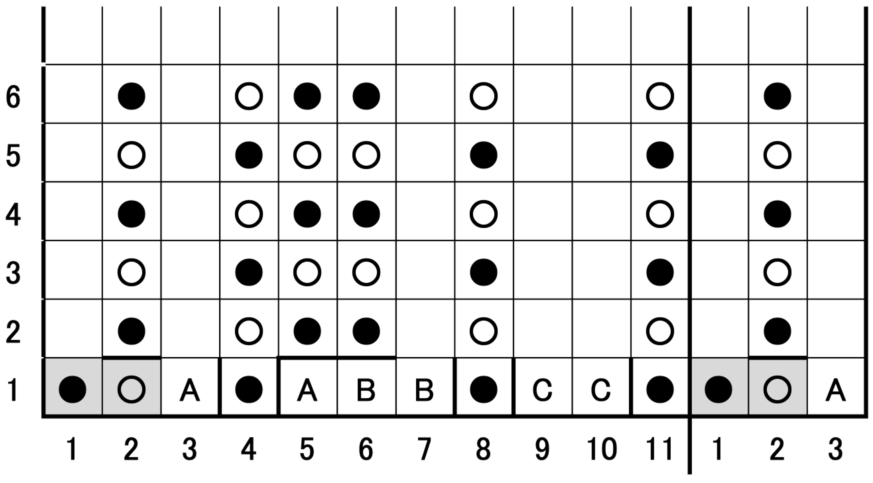
White’s cannot-lose strategy for circumference 11 as long as Black does not play in row 2 of columns 1, 3, 7, 9, and 10.
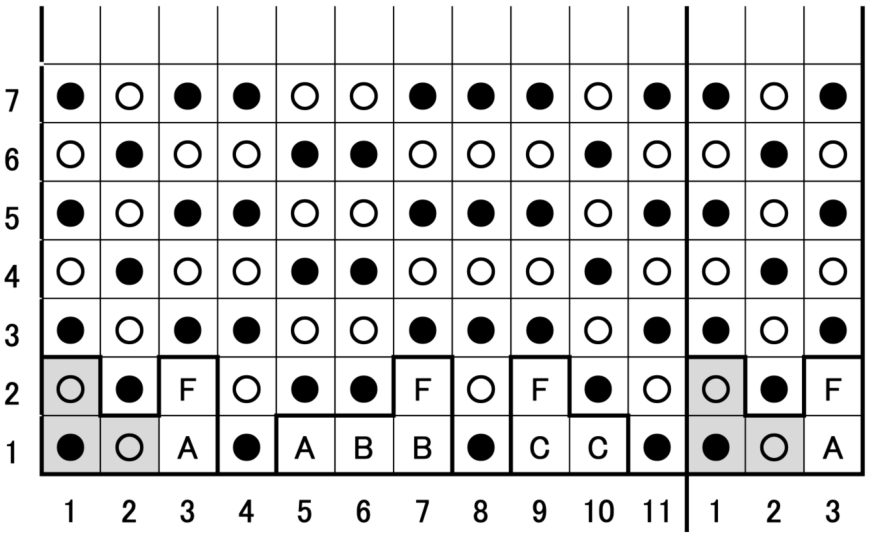
White’s cannot-lose strategy for circumference 11 after Black plays in row 2 of columns 3, 7, or 9 from Fig. 6.
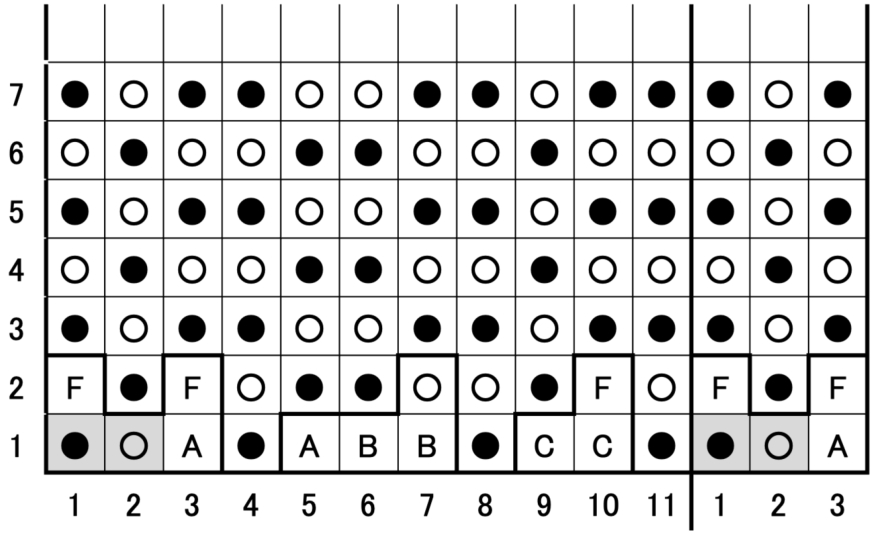
White’s cannot-lose strategy for circumference 11 after Black plays in row 2 of columns 1, 3, or 10 from Fig. 6.
If Black places a disk in a free-cell, White places a disk in any cell in tiles or free-cells. Also, if Black places a disk in one of two cells of a tile and White cannot place a disk in the other cell because White’s disk has been already placed, White places a disk in any cell in tiles or free-cells. There is no Connect4 for Black in Figs. 7 and 8. Therefore, White can prevent Black from achieving Connect4.
Thus, we show White’s cannot-lose strategy for circumference 11 in this paper. Only White’s cannot-lose strategy for circumference 6 remains to be solved.