
Abstract
Gilding has been used to decorate, one may say sublimate, the surface appearance of artworks since the beginning of gold use in art. Gold foils and leaves were used first, thanks to the high ductility of that metal, and the progress of gilding art through centuries has been linked to: (1) the evolution of the thickness of the gold film used for the process; (2) the continuous research for efficient adhesive materials adapted to the various substrates; and (3) the development of techniques of direct adhesion of the gold coating, especially on metals. This paper, based on recent laboratory results obtained through laboratory studies of various museum artworks, discusses these three aspects. First, it shall develop a mechanical modelling of gold leaf beating. Second, it shall detail the properties of the main classes of adhesive materials used for leaf gilding on various materials. Finally, the importance of the diffusion phenomena at the interface between a metal substrate and a gold coating shall be discussed, especially in the case of gilding involving a high temperature treatment.
Keywords
Introduction
Gold foil and leaf have been used by most human civilisations since very early times to decorate all kinds of artwork materials: metal, stone, ceramic, wood, cartonnage of the Egyptian sarcophagi and glass.1 Most of the progresses performed throughout centuries by the artisans are linked to two parameters: one is the evolution of the thickness of the gold film used for the process, starting from simple hammered foils with a thickness of several micrometres and progressively improved until obtaining very thin leaves of some tenth of micrometre.1 – 4 The second one is the continuous research on good adhesive material suitable for the various substrates to be gilded, as it is known that, thanks to its high natural surface energy, gold is one of the most difficult materials to apply on low surface energy substrates, such as organic materials (wood, parchment, etc.) or oxides (calcite, gypsum, etc.) known to be employed in antiquity.1, 5 Another way to insure a long time conservation of a gilding film without using an adhesive ‘third material’, especially on metals, is to use thermal treatment, mercury amalgamation or a combination of both to obtain a structural interface between the substrate and the gold film.1, 2
This paper will develop and illustrate the three aspects by means of recently studied ancient museum artworks by:
the description of a recently developed mechanical model of the rolling and beating operations involved in the fabrication of gold leaves
an outline of the main classes of adhesives used for leaf gilding on various materials
a discussion on the diffusion process involved in the formation of the gold/substrate interface in thermal gilding on metals without the use of an adhesive.
It will not address the questions of other adhesive-less gilding processes as gold depletion, electrochemical or physical vacuum deposition, etc. Powder gilding and gilding imitations will neither be considered.1
Gold beating: Very antique and very clever mechanical process
It is now known that gold leaves with a thickness less than 1 μm were already elaborated by ancient Egyptian craftsmen.1, 6, 7 Figure 1, a design found in a 2500 BC Egyptian tomb, shows that hammering, and perhaps beating, of gold was already practiced by Egyptian craftsmen to obtain very thin gold leaves.6

Illustration from ancient Egyptian tomb at Saqqara (2500 BC) showing gold melting and beating6
This implies a complicated process described and analysed here by considering the steps followed in a modern gold beater workshop.1, 8
Minimal thickness obtained by rolling
Let us consider the gold leaves elaboration process presently practiced by modern artisans. After melting a gold or gold alloy ingot, the craftsman rolls it to a thin sheet in a rolling mill. Owing to friction on the rolls and roll elasticity properties, a minimal thickness cannot be exceeded in that rolling operation: below some thickness hf, the foil passes through the roll gap without plastic strain by elastically flattening the rolls. Figure 2 shows the simplified set up used to calculate that limit thickness. The two rolls of radius Rc, elastic modulus Ec and a Poisson ratio υc are replaced by a single roll of radius R* = Rc/2 and elastic modulus
 on a rigid plane. The foil has the flow stress σ0, while p is the pressure induced by the combination of friction and strain in the rolling process.
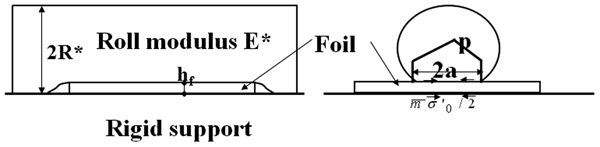
Minimal thickness in rolling (curvatures and elasticity reported to top roll)9 (exponent)
A complete calculation9 gives the minimum thickness

 is the Tresca friction coefficient at the gold/roll interface.
By considering reasonable values for σ0, E*, R* and a Tresca friction coefficient of 0·05 (Fig. 3), it is impossible to obtain by rolling a foil of less than 10 to 20 μm thickness. The limit of thickness increases strongly with friction. It is thus important to use mirror polished well lubricated rolls in order to minimise the minimal thickness.
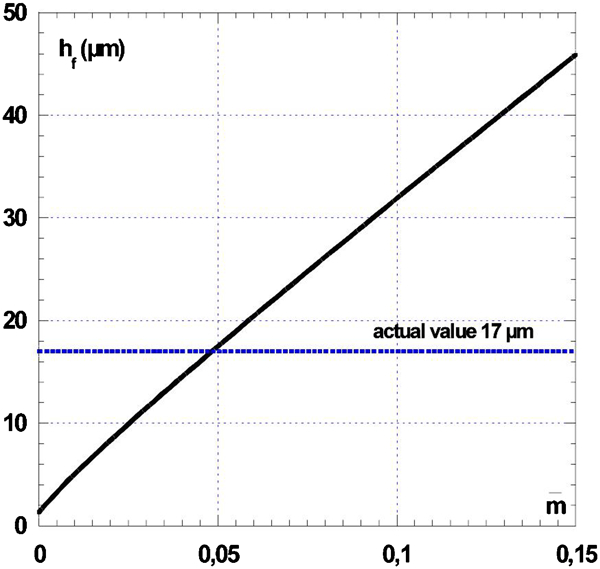
Evolution with friction coefficient of minimal thickness hf in rolling gold foils (σ0 = 0·2 GPa) with steel rolls (E* = 115 GPa, R* = 100 mm)9
The limitation of the minimum thickness is also evident in the hammering of single foils as practiced by the ancient artisans.
Trying to roll or hammer two or several foils stacked together would be inefficient because, due to the absence of oxide layer, the gold foils would adhere on each other. This is why the manufacturers had to invent another method. The very clever method found is beating of composite stacks, which will now be analysed.
Mechanical analysis of beating
Beating is performed on stacks of a large number of gold foils alternated with foils of polymer, basically to avoid the gold foils to stick to each other when trying to thin them piled together.
Originally performed by hand hammering, it is presently practiced mechanically in two steps: separated by cutting the enlarged gold foil squares to smaller ones and reassembling the stack.
In the mechanical analysis of a beater blow on a composite stack containing plastic gold leaves alternated with much thicker polymer foil inserts, the basic facts to consider are:
each blow induces only a small plastic strain increment to the gold foils and deforms the polymer inserts only elastically
the elastic energy stored in the inserts ensures their recovery between two blows without damaging the gold leaves.
Let us consider the case of the second beating series with a so called mould, the name of the stack containing more than thousand gold leaves and polymer inserts. The inserts used are in mylar, a polyethylene terephthalate (in antiquity, it could be parchment or rubber skin). Beating of the shoder, the stack used for the first beating step, follows probably similar mechanical rules. Figure 4 shows a shoder prepared by the craftsman.
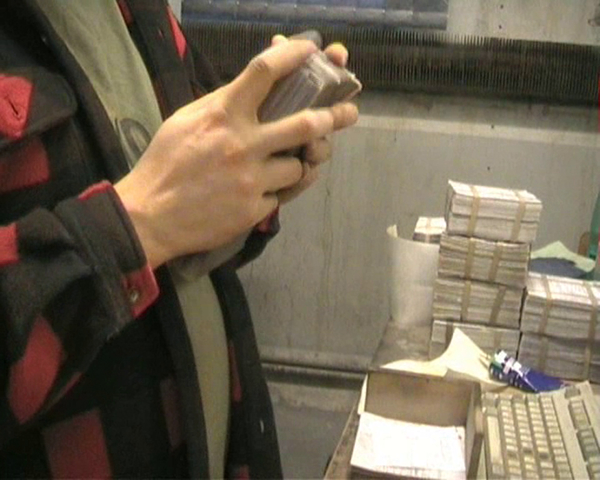
Preparing shoder for beating (Photo Claire Pacheco)
The full calculation has been published elsewhere;9 here, we summarise the main principles and conclusions. Figure 5 shows a simplified sketch of the area under the hammer of a polymer foil inserted between two gold leaves. The penetration of the hammer produces an elastic thinning of the polymer foils, which are stretched at the impact boundary. Thanks to gold/polymer friction, this induces bitensile strains on gold, consequently thinning the gold leaves. After release of the hammer, the elastic energy stored in the polymer foils promotes their separation from gold by peeling. The surface of interlayers is specially coated in order to favour at that step the separation from the gold leaves without damaging them. The exact nature of that coating is one of the best kept artisanal secrets.
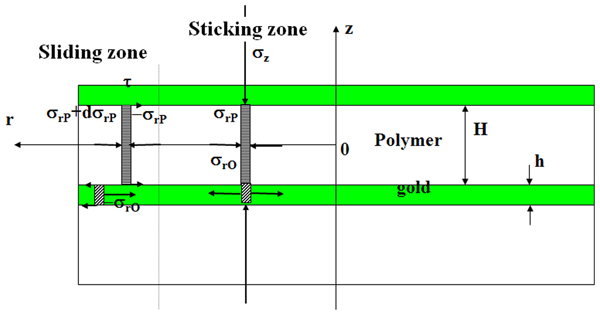
Stress state in two foils of mould during beating9
The system is ready for the next blow.
Obviously, the successive blows are in practice imparted on the surface of the mould so as to obtain an evenly distributed deformation. The mould is periodically turned over to compensate the fact that the hammer is not as flat as the anvil and straining is not uniform from the bottom to the top of the mould.
As the Young's modulus of gold EAu is much larger than that of the polymer Ep and the gold thickness h is much smaller than the polymer thickness H, the deformation of the polymer is exclusively elastic and gold can be considered as rigid. A numerical application (Fig. 6) uses the following reasonable estimations:
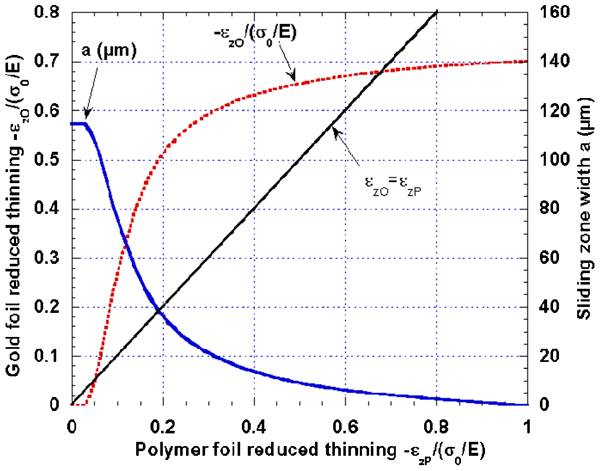
Evolution with reduced polymer thinning of width a of sliding zone and reduced thinning of gold foil in centre zone (E is polymer Young's modulus)9
polymer: Young's modulus Ep = 4 GPa; Poisson's ratio υ = 0·35; thickness of one foil H = 17 μm
gold: flow stress σ0 = 0·2 GPa; thickness h = 1 μm
friction coefficient: μ = 0·05.
Initially, the gold strain ϵz0 increases sharply, much more quickly than the polymer contraction ϵzP. The thinning of the gold leaves is therefore almost complete after the first quarter of the blow. During almost the whole process, the gold foil is strained under an in-plane isotropic tensile stress. As the metallic leaves stress state is mainly in-plane bitensile, this process can be applied only to very tough alloys. This stress state explains why the gold leaves always contain pinholes, which do not degrade the aesthetic aspect but confirm that the ductility limit is locally reached.
The reduced strain for a thickness change of 1·2–0·2 μm is ln (6) ∼1·79. The maximum thickness strain for one blow is 3·5%, and the minimum number of blows necessary for performing it is 1·79/0·035–51. One deduces from the previous values that about 3200 blows are necessary for extending a gold foil to a square surface with 120 mm side. This is in rather good agreement with industrial practice.
The elastic energy (in joules) for a blow on an area of 15×15 mm is

After each blow, the inserts must recover their initial size. For that, the available energy release rate (m−2) at the end of the blow is

This model, developed for the first time, is a good demonstration of the ability of ancient artisans to overcome technical difficulties for their artistic purpose through sophisticated hand processing.
Figure 7 shows some examples of gilded bronze objects recently studied in the C2RMF laboratory, with indication of the leaf thickness. The best way to measure accurately the thickness of the gold leaf on an archaeological or artistic artefact is to use Rutherford backscattering spectrometry on an ion particle accelerator.1 The measurements of two of the shown artefacts (Fig. 7a and b) were performed under a 3 MeV proton beam provided by the particle accelerator AGLAE.1 The thickness of the gilding of the Lillebonne Apollo (Fig. 7c) was evaluated by X-ray fluorescence.1
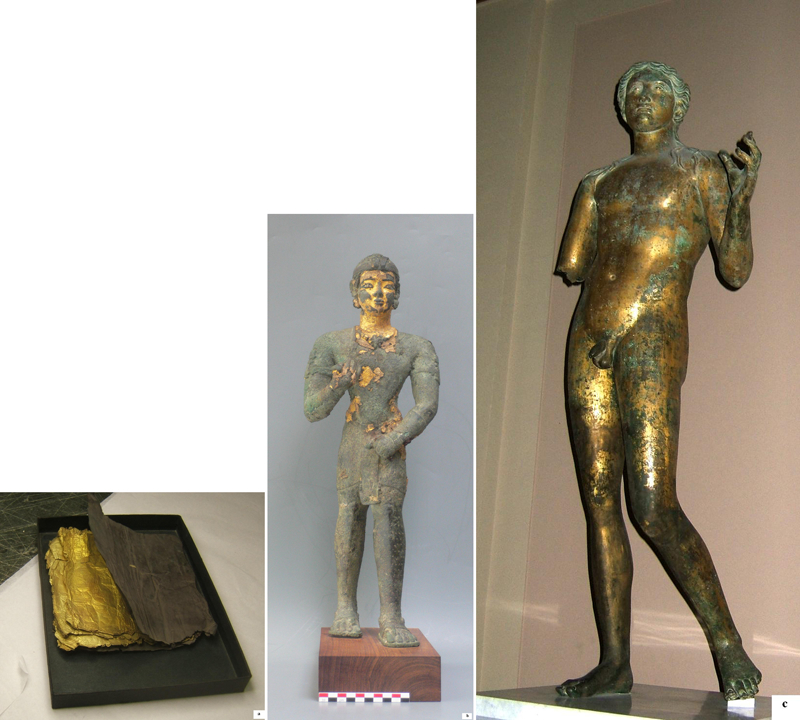
Some examples of antique gold foils and leaf gilded bronzes (see text for details)1: a foils, ∼10×15 cm2; b body, h = 50 cm; c body, h = 192 cm
Figure 7a is a set of eight gold foils (∼10×15 cm2), unfortunately not dated and kept in the Department of Egyptian Antiquities of the Louvre museum.1 The foil thicknesses are very variable, from 4 to >15 μm. Although firstly considered to be a gilder booklet, that object is more probably some kind of saving stock of a metal artisan.
Figure 7b is the bronze statue of King Archer from the empire of Meroe (third century BC to fourth century AD, in today's Sudan) kept in the Khartoum museum and recently exhibited in the Louvre.1, 10 It is entirely leaf gilded over a white preparation called stucco by the previous authors;10 a more appropriate term would be gesso. The thickness of the gold leaf (7 μm) could be measured recently by the authors on a fragment temporally separated from the statue.1
Figure 7c is the statue of Lillebonne Apollo (1·92 m high), a famous gilded bronze statue larger than life size kept in the Department of Greek, Etruscan and Roman Antiquities of the Louvre museum; it is dated to the first to second century AD. The gold leaf is applied directly on the bronze with an unknown adhesive, and the single pieces are visible as a geometrical pattern. Its thickness is estimated to be ∼1·5 μm.1
Interface in leaf gilding: Preparation and adhesion
The adhesion of a gold film on the surface of materials with low surface energy (e.g. wood, parchment, oxides, etc.) is physically a problem. Then, foil and leaf gilding will generally imply the use of a third element to ensure a safe adhesion. This is especially the case for polymers, as wood or cartonnage.
It is known that the first systematic leaf gilding process was applied by the Egyptians on wood and cartonnage.7, 11 Egyptian gilders used systematically an intermediate layer between the substrate and the gold leaf. Table 1 gives an example of study of leaf gilding on wooden Egyptian artefacts described in literature.11 The word gesso in Table 1 refers to the intermediate layer (see below).
Description of gilding on wooden Egyptian artefacts*11
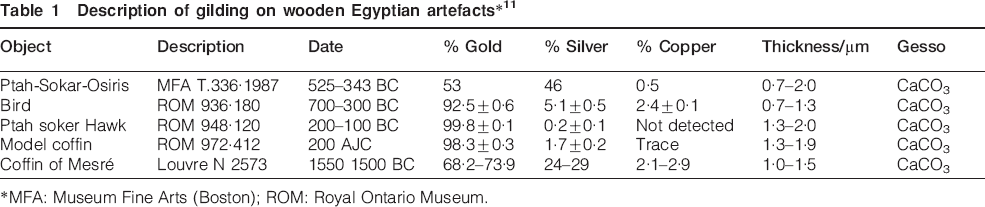
MFA: Museum Fine Arts (Boston); ROM: Royal Ontario Museum.
In Egypt, gilding with an intermediate layer was also practiced on ceramic or metal.
Surface preparation
As soon as the gold foil applied on the surface became thin enough, its topography could be affected by unevenness of the substrate. This is why leaf gilding was from the beginning applied on an intermediate layer often called preparation or primer or gesso. Gesso is the Italian word for gypsum, but that layer may be either gypsum (CaSO4.2H2O), calcite (CaCO3), a mixture of both or even a more complex mixture. For instance, the gilding leaf on the Archer King of Meroe (Fig. 7b) is applied on a layer made of a mixture of metamorphic calcite powder with quartz and muscovite secondary materials, bound by an unknown organic binder (or adhesive).10
That last point, presence of a binder, is important.1 The intermediate gesso has in fact a double role; it is applied in several layers with increasingly finer granulometry and finally polished to create an even surface ready to receive a thin gold leaf, but it also contains an adhesive compound, often called binder, to stick it to the substrate and to prepare the adhesion of the gold leaf.
The gesso may be carved or patterned to decorate the object, as on the King Archer. The decoration is visible on the gold leaf if it is thin enough.1
Adhesive
Independently from the presence or not of an intermediate gesso, the application of the gold leaf needs the use of an adhesive. In a well documented recent thesis,5 it is possible to find an important table, which gives an idea of the very rich variety of the adhesives used over centuries by professional gilders. The full table cannot be reproduced here, but a simplified French version can be found in the reference.1
In the gilding process on wood substrates, which may be considered the most common technique through the centuries and may have inspired nearly all processes on other substrates at their beginnings,1 the gesso or primer paste is generally covered by a bole. The best known is the Armenian bole, a mixture of clay and iron oxide of red or yellow colour containing an adhesive gum.1
Figure 8 gives an example of the well known richly gilded wooden decoration of a Baroque Brazilian church; a detailed analytical study of those decorations, recently performed by a Brazilian researcher,12 has shown the complex assembly of the layers (Fig. 8b) piled up to ensure a good and durable gilding adhesion.
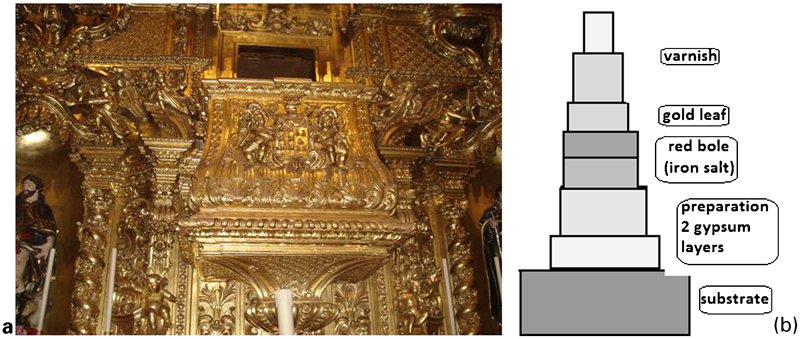
a Igreja da Ordem Terceira de São Francisco da Penintência in Rio de Janeiro and b successive layers of gilding on wood in Brazilian church12
Armenian bole is now replaced in the modern wood gilder workshops by a mixture that is easier to handle and still contains iron salts; the adhesive commonly used is generally animal glue (e.g. rabbit skin glue).
Understandably, it is difficult to make a precise distinction between what is usually called a binder and a true adhesive, as both may have a common physicochemical action, especially in the layers applied to prepare leaf gilding.1
Adhesive compounds (or binders) may be classified into three main families:1, 5
protein based adhesives, like for instance animal glues, commonly used for gilding on gesso
glucid adhesives as sugar, polysaccharide gums (e.g. Arabic gum), honey, etc.
lipid adhesives as all kinds of waxes, but also oils (e.g. linseed oil).
Some adhesives are mixed. For instance, egg yolk, commonly used for instance in icon gilding, is a mixture of lipids and proteins.
The so called mixtion gilding uses an adhesive directly applied to the substrate without a preparation layer. In the modern version, the mixtion compound is often some kind of oil (e.g. linseed oil), which may have been heated before application to accelerate its drying. In ancient gilding other compounds, added siccative compounds are often found; lead salts are often used as siccative.
The knowledge of the exact nature of the adhesive used in ancient artwork gilding and in particular the description of the physicochemical adhesion mechanism are important research subjects, which are still open.1 One may understand that characterisation of the adhesive on archaeological objects is very difficult because organic compounds are not stable in time, especially when objects are buried.
A very spectacular case has been investigated very recently by one of the present authors.13 The bronze Victory relief found in 2006 at the bottom of the Rhône river in Arles (France) is entirely covered by a gold leaf exceptionally well preserved (Fig. 9). There is no preparation layer between the bronze and the gold leaf. The adhesive used in antiquity for that direct gilding could be identified by gas chromatography–mass spectrometry. It is a saccharide compound, preserved since the first century BC, thanks to the concretions deposited by the river mud.
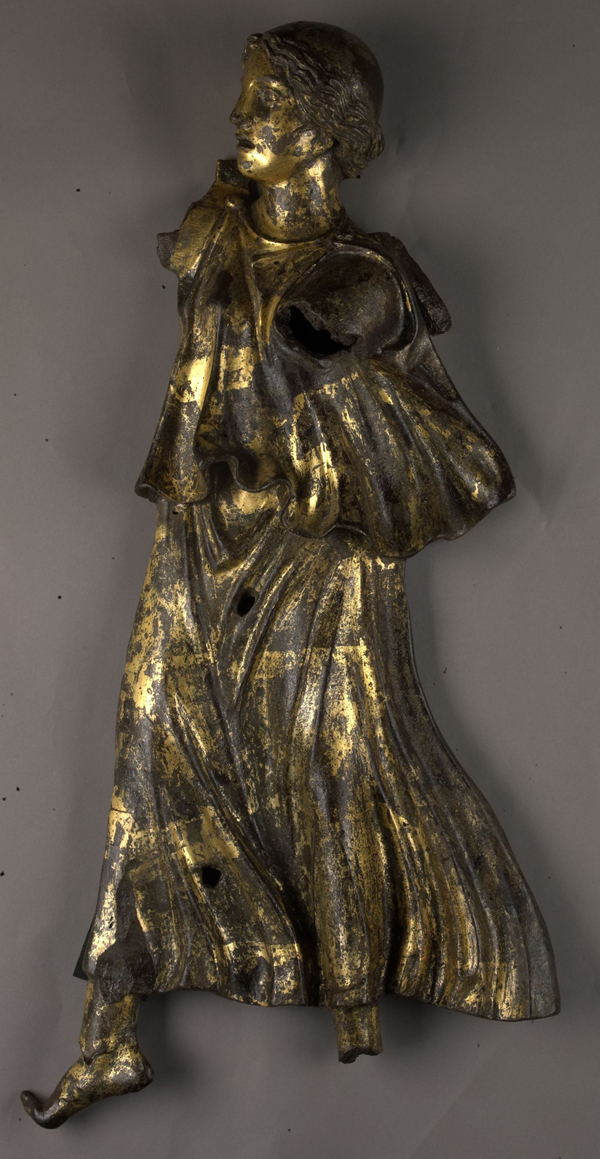
Bronze relief of Victory, musée départemental Arles Antique (France); H = 76 cm (© C2RMF/D. Bagault)
Gilding of metals with thermal treatment: Discussion on metal interdiffusion
Although most foil or leaf gilding on metals implies the use either of a preparation layer mixed and covered by an adhesive or of an adhesive only, several recipes for direct application of the gold film without any intermediate compound have been reported.1, 14 It is often called diffusion gilding because it is considered that the adhesion of the gold leaf is due to an interdiffusion phenomenon between the substrate and the gold film. The interdiffusion cannot operate at room temperature because the metal transport distances would be too small.
Heating effect plays also a role on atomic transport at the interface in mercury gilding.1 There are two variants of mercury gilding. The most frequent one, called fire gilding, is based on application of a gold amalgam to a clean etched metal surface, i.e. a liquid mixture of mercury and gold, followed by heating at a temperature high enough to let mercury evaporate (boiling point: 365·5°C) and leave a gold film that has to be subsequently burnished. In the other process, sometimes called cold gilding, it is hypothesised, from a recipe reported by Pliny the Elder,15 that a layer of liquid mercury was applied on the clean metal and acted as an adhesive for the gold leaf placed on it. As underlined by the literature,15 and demonstrated here below, it is probable that in fact cold gilding was not cold at all and also involved a thermal treatment after application of the leaf to eliminate mercury and insure adhesion of the gold film. The heating step may have been deliberately or not ignored by Pline the Elder in his treatise.1, 15
Another case where gold leaf adhesion is obtained without use of an adhesive is the so called à l'haché technique. With this technique, the foil or leaf is hammered on the metal substrate previously scratched to ensure a large contact surface with gold.1 In that case, heating is replaced by the local strong deformation provoked by hammering, promoting easier metal interdiffusion at the interface.
Laboratory evidence of gold diffusion into the metallic substrate is not easy to demonstrate experimentally for the following reasons.
First, authors who relate evidence of gold diffusion into the substrate use generally observation of a polished cross-section in the scanning electron microscope (SEM) in the backscattered electron mode, sensible to the atomic number of the elements contained in the specimen. However, mechanical polishing of such composite cross-section has frequently an effect of spreading the soft gold film over the neighbouring harder substrate, leading to an overestimation of the width where gold is present. Figure 10 shows an example from the literature of such a SEM observation where the thickness of the gold film is obviously overestimated.1, 16
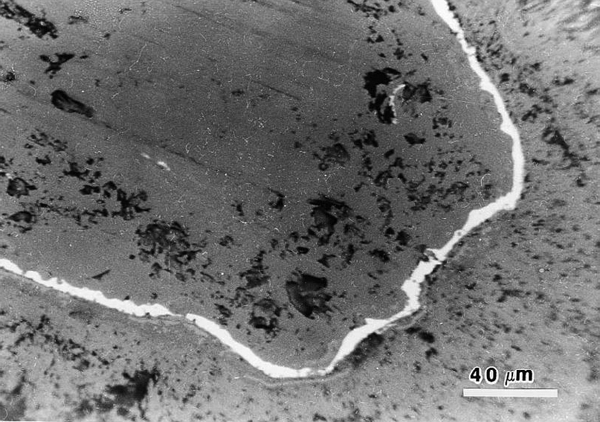
SEM observation (backscattered electron mode) of gold film on copper artefact16
Moreover, the surface of the substrate is prepared before gilding by a chemical, generally acid, etching to eliminate the oxide scale.1 Etching leads to a roughening, which makes very difficult to exactly define the initial position of the gold/substrate interface after gilding, even when using Rutherford backscattering spectrometry under accelerated ion particles.1
A way to analyse that question is to try to estimate the diffusion distance of gold into the substrate through the known data of diffusion coefficients.
Figure 11 gives a representation of interdiffusion coefficients in the system Au–Cu, compiled by Pinnel.17 To avoid misinterpretation involving possible multiphase system, it is recalled that gold and copper are soluble in all proportions. A good estimation of the diffusion distance x is given by x = 2(Dt)1/2, where D is the diffusion coefficient at the firing temperature and t is the firing time.
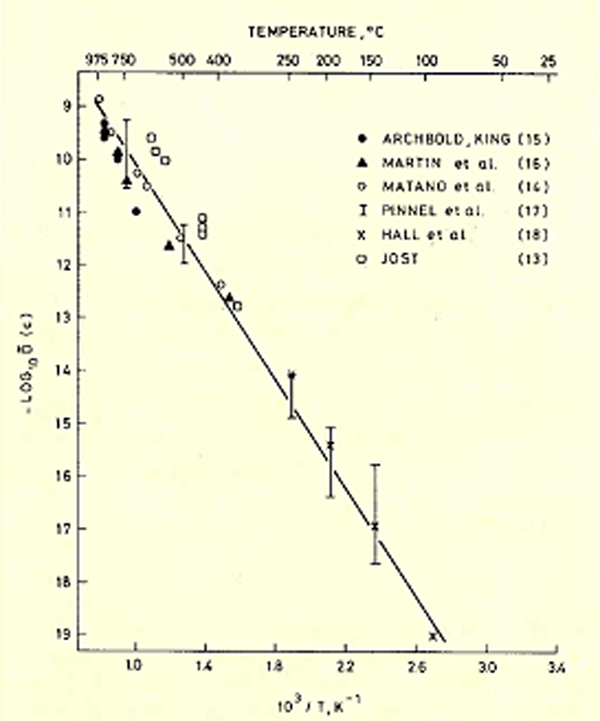
Compilation of bulk interdiffusion coefficients of Au–Cu system17
From the data of Fig. 11, the diffusion coefficient is <10−18 cm2 s−1 for a temperature lower than 100°C, which implies a diffusion distance <10−3 μm (1 nm) for a firing time of several hours.
Carrying out the same calculation at 400°C, a temperature usually applied by gilders for amalgam fire gilding, with a diffusion coefficient of 10−12 cm2 s−1, the calculated penetration distance becomes of the order of 1 μm for 3 h firing.
In fact, it is proved that, in the case of low temperatures, diffusion is more governed by grain boundary diffusion, which could be orders of magnitude faster than bulk diffusion.
It is evident that, if the firing temperature is higher, the distance increases drastically.
For instance, at 600°C, the diffusion coefficient is multiplied by a factor of 100, and the diffusion distance by a factor of 10, but grain boundary diffusion becomes less predominant.
Conclusion
This article gives a summarised overview of the gilding processes with a focus on foil and leaf gilding on metals and on the questions of leaf preparation, adhesive choice and contribution of the diffusion mechanism in adhesion. The discussions are illustrated with several examples of recent laboratory studies, and the original development of a mechanical model which explains the necessity for the gilding artisans to invent at a very early period the sophisticated method of gold beating in order to obtain very thin and malleable gold leaves for art objects decoration. This paper demonstrates the importance of knowing the adhesion material and understanding the adhesion mechanisms to describe correctly the behaviour of the substrate/gold interface and propose conservation solutions. That point remains presently a still open research field. More attainable is the description in terms of materials science of the metal diffusion phenomena in metal gilding, implying a firing at moderate or high temperature.
Footnotes
Acknowledgements
The authors thank Mr B. Dauvet, last gold beater in France, for providing complete information about the gold leaf beating process. We are also indebted to D. Robcis (C2RMF) for his constant and efficient contribution to the characterisation of the gilding properties on museum art objects.
This paper is part of a special issue on Arts and Surfaces